Fixing the Error 0x80070002 on Windows [Easy Instructions]
A lot of users have been getting the error 0x80070002 on their computers and the Full message reads “Feature Update to Windows 10 Failed to install Version 1903 – error 0x80070002” most of the times but it can sometimes also read “An error occurred while checking for new updates for your computer”.

In this article, we will be fixing the error 0x80070002 issue by implementing some solutions and will also be providing you with the reasons due to which the error occurs in the first place. Keep in mind to properly implement all the solutions and proceed in the same step-by-step manner as listed below.
What Causes the error 0x80070002 on Windows?
After going through a lot of troubleshooting techniques employed by users to fix this issue, we concluded that the following must be the most common triggers behind its occurrence.
- Incorrect Date and Time: Sometimes the date and time settings on your computer might be preventing Windows from being able to install updates and that might cause the error 0x80070002 on Windows. Therefore, we recommend that you try and check if the date/time settings are correct and the timezone is correctly listed.
- Windows Update Files: Some Update Files on your computer might have been downloaded previously but due to a storage failure, they might get corrupted, Therefore, we recommend that you try and remove the update files from your computer and then check to see if doing so fixes the error 0x80070002 issue.
- Antivirus Issue: The Antivirus installed on your system might actually be preventing the updates from being installed by hogging resources or raising false flags when the update is being applied. Therefore, we recommend temporarily disabling the Antivirus while the update is being installed.
- CheckDisk Scan: The Check disk scan utility allows you to be able to check your Disk for errors and we recommend that you make use of it as explained below in order to get rid of disk errors from your computer.
- Malware Infection: In certain cases, there might be a malware infection on your computer and due to that, the error 0x80070002 might be getting triggered. Therefore, we recommend that you try and clear out the malware and then check to see if doing so fixes the issue.
Now that you have gone through almost all the reasons behind its occurrence, we can finally start fixing the error 0x80070002 on Windows 10.
Before You Start:
Before you begin with implementing any of the advanced solutions start with some of the basic things just like making sure that you have a stable internet connection. Because slow and unpredictable internet will give rise to certain issues when downloading updates. Moreover, you can also try updating your network driver from here and then check to see if it helped solve the issue. Follow the below-listed steps to do so:
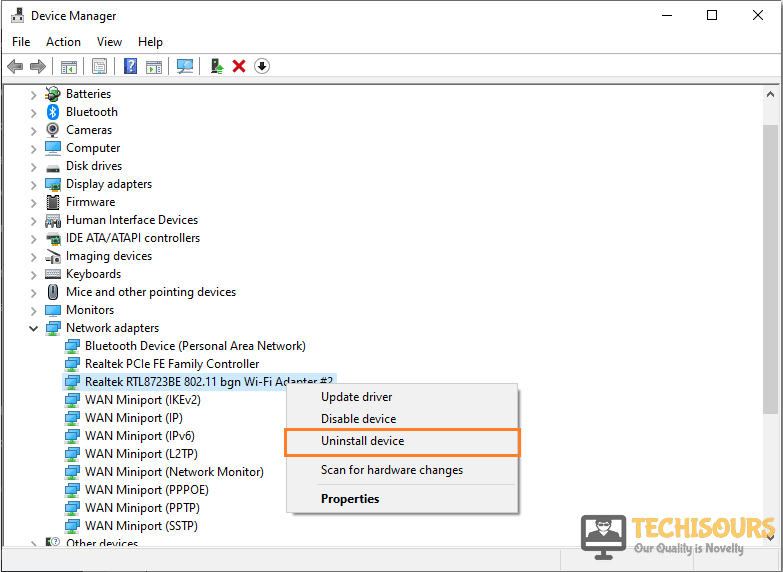
- Search for the “Device Manager” window on the search bar located near the Start menu and click to open it from the search results.

Choose Device Manager - Inside the new Device Manager window look for “Network Adapters” and click to expand it.
- Next right-click on the network adapter in use and choose to select “Uninstall”.

Uninstall Wi-Fi Adapter - Open the driver package you downloaded earlier and proceed to “Install” it on your PC.

If both of these solutions didn’t work for you then carry on to implement some complex fixes mentioned below.
Fixing the Error 0x80070002:
Solution 1: Check Your System Date and Time
If the date and time on your system are not in sync with the internet; errors like 0x80070002 are likely to show up. To fix the date and time on your system follow these steps:
- On your PC right-click on the “Date/Time” option located to the right on your taskbar.
- From the drop-down menu click to select “Adjust Date/Time”.

Adjusting Date/Time - Now make sure the following settings are turned to ON state:

Set time automatically
Set time zone automatically
- Also, make sure your time zone is set accordingly and finally check to see if it resolves the error.
Solution 2: Remove Windows Update Files
Sometimes the error occurs due to the corrupt windows update files, to fix this one can try deleting the corrupted files. To do so implement these steps:
- On the search bar near the Start menu search for “Administrative Tools” and click to select it from the search results.
- In the new window locate and click on “Services”. Click to select “YES” if asked for administrative privileges.
- On the new Services window click on the “Name” tab to arrange all services alphabetically.
- Now, scroll down to look for the “Windows Update” option.

Select Windows Update Option - Right-click on “Windows Update” and click to select “Stop”.
Note: Once the process is stopped we can delete the corrupted files, to do so: - Open “This PC” on your computer and double click the “C drive” (windows drive).
- Inside the C drive double click on the “Windows Folder”.
- Inside the windows folder use the top right search bar to search for “Software Distributions”. Once the search result finishes click to open the Software Distributions folder.
- Next, double click on the “DataStore” folder inside and now “Delete” all the files and folders inside the “DataStore” folder.

Delete the Files - Once done go back to the Software Distributions folder and double click on the “Download” folder.
- Next, “Delete” all the files and folders inside the “Download” folder.
- Now, repeat steps “1-7” but instead of clicking on “Stop” click on “Start”.
- Once done restart your computer and see if the error 0x80070002 has been fixed.


Solution 3: Windows Troubleshooter
If the above solution doesn’t work you can try Windows Troubleshooter to look for and solve the errors automatically. You can download Windows update troubleshooter directly from Microsoft’s official site. Follow the on-screen instructions after installation and make sure to restart your computer once the process is done or instead you can use the already built-in windows troubleshooter by following the steps below:
- On your keyboard press the “Window + I” keys simultaneously to open up the “Settings” window.
- In the left pane on the new window click to select “Troubleshoot”.
- In the Troubleshoot section proceed to the right and click on “Windows Update”.

Windows Update troubleshooter - On the pop-up menu click on “Run the Troubleshooter” to continue.
- Now the troubleshooter will start to look for problems and once the process is completed click on “Apply This Fix”.

Solution 4: Disabling Your Anti-Virus
Sometimes the anti-virus software installed on your PC can interfere with certain applications or tasks being carried out on your computer. If you use a third party anti-virus you can simply navigate into it from the icon-tray on the taskbar, for others using Windows Defender can follow this procedure:
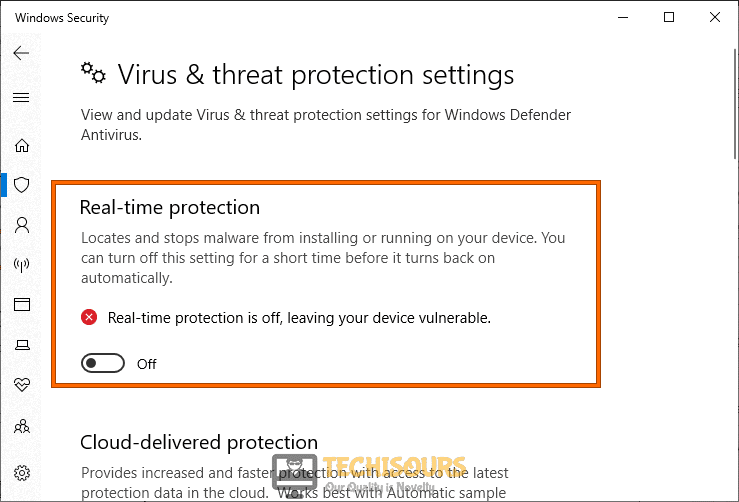
- On the search bar near the Start menu search for “Windows Security” and click to open it.
- In the left pane click to select “Virus & Threat Protection” and scroll down to locate “Virus & Threat Protection Settings”.
- Below the Virus & Threat protection settings click on “Manage Settings”. You will be presented with three different security settings here.
- Then turn OFF the “Real-Time Protection” by clicking on the slide button.

Disable Real-time protection - Windows will ask for your permission at this stage click to select “YES”.
- Now proceed to check if you have been able to resolve the error.
Solution 5: Running System File Checker
A system file checker can help fix broken system files and also helps solve this particular error. To run the system file checker proceed with these steps:
- Locate the search option and type “Command Prompt” there. When the option appears in front of you right-click on it and choose the “Run as Administrator” option.

Run Command Prompt - In the new elevated command prompt type in the following command and hit “Enter”:
Sfc/ scannow
- Do not close the window until 100% completed. When the process is completed you can reboot your computer and check if the error has been fixed.

Solution 6: Restart Windows Update Service
You can also try restarting the windows update service to help solve the error. To restart the update service implement the below-mentioned procedure:
- Locate the search option and type “Command Prompt” there. When the option appears in front of you right-click on it and choose the “Run as Administrator” option.
Run Command Prompt - In the new elevated command prompt type in the following commands in the command window respectively and make sure to hit “Enter” after each command:
net stop wuauserv
net stop cryptSvc
net stop bits
net stop msiserver
ren C:\Windows\SoftwareDistribution SoftwareDistribution.old
ren C:\Windows\System32\catroot2 catroot2.old
net start wuauserv
net start cryptSvc
net start bits
net start msiserver
4. When all the steps are completed you can restart your computer and see if the error has been removed.
Solution 7: Resetting Winsock Catalog
Some corrupted Winsock catalog files can also give a rise to the error 0x80070002. In order to reset the Winsock catalog follow this procedure:
- Locate the search option and type “Command Prompt” there. When the option appears in front of you right-click on it and choose the “Run as Administrator” option.
Run Command Prompt - In the new elevated command prompt type in the following command and then hit “Enter”.
netsh winsock reset
4. Once the process is finished make sure to reboot your computer and check if the error has been resolved.
Solution 8: Running CHKDSK
Defective hard drive sectors can be repaired using the CHDKSK command in the command prompt. Windows CHKDSK helps look for such bad sectors and repairs them. To do so follow these steps:
- Locate the search option and type “Command Prompt” there. When the option appears in front of you right-click on it and choose the “Run as Administrator” option.
Run Command Prompt - In the elevated command prompt type in the following command and hit “Enter”.
chkdsk C: /F /R
- C is the window drive here. You may receive a message that CHKDSK can’t be started at this time, type J and confirm with the “Enter” key.
- Finally, check to see if the feature update to windows 10 issue still persists or not.
Solution 9: Check the System For Malware
There may be a chance that the computer is affected by viruses and that may result in corrupt files. The error will keep showing until the malicious file is on the system. You can perform a complete system scan using your Anti-malware software and then proceed to see if you have overcome the error.
Solution 10: Modifying Registry Editor
If the above solution does not work you can try modifying the registry editor. Follow the below-mentioned procedure to do so:
- On your keyboard press the “Window + R” keys to open up the “Run” dialog box.
- Then type in “Regedit” in the new “Run” prompt and press “Enter”. You might need to provide administrative privileges at this stage.

Typing “regedit” - On the new Regedit window follow the following address towards OSUpgrade:

HKEY_LOCAL_MACHINE\SOFTWARE\Microsoft\Windows\CurrentVersion\WindowsUpdate\OSUpgrade
- Now, select the “OSUpgrade” key and right-click the empty area in the right pane of the window. Then select “New”.
- From the new drop-down menu click to select “DWORD (32-bit) Value”.

DWORD 32 Bit Value - Next, right-click on the newly made value and select “Modify” from the drop-down menu.
- On the new pop-up window change the value name to “AllowOSUpgrade”.
- Next, Enter “1” in the “Value Data” section and select “Hexadecimal”. Then click “OK”.
- Restart your computer and see if the error has been solved.

Solution 11: Starting Windows In Safe Mode
To check if any third-party install isn’t causing you issues you can boot into safe mode. Safe-Mode enables you to use your computer with very minimal tasks and apps running in your background to get into safe mode. Implement the below-mentioned procedure:
- Press the “Window + R” keys together on your keyboard to open up the “Run” command prompt.
- When the “Run” window appears up type in “msconfig” and press “Enter”.

Typing in “Msconfig” - Then open the “Boot” tab beside the General tab and below the “Advanced” options tickmark the “Safe-Mode” check box and make sure “Minimal” is selected.

Enter Safe Mode - Press “OK” and select “Restart”.
- Now your windows will start-up in the safe-mode you can try running the update now and then see if the issue has been eradicated.


Solution 12: Updating Manually
If none of the fixes work for you then you can try updating the problematic driver manually. Check the driver name from the Windows Update Settings and download it from Microsoft’s official website.
Hopefully, the aforementioned solutions would be enough for you to get rid of this particular error but for any further queries or help you may Contact Us here.