Fixing DISM Error 2 on Windows 10 [Complete Guide]
DISM is a command-line tool that is used to fix corrupt Windows files on a computer, but sometimes DISM can itself run into the DISM Error 2 especially on Windows 10 and Windows 7. The full error message usually states “DISM error 2 File not Found or DISM Error 2 Unable to access the image”. In this article, we have concluded the reasons due to which the error occurs and have also listed the solutions for them.
Make sure to read through all of the solutions and also to analyze the reasons due to which they are triggered in order to ensure complete eradication of the error message from your computer.
What Causes the DISM Error 2 on Windows 10?
After going through the solutions that are commonly adopted to fix this error message, we concluded that the following must be some of the most crucial reasons due to which it is triggered in the first place.
- Command Line: In certain cases, the command line that the user is adopting might be incorrectly configured or the command used might not have been implemented properly. Therefore, we recommend that you try using a slightly different command that might sometimes do the trick and fix the DISM error 2 on your computer.
- Stuck Tool: The DISM Tool can sometimes get stuck while executing certain commands and that can end up triggering this error message. Therefore, we recommend that you run some commands on your computer that get rid of this.
- Antivirus: The Antivirus being used by the computer can sometimes block the DISM tool from accessing the drive by hogging its resources or falsely flagging it as a virus. Therefore, we recommend that you try and disable the Antivirus at least temporarily to ensure that the DISM error 2 isn’t being triggered because of it.
- Bad Sectors: The Hardrive often acquires bad sectors due to prolonged usage and this can really end up harming the tool’s ability to be able to repair the drive if it has been damaged beyond repair. Therefore, we recommend that you check for any wear, tear or bad sectors on the hard disk.
- Damaged OS: The operating system that you are using might be in a faulty state or it might not be working properly due to which the DISM error 2 is being triggered. Therefore, we recommend that you try and repair the operating system and then check to see if doing so fixes the issue.
Now that you have gone through the reasons behind its occurrence, it is about time that we move on towards implementing the solutions.
Before You Start:
Before you begin with any of the fixes make sure you are using the correct DISM version. If you are experiencing DISM error 2 it is recommended that you run the commands using WinPE. WinPE is Windows Pre-Installation Environment, it is often used to perform a recovery operation in Windows. Once done now continue on with implementing some of the advanced solutions listed below.
Fixing the DISM Error 2 Unable to Access the Image:
Solution 1: Try Using A Different Command
Some users were able to work around the error with a different command, try using the following commands in the command window and see which one works best for you:
dism.exe /image:C: /cleanup-image /revertpendingactions
OR,
dism.exe /online /cleanup-image /reverpendingactions
Solution 2: Refresh DISM Tool
By refreshing the DISM tool in Windows you might also be able to fix the error. To refresh the DISM tool follow these steps:
- Hold down the “Window + R” keys together on your keyboard to open up a “Run” dialog box.
- In the “Run” prompt type in “cmd” and then hold down on the “Shift + CTRL + Enter” keys to open an “Elevated Command Prompt”. If the system asks you for permission click to choose “YES”.

Run Command Prompt - In the new elevated command prompt window type the following command:

exe/image:C /Cleanup-image /revertpendingactions
4. Press “Enter” now and after the process is completed “Restart” your PC.
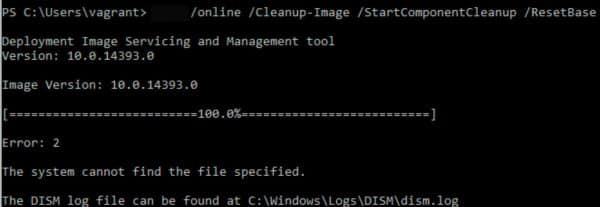
5. After the restart, now repeat steps one, two, and three and run the following command:
exe /online/Cleanup-Image /StartComponentCleanup
6. Once the process is completed again restart your computer.
7. Now, once again repeat steps 1,2,3 to run an elevated command prompt.
8. Type in the following command and hit “Enter”.
sfc/scannow
9. Then restart your computer once again.
10. Now, once again repeat steps one, two, and three to run an elevated command prompt.
11. Type in the following command and again hit “Enter”.
dism.exe /online /Cleanup-image /RestoreHealth
12. This will hopefully solve the DISM error on your pc, if not follow down for other solutions.
Solution 3: Disable Your Anti-Virus
Sometimes your anti-virus software can interfere with certain apps or tasks being carried out on your computer so try to disable it and then perform the task again. If you use a third-party anti-virus on your system you can simply navigate into it from the icon-tray on the taskbar, for others using Windows Defender can follow this procedure:
- On the search bar near the Start menu search for “Windows Security” and click to select it.

Choose Windows Security Option - In the left pane click on “Virus & Threat Protection” and scroll down to “Virus & threat protection Settings”.

Virus and threat protection - Below the Virus & Threat protection settings click to select “Manage Settings”. Here you are presented with three different security settings.
- Then turn off “Real-time Protection” by clicking on the slide button.
- Windows will ask for your permission at this stage click to select “YES”.
Disable real-Time Protection - Now proceed to check if the dism error 2 windows pe got resolved.


Solution 4: Check Hard Drive For Bad Sectors
Sometimes the error is caused by a dying or malfunctioning hard-drive so it’s better to check your hard-drive for bad sectors and low health. You can download Hard-disk Sentinel and monitor the health and temperature of your hard disk.

Solution 5: Using the Disk-Cleanup Tool
Windows come with a disk-cleanup tool, it helps reset the defragmented data and can help resolve errors caused by corrupted files. To use the Disk-Clean-up tool follow the steps below:
- Open the “File Explorer” or “This PC” on your computer.

Click on This PC - In here locate the option of “Local Disk C (OS Drive)” and right-click on it.
- From the drop-down menu click to select “Properties” at the bottom.
- From the new window click on the “Tools” tab located beside the “General” tab.
- In the Tools, tab click on “Optimize” in the “Optimize and Defragment Drive” section.

Choose Optimize Option - Now just simply follow the on-screen instructions to successfully optimize the drive.


Solution 6: Perform A System Restore
System Restore is a program that creates restore points in your PC at a specific location and time. These points help restore the system to an earlier error-free version or before the installation of a new program. To perform a system restore follow the below-listed steps:
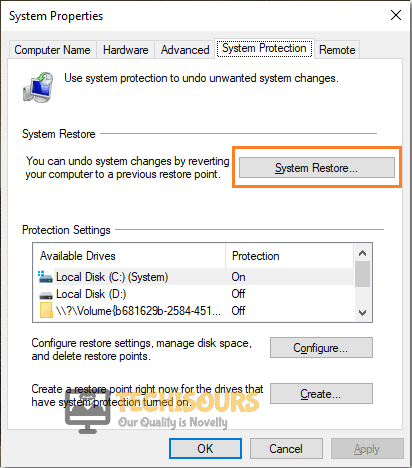
- On the search bar near the Start menu type in “Create A Restore Point” and open it from the search results.
- A new window will pop up on your screen from here click on “System Restore”.

Choose System Restore Option - If you cannot click on System Restore, the reason is the drives on your pc are not protected. In this scenario, click to select “Local Disk C”.
- Next, click on the “Configure” button.
- In the new window select “Turn On System Protection” instead of “Disable System Protection”.
- Then click “OK” and “Apply” afterward.
- Now, click on the “System Restore” option.
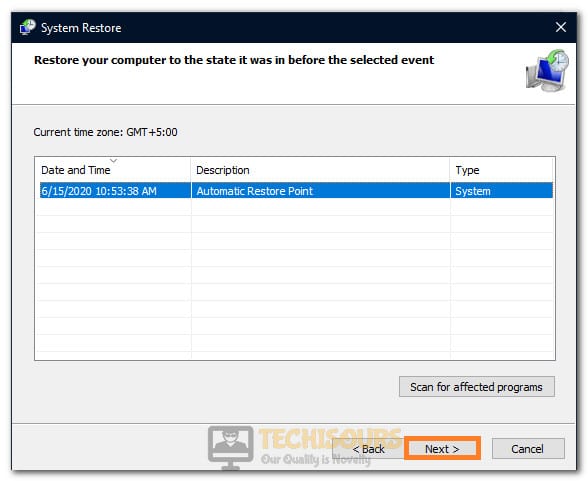
- Create a restore point to a date when your PC was perfectly fine and then click “Next”.

Selecting the Restore Point - Once the procedure is complete, run DISM and see if the error has been eradicated.
Solution 7: Use Source Options
DSIM Errors can be caused by Windows Updates, thus here we will make use of the source option to store the non-corrupted files. To activate the source options follow the steps below:
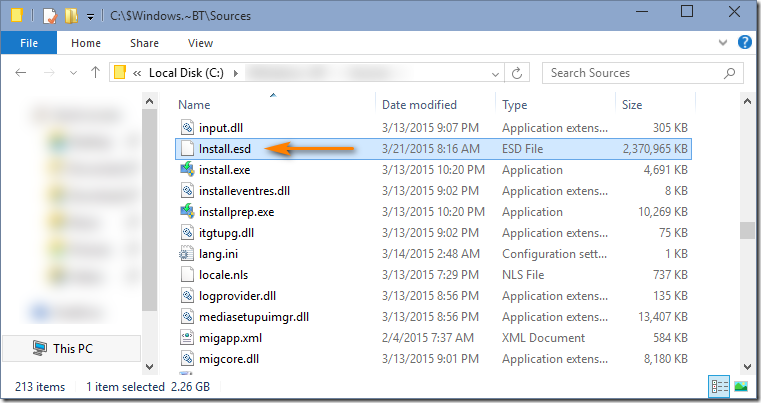
Note: To accomplish this task you need to “install.wim” file or “install.esd” file from a Windows installation media, make sure they are from the same windows version. You can download Window installation media from Microsoft’s official website.
- Plug in the Windows installation media into the computer and notice the “Drive Letter”. (e.g. “E:” )
- Then “Open” the media explorer and explore its contents.
- Look for the “Source” directory and see if it contains a file named “win” or “install.esd”.

Select install.esd file - Next, type in “Command Prompt” in the search bar and press the Enter button. The system will ask you for permission here click on “YES”.
Run Command Prompt - Now, enter the following command in the elevated command prompt and press “Enter”.
DISM /Online /Cleanup-Image /RestoreHealth /Source:repairSource\install.wim
7. Once the process is completed, restart your computer finally and see if the error is gone.
Note: This will repair the file without Windows update, this way DISM can work without meeting the broken update file.
Solution 8: Repairing Windows
Newly installed drivers or updates on the system can cause errors and finding the faulty driver can be very hard, so use Windows repair to repair such bugs.
- On the search bar near the Start menu type “Reset This PC” and click to select it.
- On the new window in the left “Recovery” pane click on “Get Started”.

Choose Recovery - A new popup menu will appear displaying you two options:
Keep My Files (It will keep your all files even on C drives, but only remove apps that you installed and settings setup).

Remove Everything (It will remove all files on your PC).
4. From here choose to select “Keep My Files”.
5. Lastly, just go through the Windows procedure and let it do its work; only make sure you do not power OFF your computer when the process is going on.
6. Once completed now see if you have been able to overcome the error.
Hopefully, the aforementioned solutions will help you resolve the error smoothly but if the issue still exists feel free to Contact Us here.