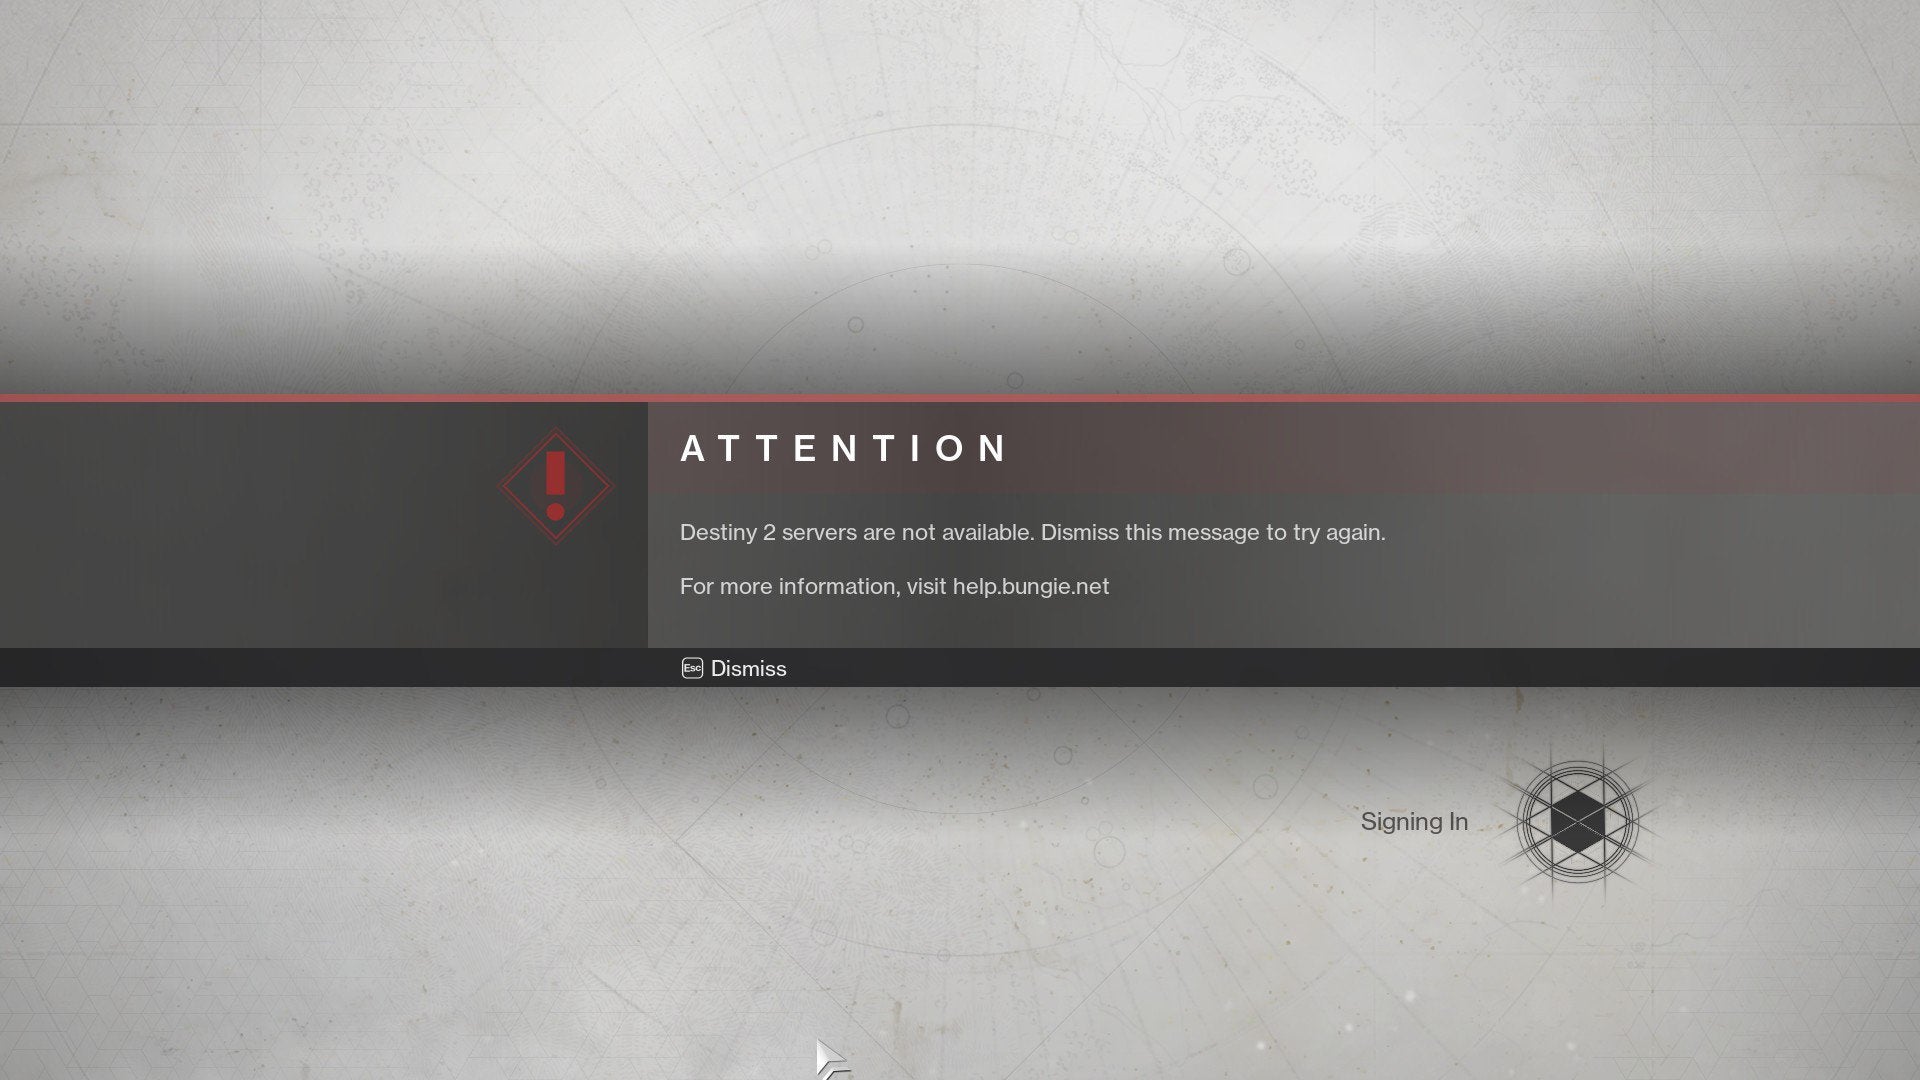
Easily Fix Destiny 2 Servers are not Available Error [Complete Guide]
Destiny 2 servers are not available is a very common error faced by the Destiny 2 players. One of the obvious reasons for this Error is too much traffic, when a certain amount of players are already connected to the game and the servers get overwhelmed, some users get this error. When the issue is from the server side there’s not much that can be done except to wait, but sometimes the issue could be on the player’s side and we surely can do something about that. Below we will share some solutions to completely address the issue.
What Causes the Destiny 2 Servers are not Available Error?
After going through some preliminary fixes, we concluded that the following must be the most crucial triggers due to which this error message is seen.
- Wireless Connection: Sometimes a Wireless connection might be facing interference from other electronic devices or the router might not be able to supply ample network packets to your PC. Therefore, we recommend that you use a Wired ethernet connection through a Lan Cable and check to see if that does the trick. Wired Connections are more stable than Wireless ones and can often fix packet loss issues on Wi-Fi.
- Admin Permissions: Your game and the launcher might require certain admin permissions to access network ports or read sensitive data being stored on your computer. If this privilege isn’t granted, you will run into the Destiny 2 Servers are not available message and will be unable to connect to the server.
- Multiple Connections: In some cases, on Windows, the PC might be connected to multiple internet connections which might be causing misconfiguration. Therefore, we recommend that you try and disable all other internet connections and check to see if doing so fixes the error message.
- Disabled UPnP: The Universal Plug and Play feature was introduced for gaming and other activities that require network packets to be streamed without any interference to reduce lag and address packet loss. However, this can be deemed as a security threat to some routers and you need to ensure that this feature hasn’t been disabled on your computer.
- DNS Server: The DNS server that your PC is configured to connect to might be facing an outage or might not be allocating the packets properly due to which you are running into the error message while trying to connect to Destiny 2 servers. Therefore, we recommend that you try and change the DNS server that your computer uses and then check to see if doing so fixes the error.
Now that you have been guided about the reasons due to which the Destiny 2 Servers are not available message appears, we can start implementing fixes to eradicate it from our pc.
Before You Start:
Before you begin make sure you have an active and stable internet connection on your device as having a stable connection is a key to playing online multiplayer games. In order to examine your internet speed, you can tune into any internet speed test website just like Ookla. Once you have confirmed your internet connection now you can proceed onto implementing some of the advanced troubleshooting techniques.
Fixing the Destiny 2 Servers are not Available issue:
Solution 1: Use A Wired Internet Connection
Playing online multiplayer games over Wi-Fi can be very frustrating so it is recommended to use an Ethernet cable instead to improve your connection bandwidth as well as minimizing the internet losses to a great extent. Also, a LAN network reduces the ping spikes and overall provides a very stable internet.
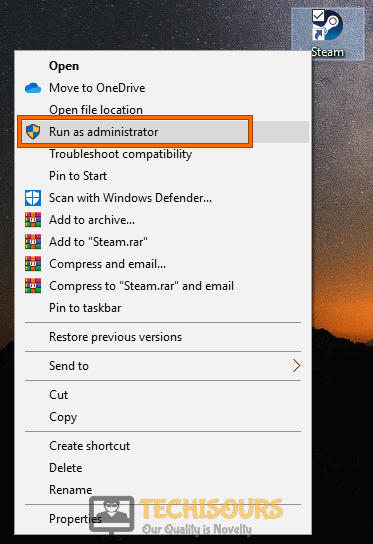
Solution 2: Run Steam In Admin Mode
Some players were able to resolve the issue successfully by simply running the Steam app as an administrator. Also running Steam as an administrator may allow connections that are being blocked hence eradicating the error instantly. Therefore, right-click on the Steam icon located on the desktop and choose the “Run as Administrator” option to run it in admin mode.
Solution 3: Disabling Other Connections
If switching to Ethernet didn’t help you can try disabling any other network connection and then try again. To disable other network connections follow these steps:
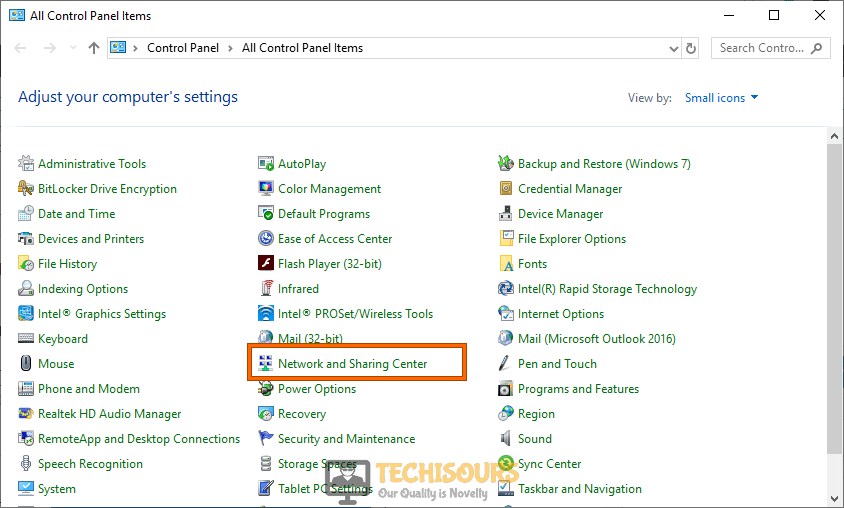
- Open your PC and search for “Control Panel” in the Run prompt.

Typing in Control Panel - In the control panel window click on the option of “Network and Internet” and then proceed to select “Network and Sharing Center”.

Network and Sharing Center - On the left side of the window click to select “Change Adapter Settings”.
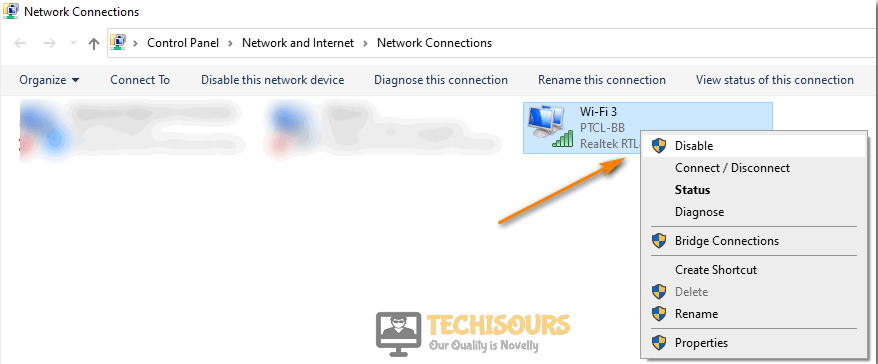
- Here you will be shown a number of internet connections being used by the device. Right-click on any of the active connections you don’t want to use and select “Disable”.

Disable Internet Connections - Do this for all except the “Ethernet” and proceed to play the game again and observe if you are able to overcome the destiny 2 servers are not available pc issue now.

Solution 4: Restart Your Router
Network unpredictability can also give rise to these kinds of errors. Using a router with limited bandwidth can be a reason for slow internet speeds, in this case, you can restart your router. To restart, simply press the power button at the back of the router. Make sure you wait a minute or two before turning the router back “ON” and then check to see if the issue still persists or not.

Solution 5: Updating Network Card Driver
An outdated network driver can trigger errors in-game so in order to manually update your network driver, you can go to the manufacturer’s website and download the latest drivers. Once the download is complete follow the steps below:
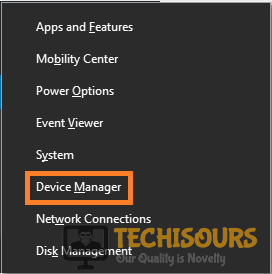
- Search for “Device Manager” in the search bar located near the Start menu and click to open it up.

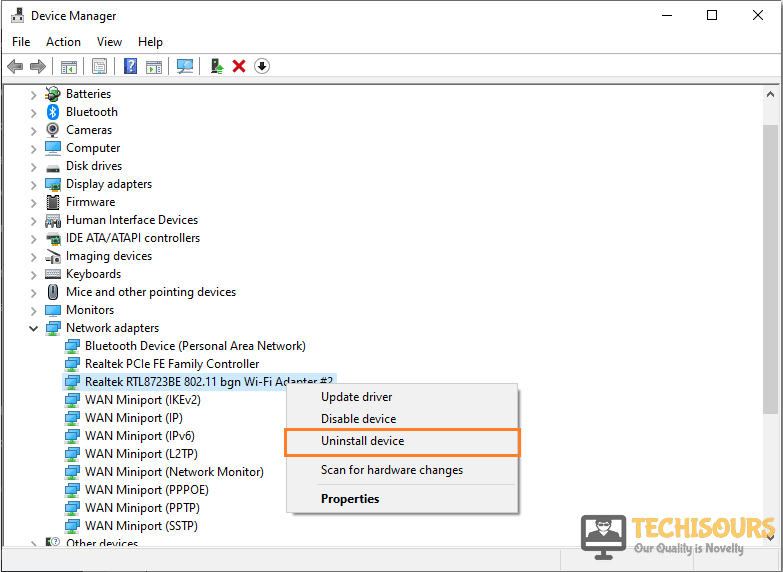
Open Device Manager - Inside the new device manager window look for “Network Adapters” and click to expand it.
- Right-click on the network adapter in use and click to select “Uninstall device”.

Uninstall Wi-Fi Adapter - Now open the driver package you downloaded earlier and install it on your PC by following the on-screen instructions.
Solution 6: Enabling UPnP on Windows 10 Network
If you play Destiny 2 on multiple devices, enabling UPnP can be a good idea because it allows devices on the same network to recognize each other. To enable UPnP, proceed with these steps:
- Open your PC and search for “Control Panel” in the search bar located near the Start menu.
Typing in Control Panel - In the control panel window click on the option of “Network and Internet” and then proceed to select “Network and Sharing Center”.
Network and Sharing Center - On the left side of the window click to select “Change Advanced Sharing Settings”.
- In the new window that pops up on your screen under the Network Discovery section select “Turn On Network Discovery”.

Turn On Network Discovery - At the bottom of the window click on “Save Changes” and exit from the window.

Solution 7: Changing DNS Servers
Sometimes disabling DHCP can help fix the error. To disable DHCP on your computer follow these steps:
- Open your PC and search for “Control Panel” in the Run prompt.
Typing in Control Panel - In the control panel window click on the option of “Network and Internet” and then proceed to select “Network and Sharing Center”.
- On the left side of the window click to select “Change Adapter Settings”.

Change adapter settings - Now right-click on the connection you are currently using and click on “Properties” from the drop-down menu.
- On the Wi-Fi properties window double click on “Internet Protocol Version 4 (TCP/IPv4)”.

Internet Protocol Version 4 (TCP/IPv4) - When the new window opens up select “Use the Following Address” and also select “Use the Following DNS Server Addresses” and type in the following Primary and Secondary DNS Addresses.
8.8.8.8
8.8.4.4
- Finally, click “OK”, restart your computer and proceed to check if the error got vanished now.


Solution 8: Reset TCP/IP Address
To make sure there is no network corruption on your destiny 2 system reset the IP address of your computer. To do so carry out these steps:
- Type in “cmd” in the search bar near the Start menu and right-click on the Command Prompt to select “Run As Administrator”.

Run Command Prompt - In the Command Prompt window type the following command in the command window and hit Enter:

netsh winsock reset
- After cmd resets your IP address restart your computer and observe if the issue still exists or not.
Solution 9: Switch Your Internet Connection
If the issue still persists you can try switching connections, connecting to a mobile hotspot can help. Doing so will help to pinpoint the issue, if or not the issue exists from the ISP side.
Solution 10: Verifying Game Files
In the end, if none of the above-listed solutions worked for you then you can start verifying the integrity of your game files. To do so follow these steps:
- Right-click on Destiny 2 in your Steam game library and click on “Properties” from the drop-down menu.
- In the Properties window click on “Local Files” in the left pane.
- Now click to select “Verify Integrity of your Game Files” and now steam will start verifying your game files.

Verify Integrity of the Game Files - This may take several minutes and once it gets done now check if you have been able to overcome the issue.

For Console Players you can try Clearing Cache:
Xbox Users:
Caches are temporary files that help load the game, these files can sometimes become defective causing this error. Clearing cache can allow the Xbox to create fresh files. You can clear the cache on the Xbox in a variety of ways. One way is to perform a Manual Reset:
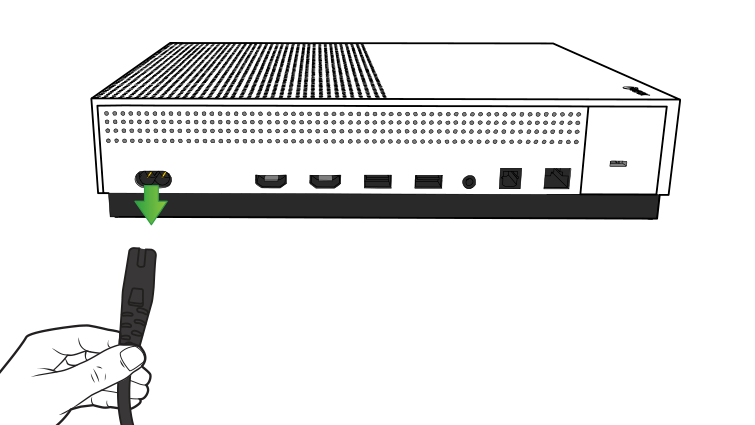
- On the front of your, Xbox press the “Power” button until the system powers down completely.
- Once the device is turned “OFF” detach the power cord from the back. Detaching the power cable clears cache files on the memory.

Clear Xbox Cache - Now reconnect the power cord and wait for your Xbox to turn “ON”.
- Finally, play your game just like you would and see if the Destiny 2 Servers are not available error has been solved.
The second way of clearing cache is through the Xbox settings:
- On the Xbox home screen navigate towards the “Settings” option.
- Under the Settings sections look for “Network” and inside Network look for “Advanced Settings”.
- Navigate towards “Alternate MAC Address” and select the “Clear” option.

Select Advanced MAC Address - At this point, Xbox will ask for user confirmation, select YES.
- Now Xbox will start clearing the cache, once done you can jump into the game and see if the Destiny 2 Servers are not available issue has been resolved.

PlayStation Users:
PlayStation users were able to solve the issue by hard resetting their consoles. To hard reset a PlayStation follow these steps:
- Completely shut down your PlayStation as you would do normally.
- From the back of the console remove the power cord and let the system stay powered “OFF”.
- After a few minutes put the power cord back in, jump into the game, and see if the Destiny 2 Servers are not available error is fixed.
Proper implementation of the aforementioned fixes will lead you towards resolving the error completely but for any further queries or help you may Contact Us here.