How To Fix Apex Legends Out of Sync with Server [Complete Guide]
Apex Legends Out of Sync with server error is seen by users during gameplay or while trying to connect to a party and it puts them back on the launch screen with the error message displayed. In this article, we have compiled some solutions, workarounds, and fixes to help you completely get rid of this issue on your computer.

Before you start implementing these solutions, make sure to read through the triggers due to which this issue arises in the first place to develop a better understanding of this issue. Also, make sure that you have gone through some preliminary troubleshooting steps such as restarting the game and the PC before you move on towards more complex solutions.
What Causes the Apex Legends out of Sync with Server Error?
After going through some basic troubleshooting techniques, we concluded that the following are some of the most important reasons due to which this error occurs in the first place.
- Router Configurations: Sometimes, it is possible that the Router hasn’t been using the correct configurations and is limiting your Bandwidth due to which you are running into this issue. Therefore, we recommend that you try and implement the correct egress and ingress settings in order to allocate proper bandwidth to your device.
- Outdated OS: It is possible that the operating system that you are using is preventing you from being able to play the game and is causing the Apex Legends out of Sync with Server error. Therefore, we recommend that you check for any updates available for your OS and install them on your computer.
- DNS Server: In some cases, the DNS server that you are using might be experiencing an outage due to which the Apex Legends out of Sync with Server issue is being triggered. Changing the DNS server from your computer settings should get you out of the woods if this trigger is causing the issue.
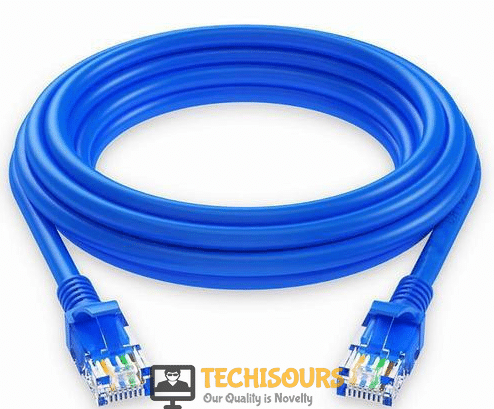
- Wireless Connection: Sometimes there might be certain interference with your Wireless connection due to which you get this issue on your computer. Therefore, we recommend that you try and use a Wired connection instead of a Wireless one and then check to see if doing so fixes the issue.
- Launch Configurations: Certain launch configurations might be used by the Router and the console that you are using and they might prevent the game from being able to sync properly with its servers. Simply performing a Power-Cycle should get rid of these launch configurations by causing them to be regenerated.
Now that you have read through the reasons due to which this error occurs, we can finally move on towards implementing the solutions.
Before you Start:
- Make sure to reset your Internet Router by unplugging it from power and pressing and holding its power button to get rid of static electricity. Once you have held the button for about 30 seconds, make sure to plug it back in to start it back up and check to see if the Apex Legends out of Sync with Server error has been fixed.
- Try Switching out your Server to another one, for this, restart the game until it loads initially, and you are met with the “Continue” screen. At the bottom, there should be a “Data Center” option and by pressing that, you can change your server to another location. After doing so, check to see if the issue is resolved.
Clicking on “Data Center” - It is possible that your GPU is causing this issue and if so, try to go into the Apex Legends Settings and from there, navigate to the “Video” settings and turn off the Texture Streaming budget. Also, if that doesn’t work, try playing in Borderless Window mode and check to see if that fixes this issue.
- If you have ever changed your devices’ Mac Address, try to change it back to the Factory Mac Address and that should fix this issue.
- If you are have been using a particular Data Center from the start, make sure to switch back to that one and not use any other one. It can be an issue if the server is trying to sync your profile data between each other and using the one that you have always used might fix this issue.
Fixing the Apex Legends out of Sync with Server Error:
Solution 1: Settings Egress and Ingress Rate
For this, we will have to access our Network Router settings, for that, you need to make sure that you have access to your Router and aren’t using your School and neighbor’s internet. In order to do so:
- Launch into Google Chrome and type in your IP Address in the search bar.
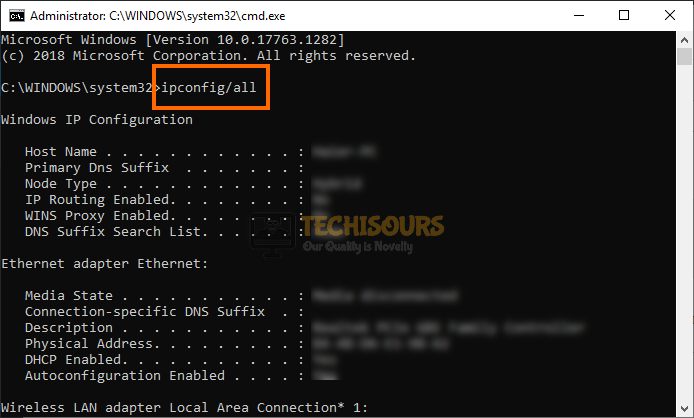
- If you don’t know that, press “Windows” + “R” to open the Run prompt. Type in “Cmd” and press “enter”. After that, type in “ipconfig /all” and press “Enter” to list your network configurations. From there, note down your IP Address written after the Default Gateway section. This is what you will be typing into the search bar.
ipconfig/all - After typing your IP address in the search bar and pressing enter, log-in to your Router access page using your login credentials which can be found on the back of your internet router unless they have been customized.
- From here, look for a “Limit Bandwidth” setting.
- In that setting, enter in the Upload and Download rate for your IP address/ Mac Address of your device.
- The bandwidth that you have signed up for should be entered in the Download and in the Upload Rate. If you don’t know the bandwidth that you signed up for, you can use Speed Test Facility on your browser and it will let you know.
- Simply convert that bandwidth into Kbps or enter that into the download and upload rate.
- Save your settings and also make sure to enter in the same rate for any other device on your network.
- Check to see if doing so fixes the Apex Legends out of Sync with Server error.
- If that doesn’t work, repeat the above steps to sign in to your router’s page and make sure to disable the QoS settings and the NAT Boost on your Router.
- Check if disabling the above two options fix this issue.
Solution 2: Update Windows
It is possible that the Windows has been outdated on your computer due to which you are running into this issue. To update Windows:
- Press “Windows” + “I” to open the settings and click on the “Update & Security” option.
Clicking on “Update and Security” - From the left select “Windows Update” and click on the “Check for Updates” option on the right.
Check for updates - If available, click on the “Install” option to download updates on your computer and install them
- After updating Windows, check to see if the Apex Legends out of Sync with Server error is resolved.
Solution 3: Reinstalling Apex Legends and Origins
- Press “Windows” + “R’ to open the Run prompt.
- Type in “Appwiz.cpl” and press “enter” to launch into the application management window.
Typing in “Appwiz.cpl” in the Run box. - In the Apps and Features/Programs and Features window, scroll down to navigate Apex Legends and Origins. Right-click on each and click on Uninstall or Uninstall/Change. Click on Yes on the permission prompt to uninstall the two programs.
Uninstall - After restarting your system, open your browser and proceed to the download Origin Game Client.
- After selecting the destination for the Launcher, wait for it to download. Browse your Origin Setup and Run the Setup Wizard with the help of the onscreen instructions to install it on your computer.
- Once installed, click on Finish and Launch the Origin Game Client. Search for Apex Legends in the search bar of the Origins Store and Install it for free.
- Wait for it to install, and the Game will Launch automatically.
Solution 4: Updating your Graphics Cards Driver
For this step, you have to know the graphics card you are using on your PC. If you already know this, skip Step 1 and Step 2.
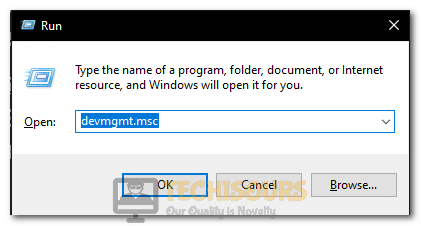
- Press “Windows + R” on your keyboard to open Run. In the Run dialogue box, type or paste “devmgmt.msc” to open the Device Manager.
Typing devmgmt.msc in the Run prompt - Locate the Display Adapters option and double-click on it to extend it further. This will show you the Graphics Card installed on your PC.
- Once you know your graphics card, open your browser and type “[your graphics card name] drivers.” Fill in the bracket with the name of your graphics card. If you are directed to our Graphics Card Manufacturer site, Navigate to the Drivers & Utility or Drivers & Support. Browse for your Graphics Card and download the latest driver present.
- Once downloaded, get back to Device Manager and right-click on your Graphics Card, and proceed by clicking on “Update Drivers” in the menu. Proceed by clicking on “Browse my Computer for Drivers”. Wait for a while until the computer finds and installs the updated drivers.
Clicking on the Browse My Computer for Drivers option - It is recommended to restart your computer and try running the game after it restarts.
Solution 5: Deleting cloud saves on Origin
- Open “Origin Client” and proceed to the “Origin Menu.”
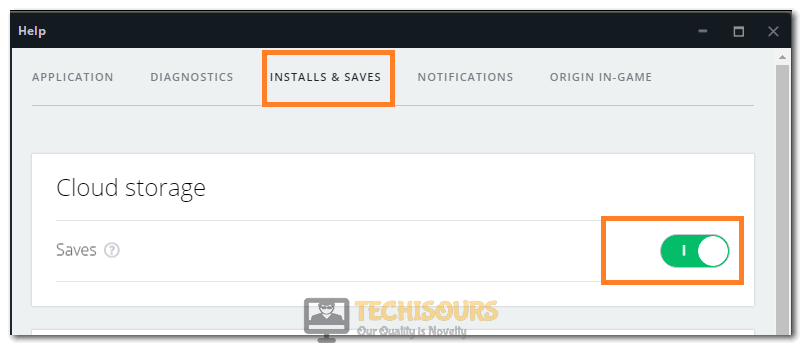
- Locate the “Application Settings” option navigate to the ‘‘Install and Saves’’ option and click on the Saves toggle under the Cloud Storage heading to disable it.
Clicking on “Application Settings” - Without being logged into the “Origin Client”, launch the game and check if all the saves you want are there, then close it again.
- Again open the Origin Menu from the client.
- Navigate to the Install and Saves option and enable the Cloud Storage Saves by turning the toggle on.
Enabling Cloud Saves - Relaunch the game, and you should get a pop-up where you can choose to overwrite the cloud save with your local save.
Solution 6: Use Ethernet
If you are using a Wi-Fi connection to power your internet, it is recommended that you try using ethernet instead because it has less loss as compared to wireless and overall provides more bandwidth at a faster rate which can help your applications communicate with the game servers more effectively.

Solution 7: Change your DNS
Sometimes, changing your DNS can also result in solving the problem. Just know that doing so is not an essay task and you must be technically experienced to manage it properly.
- Press “Windows” + “R’ to open the Run prompt.
- Type in “ncpa.cpl” and press “Enter” to launch into the network management window.
ncpa.cpl - Right-click on your network connection and select “Properties”.
- Select the “Internet Protocol Version 4 (IPV4)” option from the list and select the “Properties” button.
Internet Protocol Version 4 (TCP/IPv4) - Click on the “Use the Following DNS Address” and type in the following Primary and Secondary DNS Addresses.
8.8.8.8
8.8.4.4
- Click on “Apply” to save your changes and check to see if doing so fixes the issue.
Solution 8: Power cycling
If you are on a PS4 or another console, try power cycling it as it can reset certain launch configurations which might end up fixing this issue on your computer.
- Press the power button for a few seconds until you hear a couple of beeps and the console shuts down.
Press the power button - Turn it back on after a while and start the game.
- Check to see if the Apex Legends out of Sync with Server error has been fixed.
Solution 9: Perform Disk Cleanup
Sometimes, it is recommended that you try and perform a Disk Cleanup to deal with any residual files causing hiccups during gameplay. For that, right-click on your Local Disk where Apex Legends is installed and select “Properties” from there, click on the “Disk Cleanup” option, and follow through with the instructions.

Check to see if performing a Disk Cleanup gets rid of this issue.
Solution 10: Clearing DNS Cache
- Press “Windows + R” on your keyboard to open the “Run” dialogue box. Paste or type “cmd” in the “address bar” and press “Ctrl + Shift + Enter” to open “Command Prompt Window”. Click on “YES” if you come across any permission prompts.
Typing in cmd - In the “cmd prompt,” type or paste “ipconfig /flushdns” and press “Enter” to execute the command.
Flush DNS - Check to see if flushing the DNS fixes the Apex Legends out of Sync with Server error on your computer.
If you are still unable to fix the issue after all this troubleshooting, contact us and we will guide you further.


