How to Fix Windows could not Complete the Installation Error [Complete Guide]
The Windows Could not Complete the Installation Error is seen by some users while trying to install an update on their computer or sometimes while trying to install the Windows OS on their computers. In this guide, we will be implementing some fixes that are aimed at completely getting rid of this error so that you are able to install the update on your computer normally. The error message that users get reads “Windows Could not Complete the Installation. To install Windows on this computer, restart the installation“.

Keep in mind to follow all solutions that have been listed in this guide accurately and also ensure to proceed in a step-by-step manner. We have also compiled some of the primary reasons due to which this error message is triggered and have listed them as follows.
What Causes the Windows Could not Complete the Installation Error?
After going through some user experiences and reading through certain troubleshooting techniques, we devised that the following are the primary reasons due to which this error message is triggered.
- Damaged System Files: The primary reason behind this issue is usually the fact that some update files on your system might be damaged due to which you are getting the Windows could not complete the installation message while trying to install them on your computer. Therefore, recommend that you perform a system repair and then check to see if by doing so, you are able to fix this issue.
- Password Misconfiguration: It is possible that the Password policy on your computer might be causing the error by prompting a password requirement at a particular step. Therefore, it is vital that you modify this policy from the Local Security Policy Window and then check to see if doing so fixes the error message while updating.
- Registry Key Configuration: Some users get the Windows Installation has failed error because certain registry keys on their computer have been misconfigured and they are preventing the update from being installed on the computer. Therefore, as listed below, you can amend these registry keys and ensure that they are properly set up to allow you to install Windows.
- Audit Mode: If the computer is in an Audit Mode state, the Windows could not complete the installation error will be triggered. Therefore, we recommend taking the system out of this Audit Mode state and then checking to see if you are able to fix the error message.
- Administrator Account: Sometimes the Administrator account on the computer gets disabled during the implementation of the update and this might trigger the windows could not complete the installation error while applying the update. Therefore, we recommend trying to enable the administrator account and then checking to see if you can fix the issue.
Now that you have gone through almost all the major reasons behind this error, it is time that we start implementing solutions to fix the Windows Could not Complete the Installation Error.
Fixing the Windows could not complete the installation windows 10 dell issue:
Solution 1: Perform Automatic Repair
- To start with press the power “ON” and “OFF” buttons on your PC three times.
- For the third time, your computer will trigger a message on your screen displaying “Preparing Automatic Repair” and will then boot into the “Advanced Recovery” mode.
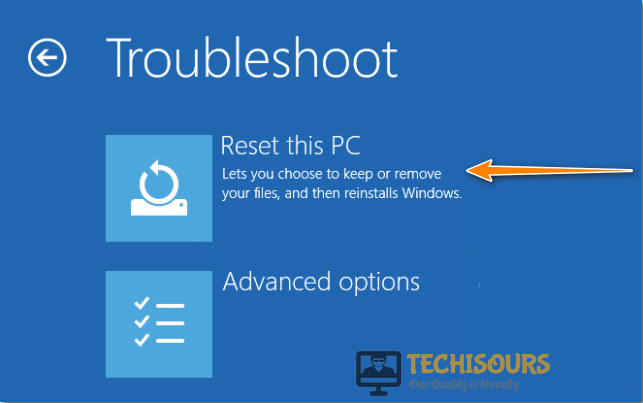
- Choose to select “Advanced Options” and then click “Troubleshoot”.
- Now press the icon of “Reset this PC”.

Reset this PC - Next, choose “Keep my Files” and “Cancel” respectively. Doing so doesn’t allow you to Reset your PC.
- Select your account, enter the password and press the “Continue” button.
- Finally, click to select the “Reset” button and now check to see if your problem got resolved.
Solution 2: Run Windows Account Creation Wizard
While performing the automatic repair on Windows if you get stuck in the error of Automatic Repair Loop then you need to troubleshoot it by following the below-mentioned steps:
- Press the “Shift + F10” keys simultaneously on the error window to open the command prompt window.
- In here type in the following command and then press Enter:
cd %windir%/system32/oobe/
- After execution of the above command paste the following command in the command window and hit the Enter key:
msoobe
- A user account creation wizard will pop up on your screen. Set up your account and enter a suitable password here.
- Finally, restart your PC and check to see if the windows could not complete the installation windows 10 dell issue gets resolved.
Solution 3: Reinstall the System Home Version Without Activation
This error may also appear in a case where you are trying to install a specific version of your Microsoft Windows. In this scenario try to reinstall the home version of the system again but this time make sure that you don’t activate it during the installation procedure. Once the installation gets completed enter the product key so that your system gets activated quickly. Finally, check to see if it works fine now.
Solution 4: Use An Alternate Windows Installation Source
Sometimes the system installer you are using might be faulty or corrupted hence giving rise to this error. So in order to avoid this use another authenticated and reliable installation media source from Microsoft and then execute it on your PC. Finally, observe if the error persists or not.
Solution 5: Enable Built-In Administrator Account
- Launch the command prompt window by pressing the “Shift + F10” keys simultaneously on the error screen.
- Here type the “MMC” command in the dialog box and hit Enter.
- A console window will pop up on your screen. Navigate to the “File” section and then select “Add/Remove Snap-in”.

Add/Remove Snap-in - In the next window that pops up on your screen double-click to select “Computer Management”.
- Choose the “Local Computer : (the computer this console is running on)” option and then press “Finish” to proceed further.

Select local Computer Option - Now select “OK” to move on further.
- Once you return to the main interface click to select “Computer Management (Local) -> System Tools -> Local Users and Groups -> Users -> Administrator” respectively.
- Now double-click on “Administrator” to open the Administrator Properties. Here make sure to uncheck the option “Account Is Disabled” and then press “OK” to continue.
- Next, choose “Administrator” and right-click on it to select “Set Password”. Specify a strong password to continue further.
- Finally, restart your PC and check to see if you have been able to resolve the error successfully.


Solution 6: Reconfigure Password Policy
- On the error, screen press the “Shift + F10” keys simultaneously to open the Command Prompt window.
- Type in the “secpol.msc” command in the command window and then hit “Enter”.
- In the pop-up window click on “Account Policy” to expand it and afterward select “Password Policy”.

Choose Password Policy - Right-click on the “Minimum Password Length” in the right pane to select “Properties”. Here alter the “Security Settings” to zero characters and click “Apply” to save the changes made and then hit “OK”.

Set Password Length - Also right-click on the icon “Password Must Meet Complexity Requirements”, choose “Properties” and make sure it is disabled. Apply the changes and then press “OK”.
- Finally, reboot your computer and then check to see if the issue still persists or not.


Solution 7: Run Windows Update Installer
- Press the “Shift + F10” keys simultaneously on your error screen to open up the command prompt window.
- In here type in “D:” and then hit Enter to open the D: partitioning of the hard drive.
- Now type “setup” and press Enter to run the windows update installer manually and later on check to confirm if the problem has been solved now.
Solution 8: Modify Registry Subkeys
- Press the “Shift + F10” keys simultaneously on the error window to open up the command prompt and type “Regedit” in the dialog box and hit Enter.

Typing “regedit” - A registry editor window will pop up on your screen. Now navigate to the below-listed registry key paths one by one and modify the data field values from the right pane window:
Computer\HKEY_LOCAL_MACHINE\SYSTEM\Setup\Status            -->        Audit : 0

HKEY_LOCAL_MACHINE\SYSTEM\Setup\Status\ChildCompletion     -->        Setup.exe: 3

HKEY_LOCAL_MACHINE\SYSTEM\Setup\Status\ChildCompletion     -->        Audit.exe: 0

HKEY_LOCAL_MACHINE\SYSTEM\Setup\Status\SysprepStatus       -->        CleanupState: 2

HKEY_LOCAL_MACHINE\SYSTEM\Setup\Status\SysprepStatus       -->        GeneralizationState: 7

HKEY_LOCAL_MACHINE\SYSTEM\Setup\Status\UnattendPasses      -->        AuditSystem: 0
- Finally, reboot your PC and check to see if Windows work fine now.

Solution 9: Exit From the Audit Mode
- Press the “Shift + F10” keys simultaneously on your error screen window to open up the command prompt.
- In here type in the following command in the dialog box to disable the audit mode and then hit Enter.
sysprep /oobe /generalize
- Close the command prompt window, reboot your computer and check to see if the error is resolved now.
- However, if the error still persists then again open the command prompt window, type “Regedit” and hit Enter.
- Move to the following registry key now:
HKEY_LOCAL_MACHINE\SOFTWARE\Microsoft\Windows\CurrentVersion\Setup\State
- Then locate the option of “ImageState”, right-click on it, and select the “Delete” option.
- Exit from the command prompt window now and finally observe if you have been successful in eradicating the issue.
Implement all of the above-indexed solutions in order to get rid of this error but for any further queries or assistance, you can Contact Us here.