Easily Fix Windows could not Automatically Detect this Network’s Proxy Settings Error
If you have been getting the “Windows could not automatically detect this network’s proxy settings” Error on your computer, you don’t need to worry because we have compiled this guide to address this issue. Basically, we started to experiment with different troubleshooting methods and came to conclude the most effective ones in this guide.

In addition to that, we also pinpointed the reasons due to which the error might be seen on your computer and have also listed them below. Make sure to implement these fixes on your computer one by one until one of them fixes the error message for you.
What Causes the Windows could not Automatically Detect This Network’s Proxy Settings Error?
After studying this issue in detail, we came to conclude that the following have to be the most important reasons due to which the error message is triggered.
- Network Adapter Issue: It is possible in some cases that the network adapter that has been installed on the computer got glitched and due to that, the error message is being triggered. Therefore, we suggest that you try to update, restart or reinstall this adapter in an attempt to fix the “Windows could not automatically detect this network’s proxy settings” issue as we have mentioned below.
- VPN Connection: In certain cases, the VPN connection that you have connected to might be preventing the automatic detection of the Network’s Proxy settings. Therefore, you can try to temporarily disconnect from the VPN and check to see if the issue is fixed in that way.
- Firewall/Antivirus: Sometimes the Firewall or the Antivirus installed on your computer might prevent the proper functioning of some other services on the computer and this might prevent the automatic detection of network proxy settings.
- Problem with DNS and IP Address Detection: If the IP Address and the DNS Server address have both been configured to be automatically detected, you might get this error on your computer. Therefore, we strongly suggest that you try to set a static value for these as we have done below in order to be able to Automatically detect the network’s proxy settings.
Now that we have taken you through most of the reasons behind the occurrence of this issue, we can finally start implementing the solutions.
Before you Start:
- Restart your Computer: Sometimes, a simple restart to the computer might fix this issue completely. Therefore, click on the “Windows” icon at the bottom left side and click on the “Power” icon. Press “Shift” on your keyboard and click on the “Shutdown” button to completely shut down the computer. After that, start it back up and check to see if you are able to fix this issue.

Shutdown the Computer - Restart your Internet Router: Press the “Power” button on your internet router to turn it off and unplug its power adapter from the wall. After that, make sure to press and hold the “Power” button for a while to get rid of any leftover electricity. Start the router back up and check to see if doing so has fixed the “Windows could not Automatically Detect This Network’s Proxy Settings” Error.

Fixing the Windows could not Automatically Detect This Network’s Proxy Settings Error:
Method 1: Configure Automatic Detection of Network Settings
- From your keyboard, press the “Window + I” keys to launch into the settings.
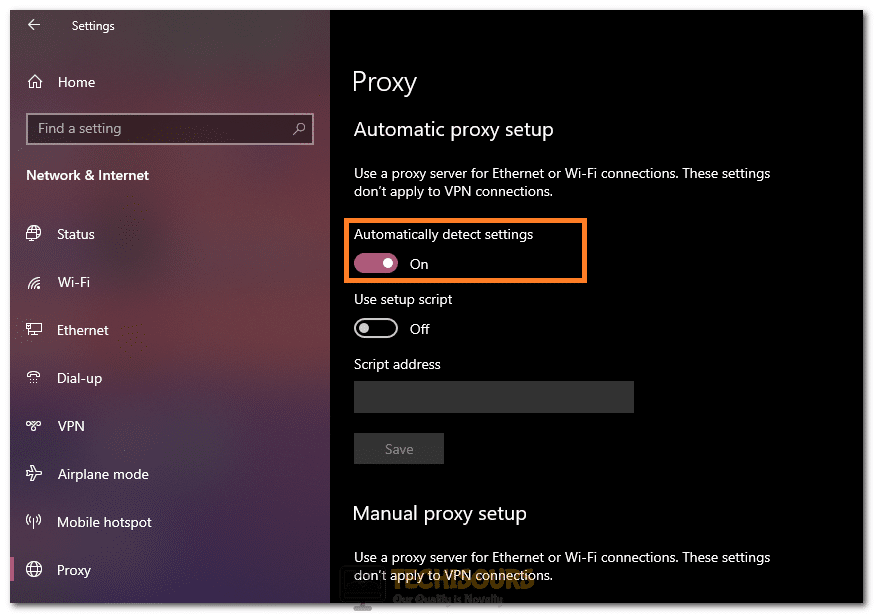
- Here, click on the “Network & Internet” option and then click on the “Proxy” option from the left side.
-

Clicking on the “Automatically Detect Settings” option Make sure that the “Automatically Detect Settings” option has been enabled.
- Check to see if doing so fixes the “Windows could not Automatically Detect This Network’s Proxy Settings” issue.
Method 2: Troubleshoot Network Adapter
- Press the “Window + I” keys simultaneously to launch into the Settings panel.
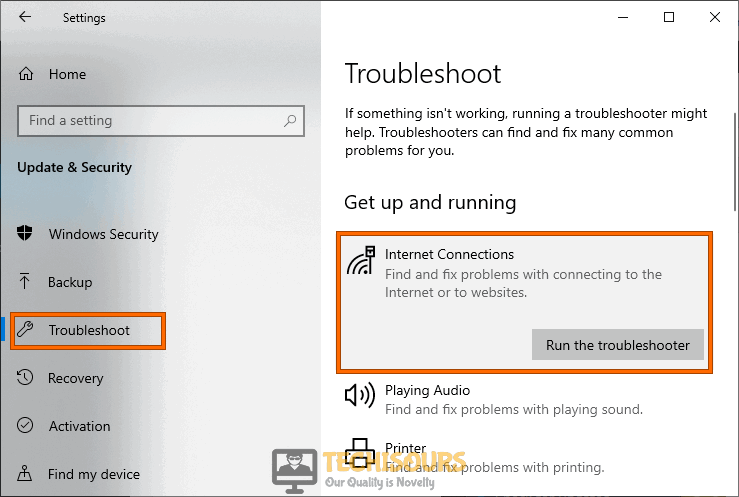
- From the panel, click on the “Update & Security” option and then select the “Troubleshoot” button from the left side.

Clicking on “Update and Security” - After doing so, click on the “Additional troubleshooters” button and then select the “Network Adapter” button.
- After that, click on the “Run the Troubleshooter” button to start the troubleshooting of the network adapter.

Run the troubleshooter - Follow through with the on-screen instructions to complete the troubleshooting process and check to see if the Windows could not Automatically Detect This Network’s Proxy Settings issue is fixed.

Method 3: Configure Automatic Obtaining of IP and DNS Address
- Press the “Windows + I” keys to launch into settings and click on the “Network and Internet” button.
- Click on the “Status” option and from the right side, click on the “Change Adapter Options” button.

Change adapter options - Right-click on the “Wi-Fi” network that you are connected to and click on the “Properties” option.
- Double-click on the “Internet Protocol Version 4 (IPV4)” option and make sure to check the “Obtain an IP Address Automatically” and the “Obtain DNS Server Address Automatically“.
- After doing this, make sure to save your changes and restart the computer.
- Check to see if doing so fixes the “Windows could not Automatically Detect this Network’s Proxy Settings” error.

Method 4: Update Network Driver
- Press “Windows + R” keys on your keyboard to launch into the Run prompt and type in “devmgmt.msc” and press “Enter” to launch into the device manager.

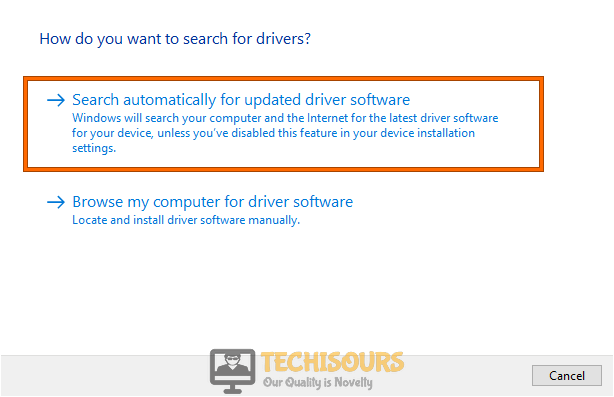
Typing devmgmt.msc in the Run prompt - From here, the list of drivers installed on your computer will be shown, make sure to expand the “Network Adapter” list and right-click on the installed driver and select the “Update Driver” option.
- From the next screen, make sure to select the “Search Automatically for updated driver software” option.

Search automatically for updated driver - Check to see if doing so has fixed the Windows could not Automatically Detect This Network’s Proxy Settings error.

Method 5: Rollback Network Driver
- Press “Windows + R” keys on your keyboard to launch into the Run prompt and type in “devmgmt.msc” and press “Enter” to launch into the device manager.
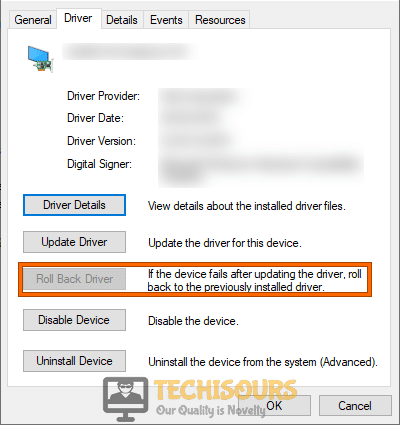
- From here, the list of drivers installed on your computer will be shown, make sure to expand the “Network Adapter” list and double-click on the installed drivers.
- Click on the “Driver” option and from there, click on the “Roll Back Driver” option.

Rollback Driver - After doing so, make sure to save your changes and fix the Windows could not Automatically Detect This Network’s Proxy Settings error.
Method 6: Reset Network Configurations
- Press “Windows + R” to launch into the Run prompt, type in “cmd” and press “Shift + Ctrl + Enter” to launch with admin permissions.
- After this, type in the following commands and press “Enter” to execute them.
netsh int ip reset resetlog.txt

netsh winsock reset

Netsh int ip reset

ipconfig /release

ipconfig /renew

ipconfig /flushdns

DISM /Online /Cleanup-Image /RestoreHealth
- After executing these commands, make sure to restart your computer and check to see if the issue is fixed on your computer.
Method 7: Disable firewall
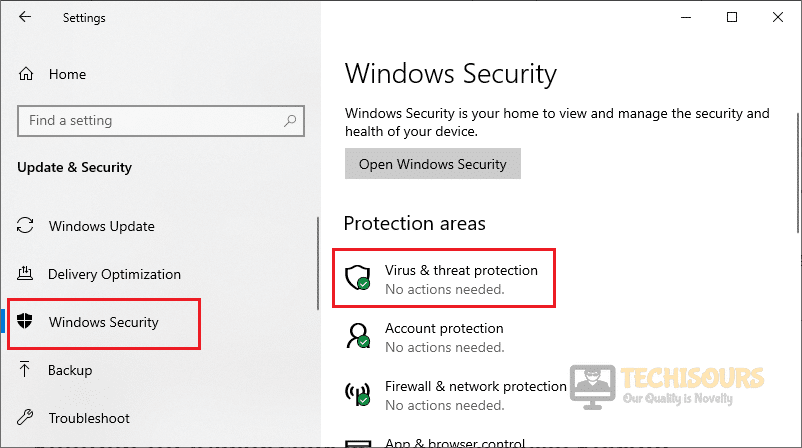
- Press “Windows + I” to launch into the Windows settings and from there, click on the “Update and Security” option.
- After this, click on the “Windows Security” option from the left side and then click on the “Firewall & Network Protection” option.

Choose Windows Security Option - Now, click on the Domain, Private and Public options one by one and make sure to turn off the “Microsoft Defender Firewall” toggle one by one.

Turning Microsoft Defender OFF for Private Network - After this, make sure to restart your computer and check to see if the issue is fixed.


Method 8: Disable VPN
- Press “Windows + I” to open the settings and click on the “Network and Internet” option.
- From the left side, click on the “VPN” option, and, make sure to disable and turn “OFF” any VPN connection running on your computer.

Turning VPN OFF - If you are running a third-party VPN connection software, make sure that you have “Disabled” it as well.
- Check to see if by doing so, you have managed to fix the Windows could not Automatically Detect This Network’s Proxy Settings error.

Method 9: Disable Real-Time Protection
- Press “Windows + I” to launch into the Windows settings and from there, click on the “Update and Security” option.
- After this, click on the “Windows Security” option from the left side and then click on the “Virus and Threat Protection” option.

Virus and Threat Protection - After doing so, click on the “Manage Settings” option under the “Virus and Threat Protection” heading.
- From here, make sure that you disable the “Real-Time Protection” toggle and then exit out of the Window.
- Check to see if doing so helps you in fixing the issue and if it doesn’t, make sure to turn the protection back on because it shouldn’t be disabled for too long.
Method 10: Scan with Malwarebytes
- Download the Malwarebytes Software on your computer and run the executable.
- After running the downloaded executable, make sure to follow the on-screen instructions to install it on your computer.
- After installing, make sure to launch the software and run a scan.

Run a Threat Scan - Check to see if the scan finds anything of concern and remove it from the computer.

Method 11: Perform a System Restore
- Press “Windows + R” to open Run, type in “rstrui.exe” and press “Enter” to launch into the restore window.
- After this, click on “Next” and then select “Choose a different restore point” or the “Show More Restore Points” option.

Clicking on the “Show more Restore Points” - This will list all the different restore points that are available on your computer.
- Make sure to select one and then follow through with the on-screen instructions to reset your computer.
- Check to see if doing so fixes the Windows could not Automatically Detect This Network’s Proxy Settings error.

Method 12: Reset Network Settings
- Press “Windows + I” to open settings, click on the “Network and Internet” option, and from the left side, click on the “Status” button.
Network and Internet - In here, make sure that you click on the “Network Reset” option and then select the “Reset Now” button.
- After the reset process has been finished, check to see if you are able to fix the issue.

Method 13: Restart Network Adapter
- Press “Windows + R” to launch the Run prompt, type in “ncpa.cpl” and press “Enter” to launch into the network control panel.

Typing in “ncpa.cpl” - Here, right-click on the Wi-Fi connection that you are using and select the “Disable” option.
- Wait for at least 1 minute and then right-click on the disabled connection and select the “Enable” button to start the Wi-Fi connection back up.

Method 14: Run SFC Scan
- Press “Windows + R” to launch into the Run prompt, type in “cmd” and then press “Shift + Ctrl + Enter” to launch in admin mode.

Typing in cmd - Type in the following command and press “Enter” to execute it on your computer.
sfc /scannow
- Wait for the scan to be completed and check to see if you are able to fix this issue.

Method 15: Uninstall Antivirus Program
- Press “Windows + R” to open the run prompt.
- Type in “appwiz.cpl” and press “Enter” to launch into the application wizard.

Typing in “Appwiz.cpl” in the Run box. - From here, make sure to find the Antivirus program that you have installed on your computer and right-click on it.
- Click on the “Uninstall” button to remove the software from your computer and check to see if the Windows could not Automatically Detect This Network’s Proxy Settings error is fixed.

Method 16: Reset Internet Settings
- Press “Windows + R” to open the Run prompt.
- Type in “inetcpl.cpl” and press “Enter” to open the internet explorer window.

Typing “inetcpl.cpl” - In here, click on the “Advanced” tab from the top and select the “Reset” option under the “Reset Internet Explorer Settings” window.
- After completing this step, check to see if you have been able to fix the error message on your computer.

Method 17: Disable Proxy Server
- Press “Windows + R” to open the Run prompt.
- Type in “inetcpl.cpl” and press “Enter” to open the internet explorer window.
- From the top, click on the “Connections” tab and then select the “LAN Settings” option.
- Once in here, make sure that you have the “Use a Proxy Server for your LAN” option unchecked.

Disable the proxy servers - Click on “OK” and then verify if the Windows could not Automatically Detect This Network’s Proxy Settings message has been fixed.

Method 18: Reconfigure Services
- Press “Windows + R” to launch into the Run prompt, type in “cmd” and then press “Shift + Ctrl + Enter” to launch in admin mode.
- Type in the following commands one by one and press “Enter” to execute them on your computer.
sc config Wlansvc start= demand

sc config dot3svc start= demand

sc config Dhcp start= auto
- After this step has been completed, restart your device and check to see if you have been able to fix this error message.
Method 19: Use Static DNS and IP Address
- Press the “Windows + I” keys to launch into settings and click on the “Network and Internet” button.
- Click on the “Status” option and from the right side, click on the “Change Adapter Options” button.
- Right-click on the “Wi-Fi” network that you are connected to and click on the “Properties” option.
- Double-click on the “Internet Protocol Version 4 (IPV4)” option and make sure to check the “Use the Following DNS Address” option.

Internet Protocol Version 4 (TCP/IPv4) - Type in the following DNS Addresses as the Primary and the Secondary DNS Addresses respectively.
8.8.8.8

8.8.4.4
- Click on “Apply” and then on “OK” and exit out of the window.
- Check to see if doing so has fixed the issue on your computer.
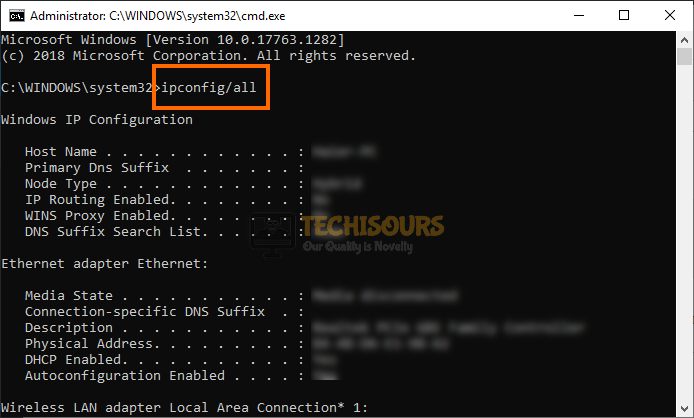
- If it hasn’t, press “Windows + R“, type in “cmd” and press “Shift + CTRL + Enter“.
- After that, run the “ipconfig” command inside cmd and note down the IPV4 Address, Default Gateway, and Subnet mask that has been listed.

ipconfig/all - From here, make sure that you repeat up to the 4th step and check the “Use the Following IP Address” option, and type in the values that we noted down previously.
- Check to see if you are able to fix the Windows could not Automatically Detect This Network’s Proxy Settings error.

Method 20: Enable custom 3D Support
- From the System Tray at the bottom right side of your desktop, click on the “Riva Tuner Statistics Server“.
- Once the app launches, make sure to turn on the “Custom 3D Support” option.
- Check to see if the issue has been resolved.
Method 21: Perform Clean Reinstall of Windows
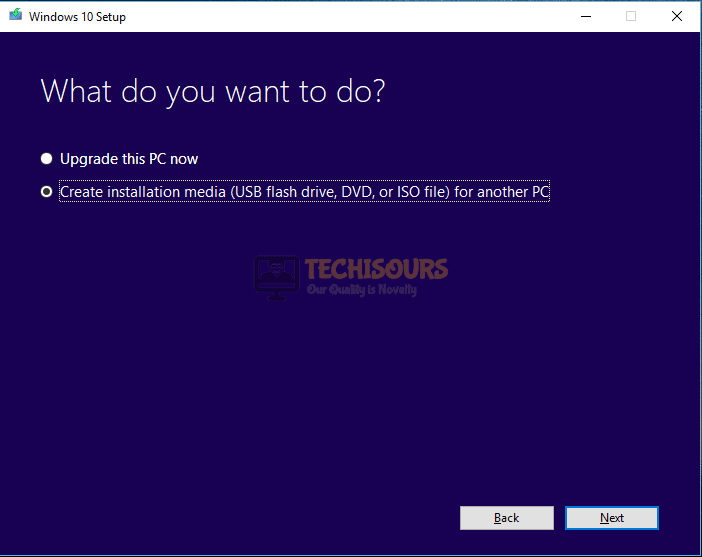
- First of all, download the Media Creation Tool on your computer from the official Microsoft Website.
- After downloading, run the executable and install it on your computer.

Create installation media (USB flash drive, DVD, or ISO file for another PC - Launch the installed ISO file and from there, follow the on-screen instructions to install Windows.
- Make sure to delete the present files on all previous hard drives for a completely new installation.
- Check to see if doing so fixes the issue.
If the error message still occurs, we suggest that you Contact Us for further troubleshooting.