What is UNCserver.exe and Should you stop it from Running in the Background? [Complete Guide]
A lot of people have been questioning the presence of a UNCserver.exe executable present on their computers that is using a considerable amount of resources. Most people have this question due to high CPU usage by UNCServer.exe and want to know if this is vital to any system function inside the operating system.

What is UNCserver.exe?
This executable is a part of the system update module for Lenovo laptops and computers. Primarily, the executable is responsible for running separate tasks in addition to the Windows Update. Normally, the UNCServer.exe module is started as soon as Windows Update starts and it is responsible mainly for opening up TCP and UDP ports that allow the incoming bandwidth during an update. This should automatically startup when the update starts and end automatically when the update has been applied. It is best to let it run and wait for it to shut down automatically.
Should you end the UNCServer.exe Process?
This gets a bit tricky but we will try to give you an easy answer. Normally, the module runs as long as it is necessary and required to run. Therefore, if you have an update running in the background and installing new system files, you should let the process run, however, if there isn’t any update running, it is best that you prevent it from running by following the methods below.
How to Stop UNCServer.exe from Running in the Background?
To stop high CPU usage by UNCServer.exe, you can end it by following the methods listed below:
Method 1: Uninstall Lenovo System Update
- Hit “Win + R” keys on the keyboard to open the run box and search for “appwiz.cpl”.
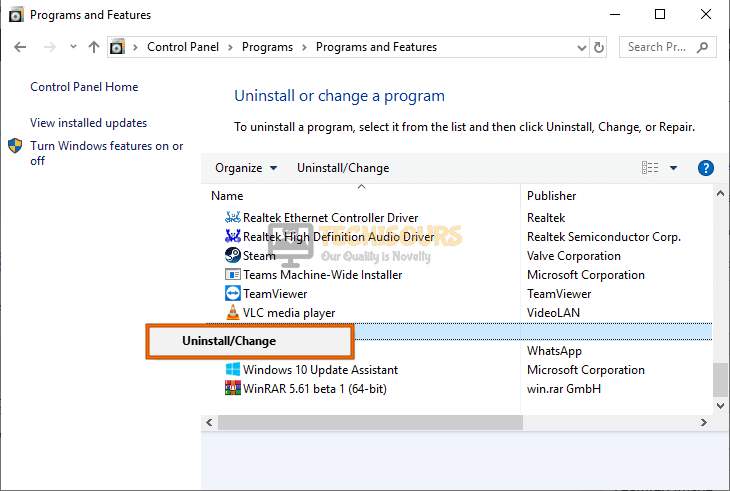
Typing “appwiz.cpl” - Now, from the list of the applications installed on your computer, locate “Lenovo System Update”, right-click on it and select “Uninstall”.
Uninstall Lenovo System Update - When the uninstall process is completed, press “Win + Shift + Esc” keys simultaneously on the keyboard to open the “Task Manager”.
- Navigate to the processes tab and check if the process labeled as “UNCServer.exe” still appears or not.
Ending Process - If this process still appears then move to the next potential fix to remove this file.
Method 2: Disable TVSUUpdatein in Task Scheduler
- Hit “Win + R” keys on the keyboard to open the run box, type “taskschd.msc” and hit enter to launch the Task Scheduler utility.
Typing “taskschd.msc” command - Once in the task scheduler window, click on the “Task Scheduler Library” located at the left pane, to expand its list and select “TVT ” from its sublist.
- From the right pane, locate “TVSUUpdateTask”, right-click on it and select “Disable “.
Disable TVSUUpdatein in Task Scheduler - After disabling the process, restart your computer and see if the “UNCServer.exe” process is removed or not.
Method 3: Fix corrupted system files
Using Command Prompt:
- Navigate to the search bar of your system and type “Command Prompt”, right-click on the Command prompt option and choose “Run as Administrator”.
Run Command Prompt - Now type the following commands and hit enter to execute them:
sfc /scannow
DISM.exe /Online /Cleanup-image /Restorehealth
Using a third-party tool:
- Launch your favorite browser and download MalwareBytes.
- Double-click on the setup file you just downloaded and follow the onscreen instructions to install the tool.
- Now launch the tool and click on the “Scan” button to start scanning for corrupted system files and fix them automatically.
Scan for corrupted files - When the scanning procedure is completed, verify that the issue has been resolved on your computer.
Method 4: Uninstall faulty application
- Press “Win + Shift + Esc” on the keyboard to open the task manager.
- Under the “Processes” tab, click on any process that is related to “uncserver.exe” and select “End Task”.
Ending Process - Now press “Win + E” on the keyboard to open File Explorer.
- Click in the search box located at the top-right corner of the window and search for “uncserver.exe”.
Searching for “uncserver.exe” - Now locate all the copies of unc server.exe file in your system’s directory and note down the application they belong to.
- Now follow the steps in solution 1 to uninstall the faulty application and check if the file is removed.
Method 5: Remove UNCserver.exe using a third-party tool
- Launch your favorite browser and download Asmwsoft Pc Optimizer.
- Double-click on the setup file you just downloaded and follow the onscreen instructions to install the tool.
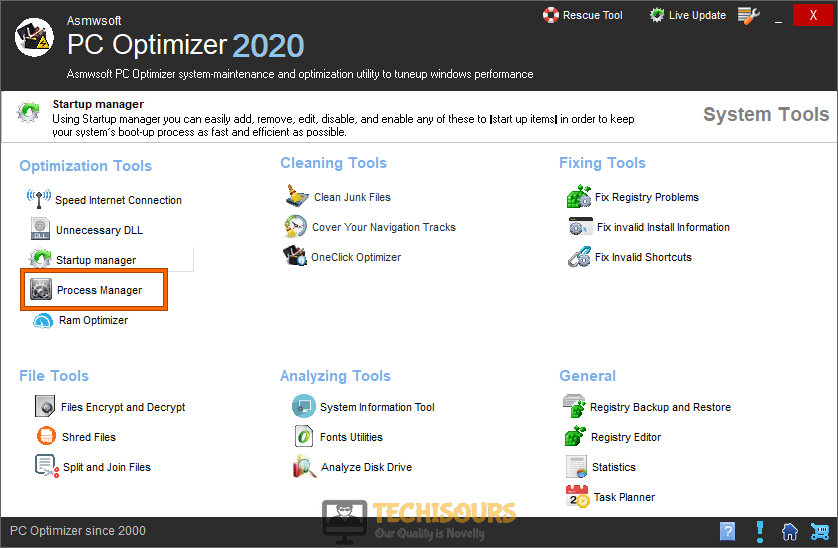
- Now launch the tool and select “Process Manager” from its home screen.
Launching Process Manager - Right-click on any process that is related to “uncserver.exe” and select the “Terminate process” option.
- Now go back to the home screen and select “Startup Manager”.
Choose Startup Manager - Right-click on any process that is related to “uncserver.exe” and select “Delete selected item” to permanently delete it.
Deleting the process
Method 6: Reinstall Lenovo System Update
- Follow the instructions in Solution 1 to Uninstall Lenovo System Update.
- Now launch your favorite browser and download the latest version of the Lenovo system update.
- After the file is downloaded, double-click on it and follow the on-screen instructions to install it.
- When the installation process is completed, check if the UNCServer.exe issues are resolved.
Hopefully, the error must be gone till now. For further detail and information click here.


