What is IAStorDataSvc and Fix IAStorDataSvc High CPU Usage

IAStorDataSvc is a background Windows process that stands for or represents the Intel Rapid Storage Technology. This process is a startup process that comes with all the latest versions of Windows, this process helps users have rapid access to frequently used apps by saving them to your Solid State Drive.

Why is IAStorDataSvc High CPU Usage being Triggered?
A lot of users complain about High CPU usage due to the Intel Rapid Storage Technology process, and therefore they confuse the process as malware on their computer. This article will take you through methods to help solve the High CPU usage caused by IAStorDataSvc.
How to Fix IAStorDataSvc causing High CPU Usage issue:
Method 1: Uninstall / Re-install Intel Rapid Storage Technology
Although, it helps you get some of your work get done faster but uninstalling it will not harm your computer in any way.
- Open up the “Run” dialog box using the “Window + R” keys on your keyboard, in the Run prompt type in “appwiz.cpl” and press “Enter”.

Typing “appwiz.cpl” - In the pop-up Programs and Features window, scroll down to locate “Intel Rapid Storage Technology”.
- Select Intel Rapid Storage Technology and press the “Uninstall” button at the top, then follow the on-screen instructions to complete the process.

Uninstall Rapid Store Technology


Afterward, you can reinstall Intel Rapid Storage Technology again using the method below:
- Follow this link to the official download website for Intel Rapid Storage.
- Download the appropriate version for your Windows and go through the installation wizard to completely install Intel Rapid Storage.
Method 2: Stop the Intel Rapid Storage Technology Service
- Press the “Window + S” keys on your keyboard to open up the Windows search bar, in the search prompt type in “Services” and press “Enter”.
- In the Services window scroll down to locate “IAStorDataSvc”, if you’re unable to locate IAStorDataSvc then look for “Intel Rapid Storage Service”.
- Once located, right-click on the service and select “Properties” from the drop-down menu.
- In the Properties window change the “Startup Type” to “Disabled” and press the “Stop” button below.

Disable Intel Rapid Storage - Once done “Apply” all the changes and hit the “OK” button.

Method 3: Perform A Virus Scan
Sometimes it can be possible that a virus is camouflaged to look like the Intel Rapid Storage process, and for that, we will scan our computer for any Virus:
- In the Windows search bar near the Start menu type in “Virus and Threat Protection” and press “Enter”.

Virus and Threat protection - In the Virus and Threat Protection settings, click on “Scan Options” and in the following window click on “Full Scan”. Then press the “Scan Now” button.

Perform a full scan - Wait for the Scan to get complete and then take action against the malware.


Method 4: End the Task Temporarily
When IAStorDataSvc causes high CPU usage, you can just end its process temporarily by the following method:
- Right-click on your Taskbar and select “Task Manager” from the drop-up menu.
- In the Task Manager window locate “IAStorDataSvc” or “Intel Rapid Storage Technology”, once located right-click on the process and select “End Task”.
Method 5: Download Microsoft Safety Scanner
Sometimes viruses can be ignored by Windows Defender if they are disguised very cleverly, and for such reasons, we will then use Microsoft Safety Scanner.
- Download “Microsoft Safety Scanner” from the official Microsoft Site, make sure to download the version that runs on your Window.

Run Microsoft Safety Scanner - Once downloaded, run the file and wait for the Scan to get completed.

Method 6: Check For Windows Updates
Sometimes having older software can cause a lot of errors, to look for any newer Window Updates perform these steps:
- Type in “Check For Updates” in the Windows search bar near the Start menu, and press “Enter”.
- In the pop-up Windows Update window click on “Check For Updates” and wait for the scan to complete, if any Updates are found they will be downloaded and installed automatically on your PC.

Check for updates

Method 7: Install Old Drivers
If the high CPU usage started coming up after a recent update, then don’t worry, all you have to do is to roll back from the Update. For this proceed as follows:
- Press “Windows + R“, type in “devmgmt.msc” and press “Enter”.

Typing devmgmt.msc in the Run prompt - In the pop-up Window expand the section for “Storage Controllers” and right-click on “Intel Rapid Storage Technology”.
- From the drop-down menu select “Uninstall”, and follow the on-screen instructions to completely uninstall Intel Rapid Storage.
- Download any older version of Intel Rapid Storage that worked perfectly for you, once downloaded install the version and then check for the error.

Method 8: Reconfigure Some BIOS Settings
- Restart your computer from the Start menu, once the computer turns off and is about to turn on again press the “BIOS” button displayed on the boot screen, these keys are usually “F2, F10 or Del”.
- In the BIOS menu navigate using the arrow keys to get into the “Advanced” tab.
- In the Advanced tab locate the “Configure SATA” option in the “Storage” menu.

Configuring SATA - Once located, change the configuration to “AHC”, once done press the “F10” key to save all changes, and quit the BIOS menu.

Method 9: Uninstall the Third Party Anti-Virus
Some users were able to find out that certain anti-malware applications like AVG or NORTON interfered with the Intel Rapid Storage Technology and caused it to eat up more CPU. They were able to solve the issue by uninstalling such third-party anti-viruses.
- Open up the “RUN” dialog box using the “Window + R” keys on your keyboard, in the RUN dialog text box type in “appwiz.cpl” and press “Enter”.
Typing “appwiz.cpl” - In the Control Panel window that opens up, scroll down and find the program you wish to uninstall.
- Select the program and press the “Uninstall” button at the top, then follow any on-screen instructions to complete the process.

Uninstall Avast

Method 10: Reset Windows
Some users were able to solve the issue after they Reset their Windows. To do so you need to follow this procedure:
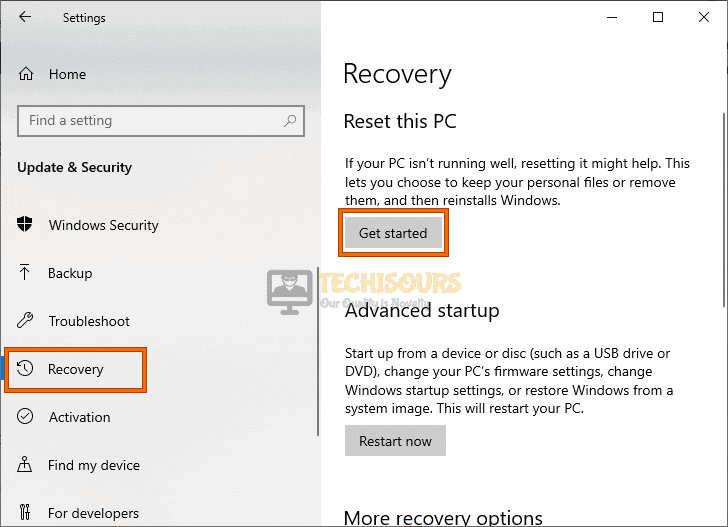
- Press the “Window + I” keys on your keyboard to open up the “Settings” window.
- In the Settings window use the search bar to look for the “Reset this PC” option.
Reset this PC - In the Reset PC menu click on the “Reset Now” button.
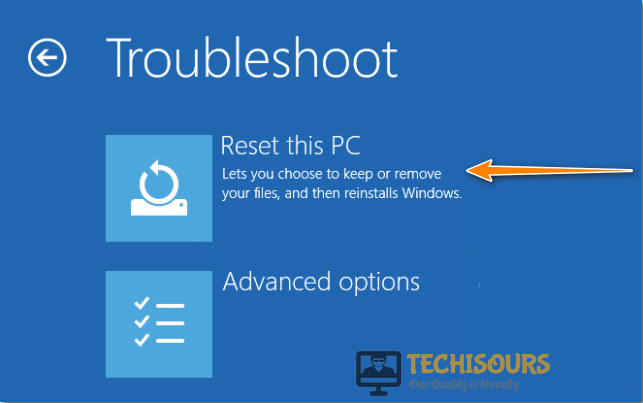
You can also use your Windows Installation Media to Reset your PC. For this proceed as follows:
- Insert the Windows Media device and press any key to boot from it, in the Installation menu select the “Language” and click on “Next”.
- Now click on “Repair Your Computer” in the bottom left of the window, click on “Troubleshoot” and then select “Reset this PC”.

Reset this PC
Method 11: Upgrade Hardware
Sometimes your hardware does not support Intel Rapid Storage Technology, if you want to keep using Intel Rapid Storage Technology you would need to upgrade your PC Specs accordingly.
How to Fix Intel RST Service Not Running:
Below you will find multiple solutions to fix the Intel RST Service Not Running issue:
Solution 1: Start RST Using Task Manager
You can verify if Intel Rapid Storage Technology is running or not using the Task Manager:
- Right-click on your “Taskbar” and select “Task Manager” from the drop-up menu, in the Task Manager window select the “Services” tab at the top.

Open Task Manager - Now scroll down and locate “IAStorageDataMgrSvc”, once located check the “Status” as running if not then right-click on the Service and select “Start” from the drop-down menu.

Solution 2: Change the Start-up Type
- Press “Windows + R” type in “Services” and press “Enter”, in the Services window locate “Intel Rapid Storage Technology” from the list.
- Once located right-click on it and select “Properties” from the drop-down menu.
- In the Properties window change the “Startup Type” to “Automatic”, once done “Apply” all the changes and click on “OK”.

Startup type - Check to see if doing so fixes the IAStorDataSvc High CPU usage issue.

Solution 3: Update Intel Rapid Storage Technology Driver
- In the Windows search bar type in “Device Manager” and press “Enter”, in the Device Manager window expand the “Disk Drives” section and right-click the “RST” supporting the drive, from the drop-down menu then select “Update Device”.

Update Intel RST Driver - Now navigate to the official download website for Intel Rapid Technology and “Download” the latest version, once downloaded go through the installation wizard to install the software.

Solution 4: Disabling RST
You can get rid of the constant pop-ups by following the method below:
- Right-click on the “Taskbar” and select “Task Manager” from the menu, in the Task Manager window, select the “Startup” tab.
Open Task Manager - In the Startup tab select “RST” and click on “Disable” at the bottom, once done proceed to “Restart” your computer.
Follow the methods listed above to ix the high CPU usage caused by IAStorDataSvc and for any further assistance in this regard do Contact Us here.