Easily Fix VAC was Unable to Verify the Game Session [Complete Guide]
A lot of users were recently complaining about the VAC was Unable to Verify the Game Session error on their screens when trying to get into a match or launch CS: GO. Therefore, in this article, we have dedicated ourselves to deploying fixes and solutions for this issue.

Make sure to go through all the steps and ensure that you also read through the reasons due to which it occurs in the first place. Also, ensure that you try out all the solutions one by one and stop when one of them works out for you.
Before You Start:
Try to follow up with some of the basic troubleshooting tips first as soon as you encounter this error message on your screen as indexed below:
- The most basic method is to “Restart” your Steam client, for this quit your Steam client completely from the system icon tray in the taskbar, once completely out launch the Steam client again and check for the issue.
- If restarting Steam does not help you can try to “Log Out” of it. In the top right of the Steam Client window click on your “Username” written in blue, and from the drop-down menu click to select “Log Out”. Once logged out, put in your “Sign-In” credentials and log back into the game again.

Logout Steam - Also, temporary configuration files are constantly made on your computer when new programs are opened, such files can sometimes get corrupted causing programs to give errors. These temporary files are all deleted after a shutdown causing to remove the error. Therefore, “Restart” your computer manually from the Start menu as you would do and then get back into the game.

What Causes the VAC was Unable to Verify the Game Session Error?
When we were investigating this issue, we came to the conclusion that the following are the most important reasons due to which this error occurs.
- Missing Game Files: It is possible that Steam hasn’t been able to properly verify all of your game files and some of them are missing. Therefore, we recommend that you try and check for any missing files on your computer using Steam and check to see if doing that fixes the VAC was Unable to Verify the Game Session error.
- Outdated Drivers: In certain situations, you might be missing out on some important drivers that are necessary for your computer to run properly. Therefore, we suggest that you try and update your drivers and check to see if doing so fixes the issue.
- Damaged App: Some people were running into the issue because your Steam application might be damaged or it might be missing some important files. Therefore, we suggest that you try and repair the app and then check to see if doing so fixes the error.
- Antivirus Software: If the Antivirus software installed on your system is interfering with some Steam processes, it is possible that you will run into the VAC was Unable to Verify the Game Session error. Therefore, we strongly suggest that you try and disable it temporarily.
- Temporary Files: The Temporary files being stored by Steam, if corrupted, can end up causing this error message while trying to play or launch Counter-Strike Global Offensive. Therefore, we suggest that you clear out these temporary files and then check to see if you are able to fix this error.
- Download Cache: The downloads folder also has a separate cache of files that are stored by Steam. Therefore, we recommend that you try and clear out the downloads cache and then check to see if doing so fixes the VAC was Unable to Verify the Game Session error.
Now that you have been taken through almost all the possible reasons behind this issue, we can finally start implementing the solutions.
Fixing the VAC was unable to Verify the Game Session CSGO issue:
Fix 1: Verify Game Files
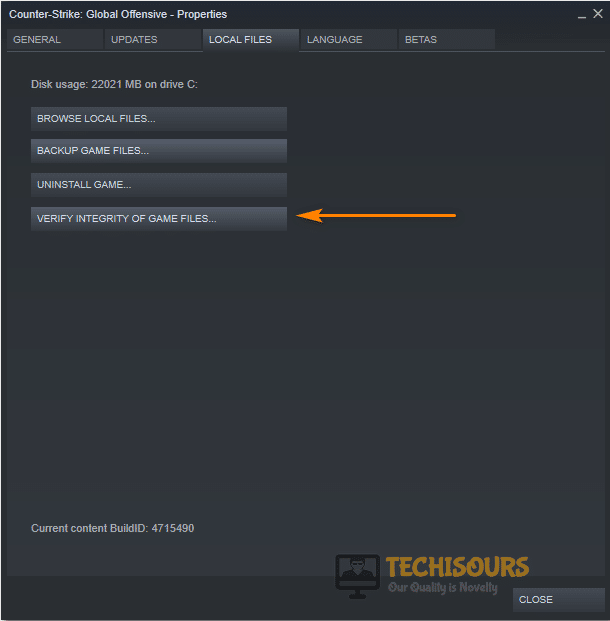
The Steam Client comes with a tool that helps verify the integrity of your games files, in case if you’re missing a file or two you can download only those specific files after verifying your game data.
- Launch “Steam” and go to your “Game Library” at the top, then right-click on “Counter-Strike Global Offensive” and select “Properties” from the drop-down menu.
- In the Properties window select “Local Files” on the left and then click on “Verify Integrity of Game Files”, while this process may take a while, and once done then check to see if the vac was unable to verify the game session error got resolved.

Verify Integrity of Game Files
Fix 2: Update Device Drivers
Having outdated display drivers can cause errors in a lot of games, having a high-end graphics card is a necessity for games now, and when you don’t have drivers installed for a card the card cannot function at its best. To update your Display Drivers follow this procedure:
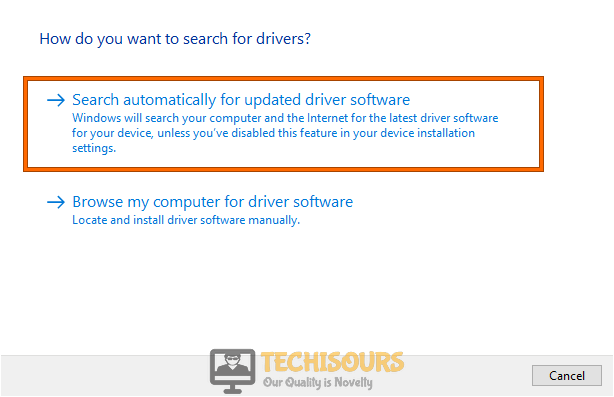
- In the search bar near the Start menu type in “Device Manager” and press “Enter”, when the Device Manager window opens up extend the menu for “Display Adapters” and right-click on your “Graphics Card”.
- From the drop-down menu choose to select “Update Drivers”, and in the following window select “Search Automatically For Updated Driver Software”. Windows will now start to search the internet for the latest driver and would “Download” and “Install” them automatically.

Search automatically for updated driver - Once you have updated your device drivers now check if the error persists or not.
Fix 3: Repair Steam.exe
The issue maybe caused due to corrupted Steam Client, the following method will help you fix any issues with Steam:
- On your keyboard press the “Window + R” keys together to open up the “Run” dialog box, in the Run prompt type in “cmd” and press “Enter”. When the Command Prompt window opens up type in the following command and hit the “Enter” key to execute it:
C:\Program Files (x86)\Steam\bin\SteamService.exe" /repair
- This may take some while, once done close the Command Prompt window and launch your game again to check whether vac was unable to verify the game session cs go issue still persists.
Fix 4: Disable Your Anti-Virus Temporarily
Your anti-malware software can stop some programs from functioning sometimes, you can try and disable your anti-virus temporarily to check if it solves the error. Proceed with the steps below:
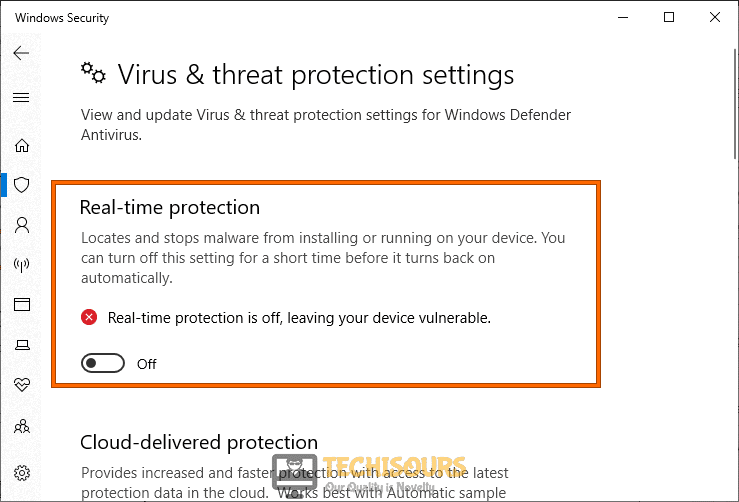
- In the search bar near the Start menu type in “Virus and Threat Protection” and click to open it from the search results.

Virus and Threat protection - Then select “Manage Settings” under “Virus and Threat Protection Settings”.
- In the following window press the toggle button under “Real-Time Protection” to turn it “OFF”, when you do so a pop-up screen will ask you for confirmation click to select “YES”.

Disable Real-time protection

Fix 5: Run Steam In Admin Mode
Running programs with administrative privileges helps them carry out tasks more freely, such is the case here. To allow Steam to work freely under administrative privileges follow this procedure:
- Navigate to the “Steam Installation Directory”, it is usually installed in “C:\Program Files (x86)\Steam”. Once inside the Steam folder locate the “Steam.exe File” and right-click on it to select “Properties” from the drop-down menu.
- In the Properties window click on the “Compatibility” tab at the top, in the Compatibility tab check the box in front of “Run This Program As Administrator”.

Run this program as an administrator - Once done “Apply” all the changes made and click on “OK”.

Fix 6: Turn Off Steam Beta
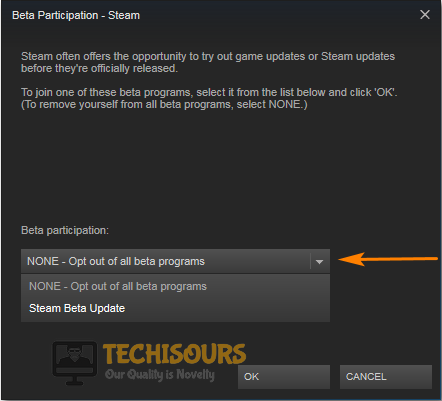
- Launch “Steam” on your computer and click on “Steam” in the top left corner, from the drop-down menu click to select “Settings”.
- In the Settings window click on “Account” from the left pane, and afterward, click on “Change” in the right pane of the following window, now select “NONE-Opt out of all Beta Programs” and then click on “OK”.

Opt-Out Of All Beta Programs
Fix 7: Uninstall Recently Installed Programs
If you’ve started to receive the error after recently installing a new program, you can try deleting it and then check for the issue. To do so follow this procedure:
- Open up the “Run” dialog box using the “Window + R” keys simultaneously on your keyboard, when the Run prompt opens up type in “appwiz.cpl” and press “Enter”.

Typing “appwiz.cpl” - In the pop-up “Programs and Features” window, scroll down through the list of installed programs to locate the recently installed program that you think is the culprit.
Note: Several users reported that the “Aim Lab” video game was causing this error hence if you’ve installed this software on your system too delete it. - Once located select the program and then click on the “Uninstall” button at the top, next follow the on-screen instruction to complete the uninstallation process and afterward check to see if the error got solved.

Fix 8: Restart CS GO Using the Console
When inside CS GO press the “`” key on your keyboard, it’s the key on top of “Tab”, this will open up an address bar in your game, in the address bar type in “Restart” and press “Enter”.
Fix 9: Repair System Files
You can also manually fix corrupted steam files by using the following method:
- Open up “This PC” and go to the following address:
C:\Program Files (x86)\Steam\SteamApps\common\Counter-Strike Global Offensive\csgo\maps\workshop
- Inside the “Workshop Folder” select all content using the “Ctrl + A” keys together on your keyboard and then press the “Shift + Del” keys.
- Now go to the address below and repeat the same steps by deleting all contents inside:
C:\Program Files (x86)\Steam\SteamApps\common\Counter-Strike Global Offensive\csgo\maps\graphs\workshop
- Once done launch “Steam” again and it will start downloading the missing files.
Fix 10: Renew IP Address
- On your keyboard press the “Window + X” keys simultaneously to open up the “Power User Menu”.
- From the menu click to select “Windows PowerShell (Admin)”, when the PowerShell window opens up type in the following commands and press “Enter” after each command:
start steam://flushconfig

ipconfig /release

ipconfig /renew
- Once all commands are executed, launch “Steam” and “CS GO” and check if the vac was unable to verify the game session csgo error got eradicated now.
Fix 11: Remove Background Processes
Some background processes can cause VAC not to work properly so you can try removing them to fix this issue. Proceed with the steps below:
- Press the “Window + R” keys simultaneously to open up the “Run” dialog box, in the address bar type in “services.msc” and press “Enter”.
- Inside the Services window, scroll down through the list to find any of the following services:
VMnetDHCP

VMUSBArbService

VMware NAT Service

VMwareHostd

VMAuthdService

Hshld
- If any of the above services are located, right-click and select “Disable” from the drop-down menu.
- Next, open up the “Task Manager” window using the “Ctrl + Alt + Del” keys on your keyboard, and inside the “Processes” tab locate any of the following processes:
hydra.exe

hsswd.exe

hsscp.exe

vmware.exe
- If located right-click and select “End Task” from the drop-down menu. Afterward, verify if the error still persists or not.
Fix 12: Verify DLL Files
- Navigate to the “Steam Installation Directory Folder”, this folder is usually found in the path mentioned below:
C>Program Files (x86)> Steam > Bin
- Inside the “Bin” folder locate the “Steamservice.dll File”, right-click the file, and select “Copy”, now go to the following address and paste the file inside. If you are asked to replace the file click on “YES”:
C>Program Files (x86)>Common Files> Steam
Fix 13: Delete Temporary Files
Windows create junk files and store them in a folder named Temp, these junk files should be removed by the user frequently to avoid the occurrence of any such errors:
- In the Cortana search bar type in “%Temp%” and press “Enter”, inside the Temp folder select all of the content using the “Ctrl + A” keys together and then press “Shift + Del” keys to delete them permanently.
Typing in “%temp%” - Then check to see if it was helpful in removing the vac was unable to verify the game session csgo error completely.

Fix 14: Set Launch Options
- Launch “Steam” on your computer and navigate to the “Library” tab, in the left pane scroll down to locate “Counter-Strike Global Offense”.
- Once located right-click on “CS GO” and select “Properties” from the drop-down menu.

Choose CSGO properties - In the “General” tab click on “Set Launch Options”. When the new window pops up type in “–verify” in the address bar and press “OK”.
- Now close the “Steam Client” and then “Restart” your computer.

Fix 15: Add Steam To the Exception List Of Your Anti-Virus
- In the Windows search bar type in “Virus and Threat Protection” and press “Enter”.
Virus and Threat protection - In the pop-up window click on “Manage Settings” under “Virus & Threat Protection Settings”.
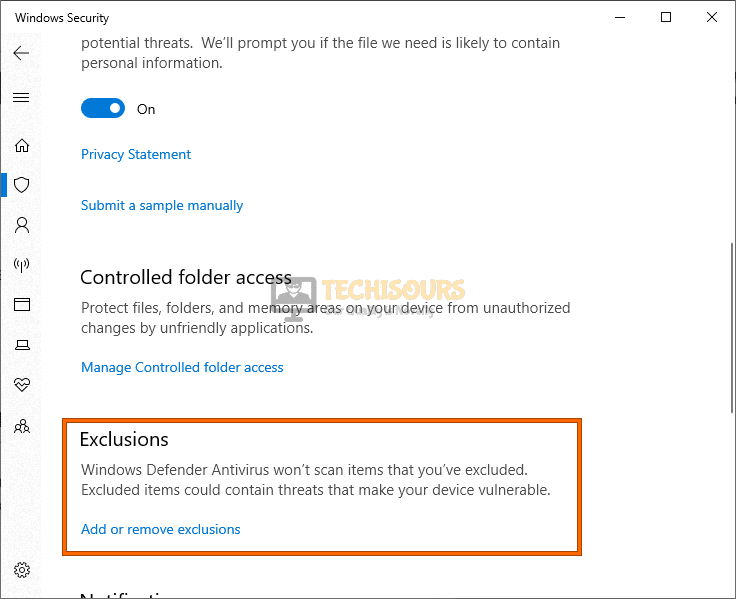
- In the Manage Settings menu scroll down to locate “Exclusions” and click on “Add Or Remove Exclusions”.

Add or remove exclusion - Then click on the “Add” or “+” icon and then make your way to the Steam Client directory mainly:
This PC > Local Disk C > Program Files (x86)
- Select the “Steam Folder” and afterward click on “Select Folder”.
Fix 16: Delete appcache Folder In Steam
- Navigate to the following address:
This PC > Local Disk C > Program Files (x86) > Steam
- Inside the “Steam” folder locate the “appcache” folder and delete it using the “Del” key on your keyboard.
Fix 17: Change Steam Account Name
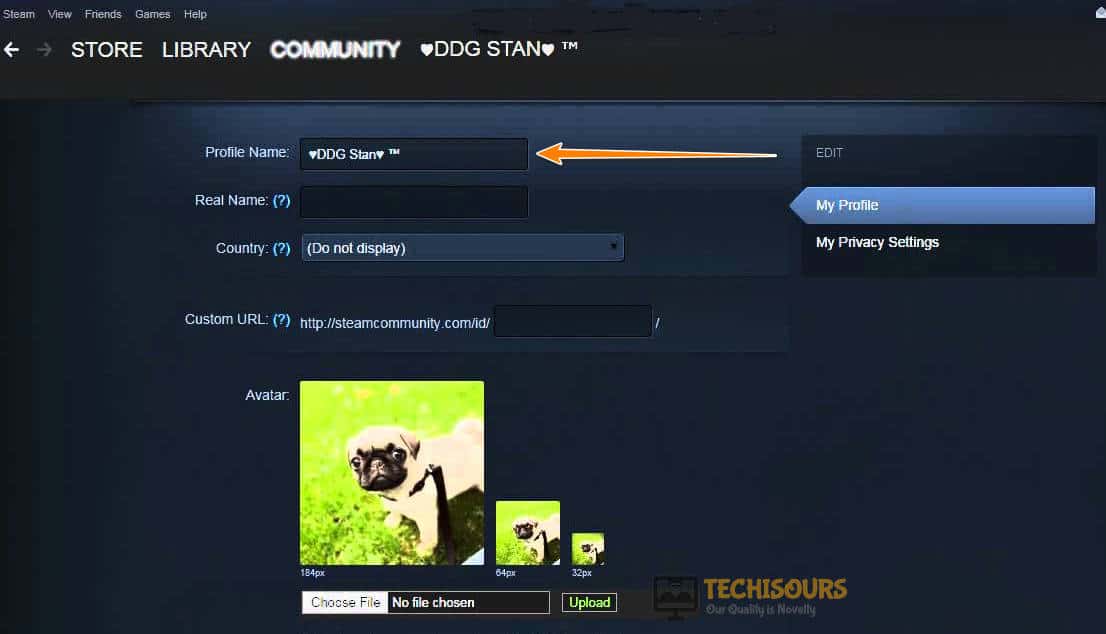
- Launch “Steam” on your computer and then click on your “Username” beside the “Community” tab, from the drop-down menu choose to select “Profile”.
- In the new window click on “Edit Profile” and then change your Profile name to as desired, once done click on “Save Changes” at the bottom.

Change Profile Name
Fix 18: Clear Download Cache
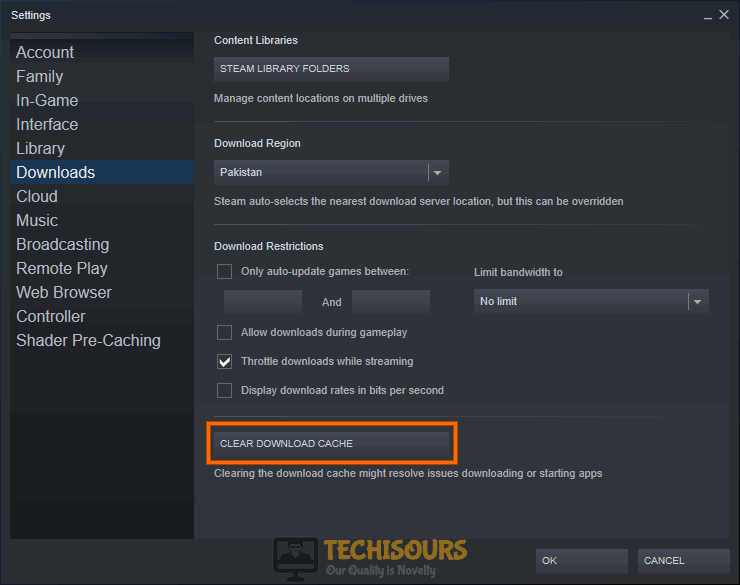
- Open “Steam” using the shortcut on your Desktop, and in the main steam window click on the “Steam” tab in the top left corner, then from the drop-down menu select “Settings”.
- When the Settings pop-up window opens up click on “Downloads” in the left pane and next click on “Clear Download Cache” in the right pane.

Clear Download cache - Next, click on “OK”, and then re-launch Steam to check if the error got eradicated now.
Fix 19: Download Microsoft Visual C++ and .Net Framework
- Go to the official Microsoft website and download the latest version for “Microsoft Visual C++ and .Net Framework”.
- Once downloaded run their setups and follow the on-screen instructions to complete the installation process.
- After installation, check to see if you have been able to fix the VAC was Unable to Verify the Game Session error.
Fix 20: Reinstall CSGO and Steam
If none of the solutions indexed above worked for you, then all you can do is reinstall Steam first, and if it does not succeed you can try re-installing CS GO.
To Reinstall Steam:
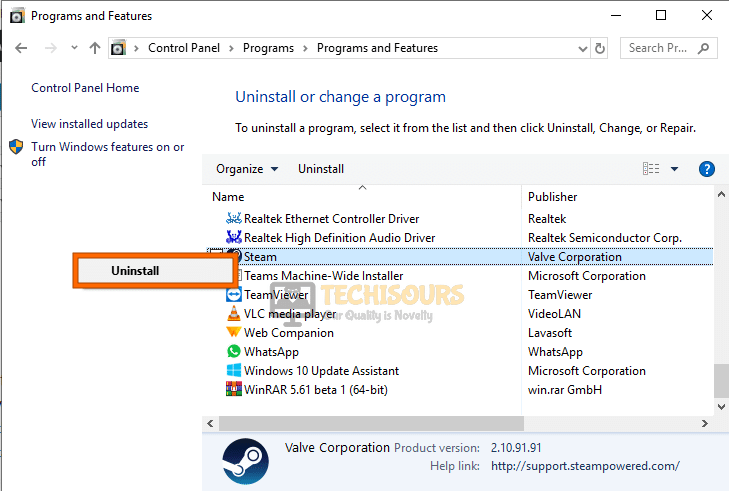
- Open up the “Run” dialog box using the “Window + R” keys together, then in the address bar type in “appwiz.cpl” and press “Enter”.
Typing “appwiz.cpl” - In the Programs and Features window scroll down to find “Steam”, once located right-click on it, and select “Uninstall”.

Uninstall Steam - Afterward, you can proceed to reinstall Steam from their official website.
To Reinstall CS GO:
- Navigate to the “Steam Library” in the “Steam Client”, and in the left pane right-click on “CS GO” and select “Uninstall” from the drop-down menu.

Uninstall CS GO - Afterward, proceed to reinstall CS GO from here.

Hopefully, the list of detailed solutions indexed above will successfully help you in fixing the error completely but if the error continues to stay feel free to Contact Us here.