League of Legends: A Critical Error has Occurred and the Process must be Terminated [Fixed Completely]
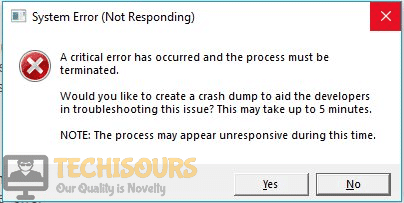
League of Legends is a well-known game that is played online all over the world. A number of League players have reported that after updating their game when they try to play a match, it crashed and a black screen is displayed. A message is displayed on the screen which states “A critical error has occurred and the process must be terminated”. This mostly happens when you select a champion and start the match.

What Causes the error “A critical error has occurred and the process must be terminated”?
There are a number of reasons that might be causing this trouble. Some of the most common are listed below:
- Weak internet connection might cause this trouble.
- This error mostly appears when you are playing this game on Windows 7 operating system.
- Your third-party antivirus software might be blocking some of the features of this game.
Pre Tips:
If you encounter this error message, before going to a major solution, restart your router by following the steps given below:
- Take out the plug of your router and wait for two minutes.
- Insert the plug of your router back in the socket.
- If you are still getting this error, change the location of your modem and move other wireless devices away from the modem to get a better signal strength.
- If it doesn’t help, try to connect your computer directly to the modem by using an ethernet cable.
What can i do if i get the “A Critical Error has Occurred and the Process must be Terminated” Error on League of Legends?
Solution 1: Disable Third-party Antivirus Softwares
If “a critical error has occurred and the process must be terminated” error message is still appearing on the screen, the reason might be that antivirus is blocking some features of the system. To resolve this error, add League of Legends as an exception to the antivirus software or turn-off your third party antiviruses and reboot the system to check if this problem is resolved.
Solution 2: Use Hextecch Repair Tool
Using a third-party repair tool to fix this problem has been proven a confirm solution in most of the cases. Follow the steps below to carry this task out.
- Download the Hextecch Repair tool from your favorite browser.
- Double-click the downloaded file and follow the on-screen instructions to install the software.
- When you run this tool, check the Reinstall box and click start.
- Launch the game and check if the issue is resolved.
Solution 3: Change some settings
If you still can’t get rid of this error, try to change some settings from the control panel and see if you can fix this error.
- Click the search button in the taskbar and open Control Panel.
- Click the View by option and select Small Icons.
Small Icons - Now open Network and Sharing Center.
Network and Sharing Center - Select Internet Options.
- Go to the Advanced tab.
- Now click the Reset button and click reset on the pop-up window.
Reset - Now check the box parallel to Delete Personal Settings.
Delete Personal Settings - Launch the game and check if the error message pops up again.
Solution 4: Remove the League of Legends client from Task manager
If your game is still crashing with this error message, Try through the following steps:
- Press ctrl+alt+delete from your keyboard.
- Click Task Manager.
- Go to Processes.
- Now remove any league of legends clients in action.
League of legends client - Launch the game again.
Solution 5: Changing LOL Settings
It was observed that the issue can be fixed simply by deleting some files from the game folder and getting rid of some configurations. In the steps below, we have listed the exact method to rid yourself of the Critical Error issue on League of Legends.
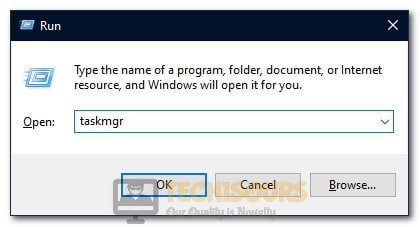
- Press “Windows” + “R” to open Run and type in “taskmgr”.
Opening Task Manager - Press the “Enter” key on your keyboard and wait for the task manager to open.
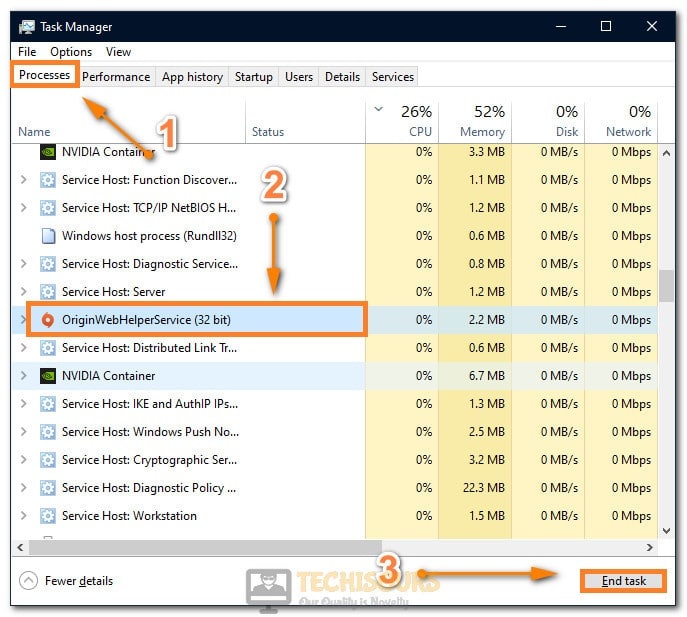
- Click on the “Processes” tab and end any other game/applications here that aren’t system related.
- End “Discord”, “Origin” and all other applications that might have an overlay or that function during the gameplay.
Ending Un-necessary Tasks - Now, right-click on the League of Legends shortcut and select “Open File Location”.
- In the game location, delete the “Config”, “Logs” and the “Data” folders to get rid of all older configurations.
- This will initiate a redownload of some basic configurations when the game restarts and you should be good to go once it finishes.
- After deleting the folders, right-click on the main executable of the game from where you launch it and select “Properties”.
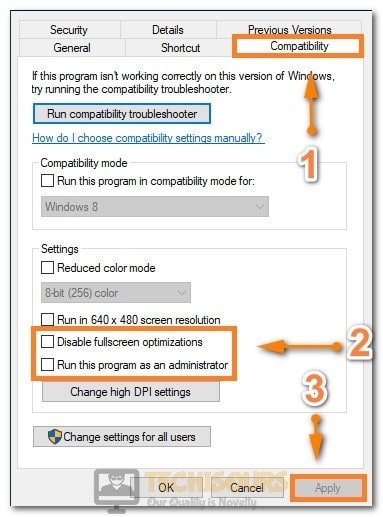
- In the game properties, click on the “Compatibility” tab and then check the “Disable Fullscreen Optimizations” tab.
- Also, check the “Run as Administrator” button.
Enabling all the options - Click on “Apply” and then on “OK”.
- In the end, make sure that the game is also allowed through your firewall.
- Check to see if the issue occurs again at startup.
Solution 6: Upgrading Windows
In most cases, a simple Windows upgrade from Windows 7 to Windows 10 is what fixes this issue for most users using the older operating systems. As we all know, Windows 7 in spite of being a fan favorite for a lot of years, is getting steamrolled by Microsoft’s latest operating system the Windows 10. As Windows 7 nears its inevitable death, there is no denying the outdatedness of its drivers, software, and configurations. Even game developers aren’t pushing to get their games fully compatible with older operating systems anymore so it seems logical that this error is occurring due to an incompatibility with your operating system and the game. Therefore, it is recommended to make an upgrade to the Windows 10 operating system and enjoy interruption-free gaming.
Solution 7: Applying Appimage on Wine
If you are using Wine to run this game on Linux or any other Unix based OS, then you should be facing this issue due to an absence of the special wine patch and custom libc. Therefore, it is recommended that you go over to this link and apply these both to your Wine installation before you can try running the game. Make sure to adjust some variables such as your Game installation path before you try to run it.
Solution 8: Uninstall Geforce Experience
It was discovered that some users were facing this issue due to interference from their Geforce Experience application. Therefore, in this solution, we will be uninstalling this application from our computer which shouldn’t have any side effects if your Graphics Drivers are up to date and installed properly.
- Press “Windows” + “R” to open Run and type in “Appwiz.cpl” to launch the app management window.
Typing in “Appwiz.cpl” and pressing “Enter” - In here, find Geforce Experience, right-click on it and select “Uninstall”.
- Follow the on-screen prompts to remove this application from your computer.
- Check to see if the issue persists.
If you need further assistance, click here.


