How to Fix “The Object Invoked has Disconnected from its Clients” Error on Windows 10
As you try to open an application, it fails to open and you see a message displaying “the object Invoked has disconnected from its clients“. You can also sometimes see this while logging into your Windows account and in this text, we have addressed and fixed this issue completely.

What does the “the object invoked has disconnected from its clients” error mean?
As soon the “The Object Invoked has Disconnected From its Clients” error message is displayed on the computer screen, It means that the specific program which is assigned to open a file particular fails to open that file and it is also common while opening a “jpg” file. By the object, the Computer means that the specific file you are trying to open.
PreTips
Before going towards the concrete solutions you should try the following methods which might help in resolving the situation such as:
- Restart the computer
- Restart the window explorer
What to do if you see the “The Object Invoked has Disconnected From its Clients” Error?
The following solutions would help you remove the error
Method 1:End the explorer.exe process
- Press the Ctrl + Shift + Esc keys to open Task Manager.
Task Manager - Locate the “explorer.exe” process and right-click it.
- Then click on the “end task” process to end it.
- Once the process has been ended, repeat “Step 1”.
- Then click” File > Run new task.”
Running new task - Type” explorer.exe” and click the “OK” button.
Method 2: Change the default application
The error is due to the application that is used to launch the program. Changing the default application will also help to remove the error. In order to do so:
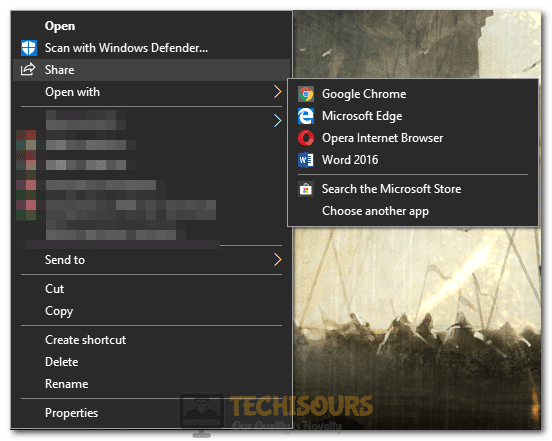
- Right-click the file that displays the “the object invoked has disconnected from its clients” error message when you try to open it.
- Choose “open with” and click on choose from another app.
Clicking on Open With - Select another program.
- Click OK.
- Restart your computer.
Method 3: Enable Secure Boot
You can also login to your PC by using the “Secure Boot” enabled. This would help your system to stop all the harmful applications. In order to enable this mode you have to follow the steps mentioned below:
- Restart your computer.
- Once on the boot screen, press the appropriate key to bring up your PC’s UEFI.
- Go to the security settings
- Click on the “secure boot “option.
- Click on the “Enable” option and save the changes.
Method 4:Use system file checker
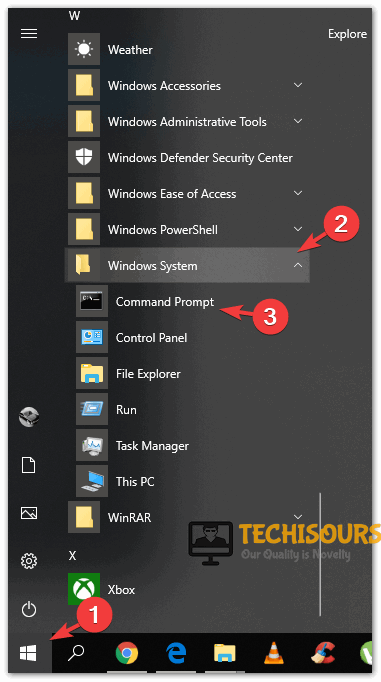
- Click on the start button, and search for the “Windows System” folder.
- Open the folder and click on the Command Prompt.
- Type in “cd”.
- Press enter.
- Type”sfc/scannow” and press “Enter” again.
sfc /scannow - Restart your computer.
For further detail and information click here. You can also contact Microsoft support to fix this issue.


