Fix: Unexpected Store Exception Error on Windows
A lot of users have been recently asking us to look into the Unexpected Store Exception error on Windows 10 that apparently prevents them from being able to properly run the computer and sometimes even results in a BSOD. Therefore, in this step, we will be completely fixing this issue by going through some basic troubleshooting techniques and steps.

What Causes the Unexpected Store Exception Error?
After getting through some basic troubleshooting guides, we came to the conclusion that the following are some of the most common reasons due to which this error surfaces on Windows.
- Fast Startup: In some cases, the Fast Startup feature can prevent the proper functioning of the computer by skipping upon the loading process of some important system files. Therefore, you might be getting the unexpected Store exception error due to that.
- Power Settings: If you haven’t properly configured the power settings on your computer, it is important that you try and do so as mentioned in the steps below. Make sure that the system isn’t set to turn certain features off in order to conserve power.
- USB Driver: On some laptops and desktops, the operating system might install incorrect or misconfigured drivers that can prevent the proper dispensation of system resources and it might cause the Unexpected Store Exception Error. Therefore, it is recommended that you try and reinstall the correct driver.
- File History: File History is a Windows 10 feature that lets the user know the last files or folders that they went through. However, sometimes, if misconfigured or malfunctioned, this feature can prevent the computer from running effectively by triggering the unexpected store exception error.
Now that you have been made familiar with most of the reasons behind its occurrence, we feel its finally time to move on towards fixing this issue.
Before we start:
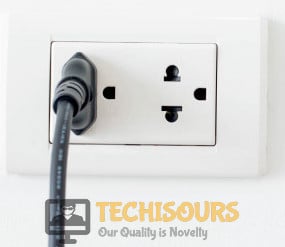
- Take the power adapter of your computer out of the socket and shut it down completely.
Power cycle Computer - After waiting for about 2 minutes, insert the adapter back into the power socket and restart your computer. Make sure you log in as an administrator this time.
- Now press the “Win + I” keys simultaneously on the keyboard to open “Settings” and then navigate to the “Update and Security” option.
Update and Security - From the left pane, navigate to “Troubleshoot” and then click on the “Run the Troubleshooter” associated with “Windows Update” located at the right side of the window.
Run the Troubleshooter
How to fix Unexpected Store Exception Issue on Windows:
Solution 1: Disable Fast Startup
- Click on the “Search” button on the taskbar and type “cmd” in the text field.
- Now right-click on the “Command Prompt” option and select “Run as administrator”.
Run Command Prompt - Type the following command in the command prompt and hit the “Enter” key on the keyboard to execute it:
powercfg -h off
- When the fast startup is disabled, reboot your computer and check whether the Unexpected store exception message is fixed.
Solution 2: Tweak Power Settings
- Press “Win + R” keys simultaneously on the keyboard to open the run box. Type “powercfg.cpl” and hit Enter to launch the Power Options menu.
Typing in “powercfg.cpl” Command - From the left pane of the window, click on the “Change when the computer sleeps” option.
Choose Computer Sleep Option - Now set the “Put the computer to sleep” option to “Never” and click on Save changes button.
Tweak Power Settings
Solution 3: Uninstall Realtek USB Driver (Dell Users)
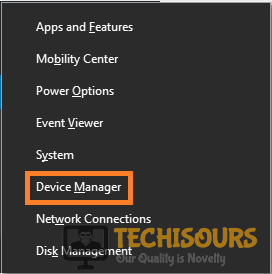
- Press “Windows + X” keys simultaneously and click on the “Device Manager” from the list.
Open Device Manager - Locate the “Universal Serial Bus Controllers” from the list and expand the list to find “Realtek USB 2.0 Card Reader” driver.
Locate USB Controllers Option - After finding this driver in the list right-click on it and click on the “Uninstall device” option.
- A confirmation dialog will appear in front of you and click on “Uninstall” to remove the driver from your system.
- Now, restart your PC to automatically install the default USB driver, and hopefully, after the restart, the store exception issue should be sorted.
Solution 4: Perform a Disk Cleanup
- Double-click on the “This PC” icon located on the desktop to open the File Explorer.
- Now right-click on any of your disk partition and select “Properties” from the pop-up menu.
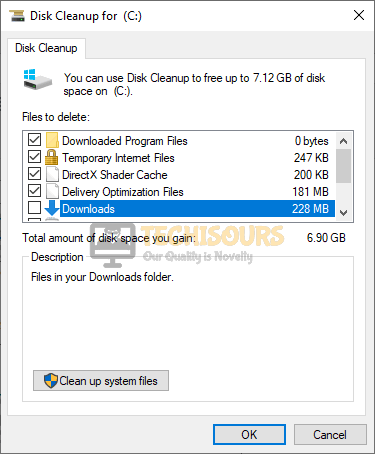
- Under the “General” tab, click on the “Disk Cleanup” button.
Run Disk Cleanup - Now check the boxes parallel to all the entries located under the “Files to delete” section and click on “OK”.
Delete files
Solution 5: Perform Scan For Corrupt System Files
- Right-click on the “Search” icon located on the taskbar and search for “cmd”.
- Now right-click on the “Command Prompt” option and select “Run as administrator”.
Run Command Prompt - Now type the following commands and hit the “Enter” key on the keyboard to execute the following commands in the Command Window one by one:
sfc /scannow
dism.exe /Online /Cleanup-image /Restorehealth
- We also recommend you to run the CHKDSK utility to scan your disks for any corrupted files. Please execute the following command in the command prompt and see if the issue is resolved.
Note: X represents the letter of your source drive.chkdsk X: /f /r
Solution 6: Temporary Turn OFF Protection
Windows defender firewall:
- Click on the “Windows” icon located on the taskbar and select “Run box” from the pop-up menu.
- In the run box, type “Control panel” and hit the “Enter” key on the keyboard to open the Control panel.
Typing in Control Panel - Now select “Large Icons” from the “View by” drop-down list located on the top-right corner of the screen and then click on the “Windows Defender Firewall” option.
Windows Defender Firewall - From the left pane, click on the “Turn Windows Defender Firewall on or off” option.
Turn Windows Defender Firewall on or off - Now check the boxes parallel to “Turn off Windows defender firewall” under both “Public network settings” and “Private network settings” sections.
Turn off Windows defender firewall
Third-Party Antivirus application (AVG Users):
- Click on the “^” icon located on the right side of the taskbar to open the System tray and locate the icon of antivirus installed on your PC.
- Now right-click on your antivirus icon and disable the toggle button parallel to “Protection is ON” to disable the antivirus completely.
Disable antivirus
Note: If you have any other antivirus installed on your PC, you can follow a similar procedure to disable it.
Solution 7: Update or Reinstall Graphics Driver
- Right-click on the “Windows” icon located at the toolbar and choose “Device Manager”.
Open Device Manager - In the device manager wizard, click on the “Display adapters” option to expand the list of graphic card drivers installed on your computer and double-click on the dedicated driver to open its properties.
Click Display Adapters - Navigate to the “Driver” tab and click on the “Update driver” button.
Update Graphics Driver - Now click on the “Search automatically for updated driver software” button to install the latest version of the driver on your computer.
- Even after updating the driver, the issue is not resolved, try to click on the “Uninstall device” button to uninstall the video card driver completely from your PC.
Uninstall Graphics driver - After uninstalling the driver, restart your computer to automatically install the latest version of the driver on your computer.
Solution 8: Run a Command in Admin Mode
- Click on the “Search” button on the taskbar and type “cmd” in the text field.
- Now right-click on the “Command Prompt” option and select “Run as administrator”.
Run command Prompt - In the command window type the following command and hit “Enter” key to execute it:
Get-AppxPackage -allUsers | Foreach {Add-AppxPackage -DisableDevelopmentMode -Register "$($_.installLocation)\appxbundlemanifest.xml"} - Once the running process is complete restart your system and check whether the unexpected store exception issue is fixed on Windows.
Solution 9: Disable File History
- Click on the “Windows” icon located on the taskbar and select “Run box” from the pop-up menu.
- In the run box, type “Control panel” and hit the “Enter” key on the keyboard to open the Control panel.
Typing in Control Panel - Find the “Update and Security” option in the window and choose the “Backup” option located at the left side of the window.
Click on Backup Option - Now, turn off the Automatically back up my files option. Note: If this program is not available, it means that the feature is not running on your PC.
Solution 10: Update Your BIOS
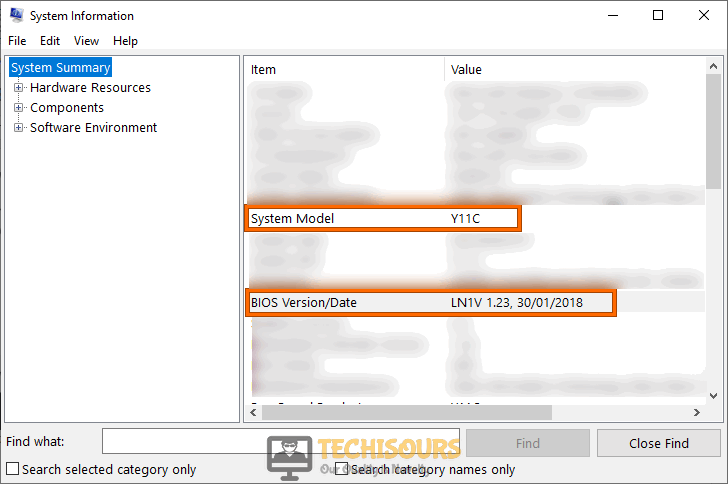
- Click on the Search button in the taskbar and search for System Information.
Check System Information - Note down the System Model and BIOS version of your computer.
Check BIOS version - Now launch your favorite browser and type your computer’s manufacturer name, your computer’s model name, and BIOS in the search bar and open a relevant link.
- Find the BIOS update file and download it after making sure that it is up to date.
- Now right-click on the downloaded BIOS files and click Extract Here.
- Plug-in a USB drive in your computer and copy the BIOS files into that USB drive.
- Now restart your computer and enter BIOS settings.
Note: Every computer has a different procedure to enter BIOS settings. - Go to the Boot tab and select the USB drive you have inserted.
- Now navigate to the Advanced tab and select the Start Flash option and it will start your update.
- Do not turn off your computer while the BIOS is updating. The computer will restart automatically when the update is fully installed.
Workaround:
This error might arise due to a faulty hard drive and several users reported that replacing the old hard drive with the new one resolved the issue for them. Before buying a new hard drive it is better to check the hard drive’s current status by typing the following command in the command window:
wmic diskdrive get model,status

It will return “Pred Fail” if your drive’s death is imminent, or “OK” if your hard drive is working fine.
Hopefully, the error might have gone by now but if you need further assistance, contact here.


