Fix: Problem with Wireless Adapter or Access Point Error [Complete Guide]
Windows 10 is the latest offering from Microsoft after Windows 8 but if it retains something from its predecessor, it is the general bugs and glitches that seem to come out of nowhere. Many people have been recently complaining that while using the Windows Network Troubleshooter it shows the ‘Problem with Wireless Adapter or Access Point‘ Error and it is unable to fix it automatically.

What Causes the Problem with Wireless Adapter or Access Point Error on Windows Troubleshooter?
After sifting through some basic troubleshooting guides, we came to the conclusion that the following are some of the most prominent triggers behind this error.
- Disabled Adapter: Sometimes, it is possible that the Network adapter that you are using on your computer has been disabled either by you or by some third-party application due to which you are running into the Problem with a wireless adapter or access point issue on your computer.
- Wireless Profile: It is evident by our investigation that in some cases the wireless profile that you are using on your computer can be corrupted due to which you might run into this issue while trying to run the network troubleshooter for your computer.
- Outdated Drivers: Also an important reason that many people seem to overlook is outdated drivers. Outdated Network drivers are often known to cause network connection issues with Windows and apparently if your network adapters aren’t updated to the latest available version, you might run into this issue.
- Firewall: Windows Firewall can sometimes block certain features of the operating system itself if it deems then dangerous and since it is far from perfect, it often suspects them due to a false positive.
- Viruses/Malware: In some situations, Viruses or malware from the internet can latch itself to your computer and prevent you from being able to access the internet. In addition to this, when the troubleshooter is run, it can trigger the Problem with Wireless Adapter or Access Point issue.
- Performance Plan: If you have selected a power-saving or moderate plan on your computer, it is possible that the computer is temporarily disabling certain adapters or features to save power. Therefore, it is recommended to follow the guide below and put the High-Performance plan to fix the Problem with Wireless Adapter or Access Point Issue.
Now that you have finally finished with the reasons, we can move on towards implementing the fixes, solutions, and workarounds that we discovered.
Before we start:
- Take the power adapter of your router and the computer out of the socket and wait for at least 5 minutes after shutting them down.

Plugging out the power cable - When the waiting period is over, re-insert the power adapter of your router back into the socket and power it up.
- When the router has acquired full signal strength, turn your computer ON and check if the network shows a good signal strength on the computer screen.
- If not, then proceed to forget the current network and re-connect to it by carefully typing the correct password and SSID.
- If you still encounter an issue with the network adapter, we recommend you to switch to a wired network by connecting your computer directly to the router via Ethernet cable.

Choose Ethernet cable - You can also try to connect your computer to your mobile network by creating a “Hotspot” and confirm whether the issue is with the home network or not.
- We also recommend you to make sure that the firmware of your home network is up-to-date. If not, then contact your ISP and get it updated.


Fixing the Problem with Wireless Adapter or Access Point Error:
Solution 1: Enable your Wireless Adapter
- Right-click on the “Windows” icon located on the taskbar and choose “Device Manager” from the pop-up menu.

Open Device Manager - Now click on the “Network Adapters” to expand the list of network drivers installed on your PC.

Selecting Network Adapters - Now double-click on your wireless adapter and navigate to the “Drivers” tab.
- Click on the “Enable device” button to enable the network driver installed on your computer.
- After enabling the driver, hopefully, the issue with the network adapter would be resolved.


Solution 2: Remove your Wireless Profile
- Click on the “Search” button located on the taskbar and type in “cmd”.
- Now right-click on the “Command Prompt” and select “Run as administrator”.

Run Command Prompt - Now type the following command in the command prompt and hit enter to remove the wireless profile from your PC.
netsh wlan delete profile name="WirelessProfileName"
- When the above command is executed successfully, check whether you still encounter the problem with wireless adapter or access point.

Solution 3: Update your device drivers Automatically
- Launch your favorite browser and download Driver Easy from its official website.
- When the tool is downloaded on your PC, double-click on it to open the installation wizard and follow the on-screen instructions to install it on your computer.
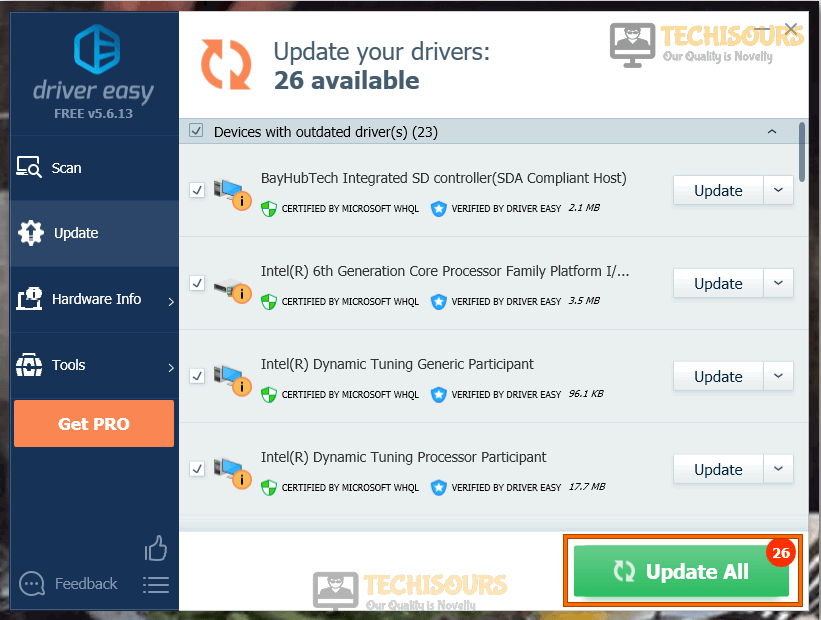
- Now launch the tool and click on the “Scan Now” button to scan for all the outdated drivers on your PC.

Clicking Scan now - When a list of all the outdated device drivers is displayed on the screen, click on the “Update all” button to update all of these drivers collectively.

Update Drivers - When all the drivers are updated, check if you encounter the same issue with the wireless adapter again.

Solution 4: Update or reinstall your network adapter manually
- Right-click on the “Windows” icon located on the taskbar and choose “Device Manager” from the pop-up menu.
Open Device Manager - Now click on the “Network Adapters” to expand the list of network drivers installed on your PC.
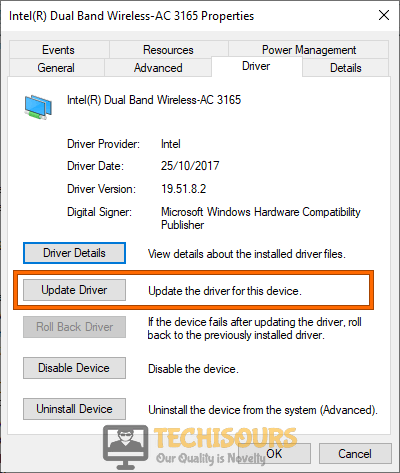
Selecting Network Adapters - Now double-click on your wireless adapter and navigate to the “Drivers” tab.
- Click on the “Update driver” button to install the latest version of that driver on your computer.

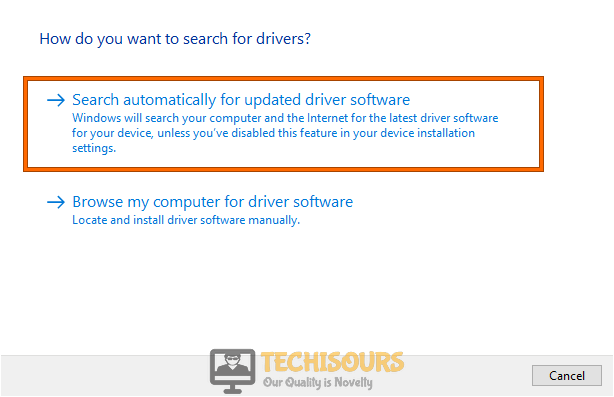
Update driver - Now choose the “Automatically search for updated driver software” option and wait till your driver is updated.

Search automatically for updated driver
If updating the driver doesn’t fix your issue, we recommend you to re-install it by following the steps indexed below.
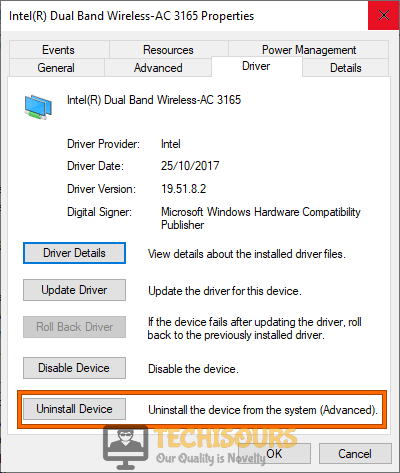
- Follow “Steps 1-3”, listed above, to open the driver properties and click on the “Uninstall device” button.
Uninstall driver - When the driver is uninstalled, reboot your computer to automatically install the latest version of the driver on your computer.
- Now open the driver properties again and navigate to the “Power Management” tab.
- Uncheck the box parallel to “Allow the computer to turn off this device to save power” and apply the settings.
Change Power Management - After applying the changes, reboot checks whether the network adapter shows any issue again on your PC.

Solution 5: Reset Winsock and Flush DNS
- Click on the “Search” button located on the taskbar and type in “cmd”.
- Now right-click on the “Command Prompt” and select “Run as administrator”.
Run Command Prompt - Now type the following commands in the command prompt, one by one, and hit the “Enter” key on the keyboard to execute them.
netsh winsock reset
netsh int ip reset
ipconfig /release
ipconfig /renew
ipconfig /flushdns
- When the above commands are executed successfully, check whether you still encounter the problem with wireless adapter or access point.
Solution 6: Disable the Active Firewalls
Windows Defender Firewall:
- Click on the “Windows” icon located on the taskbar and select “run” from the pop-up menu.

Click on Run Option - Now type “Control panel” in the run box and hit the “Enter” key on the keyboard to open the control panel.

Typing in Control Panel - Now select “Large Icons” from the “View by” drop-down list located on the top-right corner of the screen and click on “Windows Defender Firewall”.

Windows Defender Firewall - From the left pane, locate and click on the “Turn Windows defender firewall on or off” option.

Turn Windows defender firewall on or off - Now check the box parallel to “Turn Windows defender firewall on or off” under both “Private network settings” and “Public network settings” sections.
Turn off Windows defender firewall - Now apply the settings.


Third-party antivirus software:
- Click on the “^” icon located on the taskbar to open the System tray and right-click on the “Antivirus icon” installed on your PC.
- Now click on the “Avast Shield Control” and choose the “Disable Permanently” option to disable your antivirus software.

Disable antivirus permanently - When the antivirus software is disabled, reboot your system and check whether the Network adapter works normally now.

Note: If you have an active VPN, installed on your PC, we highly recommend you to disable it.
Solution 7: Disable the IP Helper Service
- Right-click on the “Windows” icon located on the taskbar and choose “Run” from the pop-up menu.
Click on Run Option - In the run box, type “services.msc” command and hit enter to open the services app.

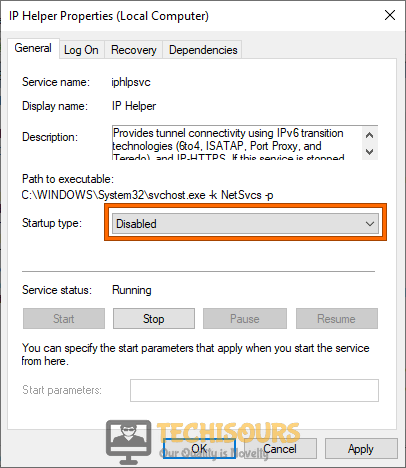
Typing in “services.msc” - From the right pane of the Services app, double-click on the “IP Helper” service to open its properties.

Open IP helper - Now choose “Disable” from the “Startup type” drop-down menu and save the settings.

Disable service - Now proceed to the “Log On” tab and click on the “Browse” button.
Click on “Browse” - Type your account name in the text field associated with “Enter the object name to select” and click on the “Check Names” button.

Click on “Check Names” - Now click on the “OK” button and wait while your account name becomes recognized.
- After applying the above settings, reboot your computer and see whether the problem with wireless adapter or access point persists.


Solution 8: Scan your system for viruses
- Press “Win + I” keys simultaneously on the keyboard to open the System Settings and go to the “Update and Security” option.

Update and Security - From the left pane, choose “Windows Security” and then click on “Virus and Threat Protection” located on the right side of the window.
Click Virus and threat protection - Now click on the “Quick Scan” button and wait while the computer scans for viruses and threats and remove them.

Quick Scan - When the scanning process is finished, reboot your system and see if the Wireless adapter problem is rectified.


Solution 9: Enable WMM Option for Your Router
Method 1:
- Right-click on the “Windows” icon located on the taskbar and choose “Device Manager” from the pop-up menu.
Open Device Manager - Now click on the “Network Adapters” to expand the list of network drivers installed on your PC.
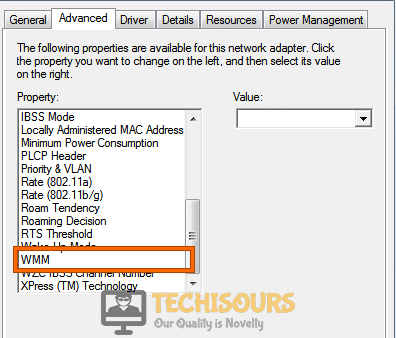
Selecting Network Adapters - Now double-click on your wireless adapter and navigate to the “Advanced” tab.
- Locate “WMM” under the list of “Properties” and select “Enable” from the drop-down list associated with “Value”.

Enable WMM Option - Apply the settings and reboot your computer to see if the issue with the wireless adapter has been resolved.
Method 2:
- Click on the “Search” button located on the taskbar and type in “cmd”.
- Now right-click on the “Command Prompt” and select “Run as administrator”.
Run Command Prompt - Now execute the following command and note down the Default Gateway under the “Ethernet” or “Wi-Fi” section:
ipconfig

Note Down Default Gateway - Copy the router’s Default Gateway IP Address and paste it in your browser’s search bar to open your “Network’s user interface”.
- Now navigate to the “Wireless” tab and locate the “WMM Support” settings.
- Select “Enable” from the drop-down list located parallel to the “WMM Support” settings.
- Save the settings, reboot your PC, and hopefully the problem with wireless adapter or access point would’ve be resolved.

Solution 10: Use High-performance power plan
- Click on the “Windows” icon located on the taskbar and select “Run” from the pop-up menu.
Click on Run Option - Now type “Control panel” in the run box and hit the “Enter” key on the keyboard to open the control panel.
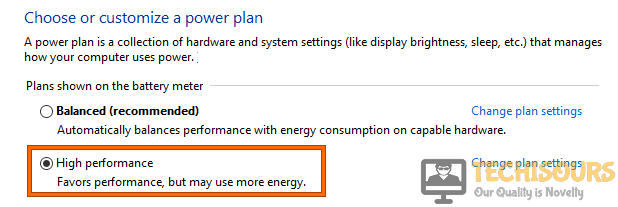
Typing in Control Panel - From the top-right corner of the screen, set the “View By:” option to “Large Icons” and select “Power Option”.
- Now check the box parallel to the “High Performance” option to use the High-Performance profile.

Click on High Performance
Solution 11: Tweak Network Settings
- Press “Win + I” keys simultaneously on the keyboard to open the System Settings and proceed to “Network and Internet”.
Network and Internet - From the left pane, navigate to the “Wi-Fi” tab and click your active network located at the top of the screen.
- Now scroll down and enable the toggle button located under the “Metered Connection” section.

Set as metered connection - After propagating the changes, see if your wireless adapter problem is terminated.


Solution 12: Reset your network
- Press “Win + I” keys simultaneously on the keyboard to open the System Settings and proceed to “Network and Internet”.
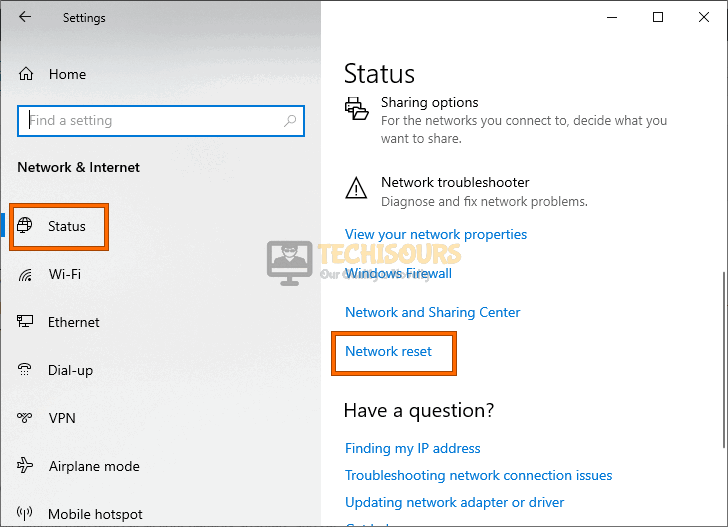
Network and Internet - From the left pane, navigate to the “Status” tab and click on the “Network Reset” option located at the bottom of the screen.

Click Network Reset - Now click on the “Reset Now” button to reset your network immediately and afterward, check whether the problem with wireless adapter or access point has been resolved.
Reset now

Solution 13: Tweak Control Panel Settings
- Now type “Control panel” in the run box and hit the “Enter” key on the keyboard to open the control panel.
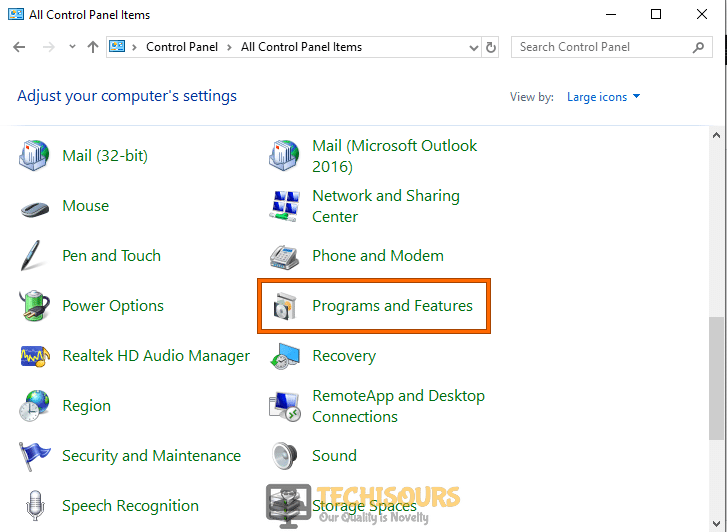
Typing in Control Panel - Now select “Large Icons” from the “View by” drop-down list located on the top-right corner of the screen and click on “Programs and Features”.

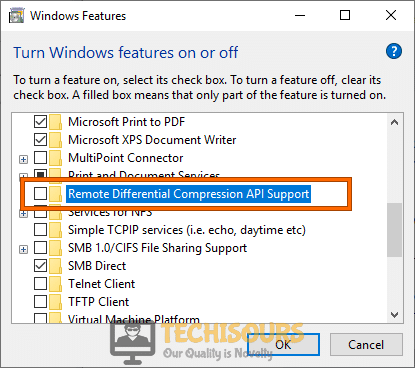
Click Programs and Features - From the left pane, click on the “Turn Windows features on or off” option and then uncheck the box parallel to “Remote Differential Compression API Support”

Remote Differential Compression API Support - Now press “Win + R” keys simultaneously on the keyboard to open the run box and search for the “ncpa.cpl ” command.

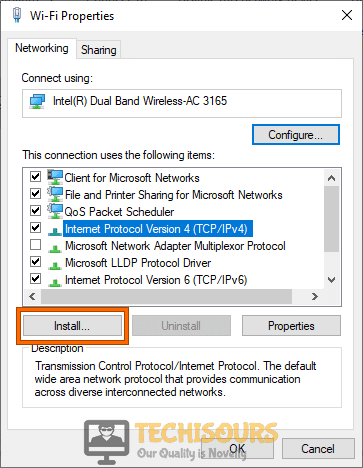
Enter Command - Now right-click on your active network connection and choose “Properties” from the pop-up menu.
- Make sure that “Internet Protocol Version (TCP/IP)” is installed. If it is not installed, click on the “Install” button and install it.

Install Internet Protocol

Solution 14: Hard reset your router
- Power off your router and locate the “Reset” button at the back of your router.
- Push the Reset button with the help of a paper clip and hold it for at least “30 seconds”.
- When all the router’s LEDs go dim, release the button and wait for the device to boot up after the reset.
Solution 15: Check for Windows updates
- Press “Win + I” keys simultaneously on the keyboard to open the System Settings and go to “Update and Security”.
Click Update and Security - From the left pane, choose the “Windows Update” tab and then click on the “Check for updates” button located on the right- side of the screen.
Check for updates - After updating your Windows to the latest build, reboot your system and see whether your network adapter is working normally now.

Solution 16: Reset your PC
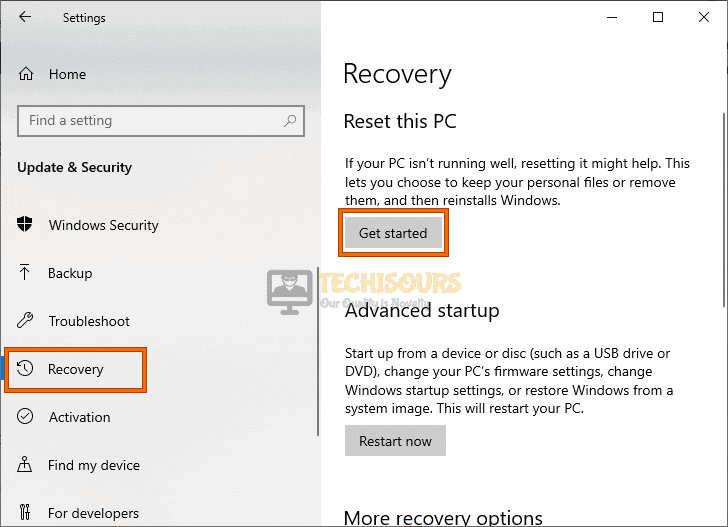
- Press “Win + I” keys simultaneously on the keyboard to open the System Settings and go to “Update and Security”.
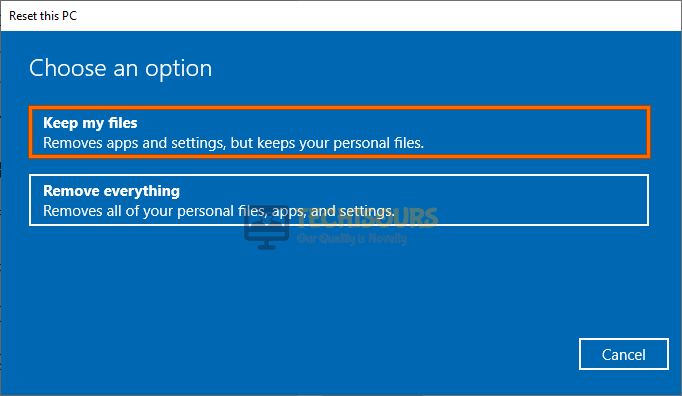
Choosing Update and Security - From the left pane, select the “Recovery” tab and then click on the “Get started” button located under the “Reset this PC” section.
Reset this PC - Now select the “Keep my files” option and follow the on-screen instructions to proceed with resetting your PC.

Choose Keep my files Option
Note: Resetting your PC requires great care and experience. If you don’t have much knowledge about resetting your PC, we recommend you to take assistance from an expert.
Workaround:
If you still haven’t managed to get around this issue, then we recommend you to buy a Wireless USB Wireless Adapter for your PC. Numerous users have reported that they got rid of the Network adapter issue just by installing a USB Wifi adapter with their computers.
Hopefully, the error might have gone by now but if you need further assistance, contact here.