Easily Fix FilenotFoundError: [Winerror 2] the system cannot find the file specified
A lot of programmers have been getting the “filenotfounderror: [winerror 2] the system cannot find the file specified” message and this is a common programming error that can be caused due to a wide variety of different reasons. In this article, we have dedicated ourselves to fixing this issue.
![filenotfounderror: [winerror 2] the system cannot find the file specified](https://techisours.com/wp-content/uploads/2021/03/55053699-0f9bbc80-506e-11e9-92de-f2d74ab2a96a.png)
What Causes the “filenotfounderror: [winerror 2] the system cannot find the file specified” Error?
After going through a lot of different user feedback-based messages, we concluded that the following must be the primary reasons due to which this error occurs.
- Coding Faults: There exist a variety of different faults that might be present in your code that can cause the “filenotfounderror: [winerror 2] the system cannot find the file specified” error and if not fixed timely, you will run into this error message. Therefore, we recommend that you try and straighten out your code or ask a question on Github regarding it where programmers could troubleshoot it and help you in running it more efficiently.
- Admin Permissions: In some cases, the admin permissions might be missing and due to this, the IDE might be unable to properly execute the code. Therefore, we recommend that after verifying the syntax of your code, you run it with admin permissions to fix the “filenotfounderror: [winerror 2] the system cannot find the file specified” error.
- Antivirus Prevention: The antivirus installed on your computer might be preventing the code from being executed by not letting it through the operating system’s firewall. Therefore, we insist that you disable the Antivirus temporarily and then check to see if doing so fixes the issue.
Now that you have been made familiar with most of the reasons, we can finally start implementing the fixes.
Fixing the FileNotFoundError: [WinError 2] The system cannot find the file specified issue:
Solution 1: Change the Order Of Slashes
Sometimes the use of incorrect slashes can also trigger this error. So try converting your “Forward Slashes /” into “Backward Slashes \” and vice versa and afterward proceed to check if this fixes your error.
Solution 2: Try Setting Up Your Environment
- On your PC open up the “Anaconda Prompt” and activate your environment (optional for non-env users).
- Then type in the following command:
python –m ipykernel install –user
- Now launch your jupyter notebook and check if it works fine for you.
Solution 3: Change Your Environment Variables
Follow the steps below to change your environment variables:
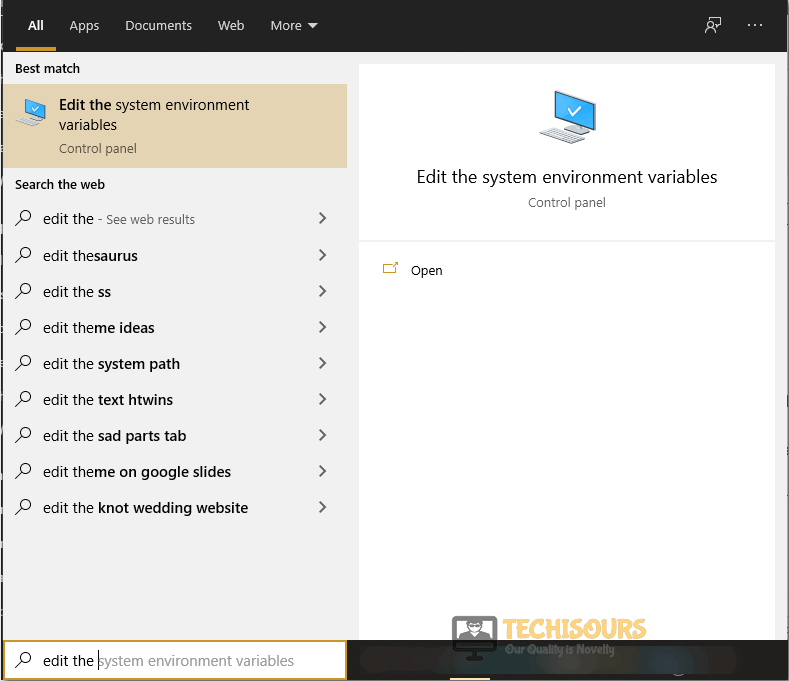
- In the search bar near the Start menu search for “Edit the System Environment Variables” and choose to select it from the search results.
Edit the system Environmental Variables - In the “Advanced” window proceed to select “Environment Variables” at the bottom.
Choose Environmental Variables Option - Here click on the “Property” that you would like to change and then click on “Edit”.
- If the property is a list of files or directories, then click on the “New” button and add the variable name and value in the new system variable window.
- In the end, click on “OK” to save all the changes made.
Solution 4: Reconfigure the argv Python Path
A few bunches of users reported that this solution also proved to be effective in their case.
- Open your desktop PC and proceed to the following directory:
/python/share/jupyter/kernels/
- Then open the “kernel.json” and here set the “argv” python path as below:
{
"argv": [
"C:\Anaconda3\python.exe",
"-m",
"ipykernel_launcher",
"-f",
"{connection_file}"
],
"display_name": "Python 3",
"language": "python"
}
3. Lastly, launch the jupyter notebook and check if the python subprocess filenotfounderror: [winerror 2] the system cannot find the file specified error got resolved.
Solution 5: Run Python Using CMD
If the thing you’re trying to run is not being set up in the system path then the error can occur too. In order to work with Sublime, you need to be able to open a cmd window and enter the following command:
Terence>python
If you are trying to run python then you should be able to see the following message after the execution of this command:
C:\Users\Terence>python

Python 3.6.0 (v3.6.0:41df79263a11, Dec 23 2016, 08:06:12) [MSC v.1900 64 bit (AM

D64)] on win32

Type "help", "copyright", "credits" or "license" for more information.

>>>
Else, if you get the following message then this means Windows can’t execute the program as it doesn’t know where it is:
C:\Users\Terence>python

'python' is not recognized as an internal or external command,

operable program or batch file.
Solution 6: Reconfigure Shell=True Argument
If you do not specify the “Shell=True” argument in the sub-process module’s run method then you may end up having this error. To solve this error add the “Shell=True” argument in the sub-process module’s run or you can also change “Shell=False” to “Shell=True” and then see if you get rid of the error.
Solution 7: Run the Script As An Administrator
- Create a shortcut for python.exe by right-clicking on “python.exe” and then selecting “Create A Shortcut” from the drop-down menu.
- Once the shortcut is created, right-click the shortcut and select “Properties” from the drop-down menu.
- Now in the new pop up window change the “Target” to something like below:
C:\xxx\...\python.exe your_script.py
- Once done, click on “Advanced” in the “Shortcut” tab and then checkmark the box for “Run As Administrator”.
- Then apply all the changes made and click on “OK” to save the changes.
Solution 8: Disable Anti-Virus
Lastly, you may want to confirm if Windows isn’t blocking access to the folder you are trying to make a virtual environment in. So you can temporarily disable your Windows Security features to see if it helps. To do so follow these steps:
- In the search bar near the Start menu search for “Windows Security” and click to select it from the list of search results.
- In the pop-up Windows Security window click to select “Virus and Threat Protection”.
Select Virus and threat protection - Now proceed to select “Manage Settings” under the “Virus and Threat Protection Settings” section.
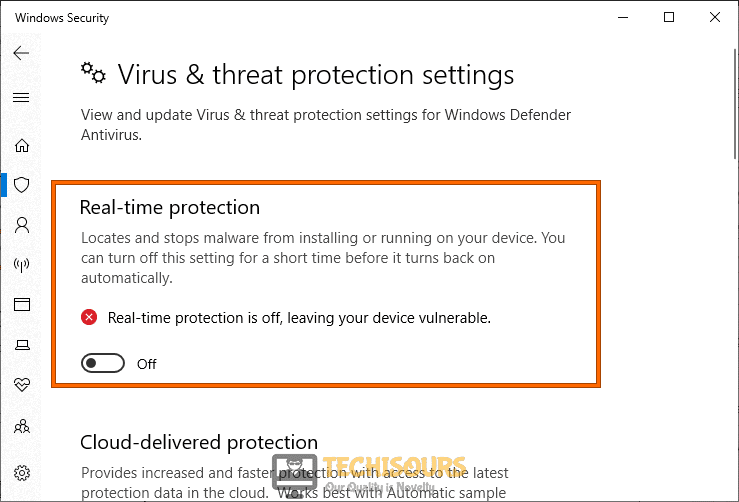
- In here turn “OFF” the “Real-Time Protection” using the slide button and afterward proceed to check if the error got solved.
Disable Real-time protection
Hopefully, careful implementation of the above-indexed fixes will lead you to get rid of the error eventually but if the error still exists then feel free to Contact Us here and we will further troubleshoot it for you.


