Fix: FFXIV Unable to Complete Version Update [Easy Instructions]
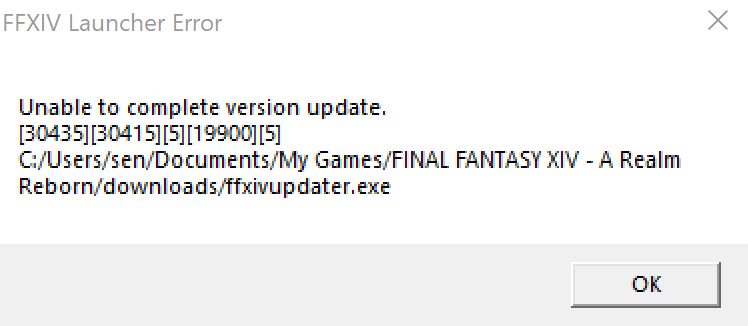
FFXIV players have recently been getting the “FFXIV Unable to Complete Version Update – Launcher Error” which prevents them from being able to complete the version update “30437, 2020, 30419, or 30605” and in this article, we have dedicated our time towards gathering fixes and workarounds for this.
Make sure that you also read through the reasons due to which such an error might be seen so that you are able to pinpoint the trigger behind this error and hopefully remove it from your computer completely.
What Causes the FFXIV Unable to Complete Version Update Error?
After going through user-oriented guides, we concluded that the following are some of the most crucial reasons behind the occurrence of this error.
- Game File Integrity: It is possible in some cases, that this issue was being triggered because the integrity of the game files had been compromised. Therefore, we recommend that you try and perform an integrity check and check to see if doing so fixes the “FFXIV Unable to Complete Version Update” error.
- Firewall: If a Firewall is preventing the game from being able to make contact with its servers, we recommend that you let the game through because this is obviously a false flag error and it is preventing the game from being able to properly apply their update files.
- Server Issue: If the Game Servers are temporarily or permanently down, we recommend that you try and check if other people are getting this issue as well. If they are, it means that the game servers are probably undergoing maintenance and you should just try and wait it out.
- Background Applications: In certain cases, background applications on your computer might be triggers this error and you can easily fix this by applying certain restrictions over which apps and services will be loaded and for a lot of users, this ends up fixing the FFXIV Unable to Complete Version Update error.
- Network Issue: If the Network that you are using is facing issues while connecting to the server, you might be running into this error message while trying to apply the update. Therefore, we strongly suggest that you try and use a different network and check if the error is resolved.
- VPN: In certain situations, a VPN connection can help you bypass certain restrictions set forth by the game servers and this might fix the FFXIV Unable to Complete Version Update error. Therefore, we recommend that you connect to the server using a VPN server and then check to see if doing so fixes the error.
Now that you have been taken through almost the entirety of the triggers behind this error, we can finally move on towards implementing the fixes.
Before You Start:
Initially try to carry out a couple of basic fixes in order to get rid of this error instantly. In this aspect unplug your Wi-Fi router, modem, or device for some minutes and then plug it back in to refresh your internet connection. Once done restarting your internet connection now try to restart your computer as well. For this proceed as follows:
- Press the “Alt + F4” keys together on your keyboard and in the pop-up “Shut Windows Down” dialogue box, click on the drop-down menu.
- From the drop-down menu, select “Shut Down” and hit “Enter”.
Another simple workaround in this regard is to right-click on the “Final Fantasy” and choose “Run As Administrator” from the drop-down menu to run the game in the admin mode. Despite following all of these simple troubleshooting techniques if the error continues to stay then move on to implement some of the advanced solutions indexed below.
Fixing FFXIV Unable to Complete Version update problem:
Solution 1: Verify Integrity of Game Files
- Right-click on Steam and select the “Run as Administrator” option. Then navigate to the ffxiv game that failed to update in the “Steam Library”.
- Right-click on the game, select “Properties,” and move to the “Local Files” tab. Afterward, click on the “Verify Integrity of Game Files”.

Verify Integrity of the Game Files - Now launch and play the game like normal and hopefully ffxiv unable to complete version update 2020 issue would’ve been resolved.

Solution 2: Turn Off Windows Defender Firewall
- From the “Start” menu search for “Settings” and then click to open it.
- Once in Settings locate the “Update and Security” option and click to open it. In the “Update and Security” tab, locate and click “Windows Security” from the left window pane.

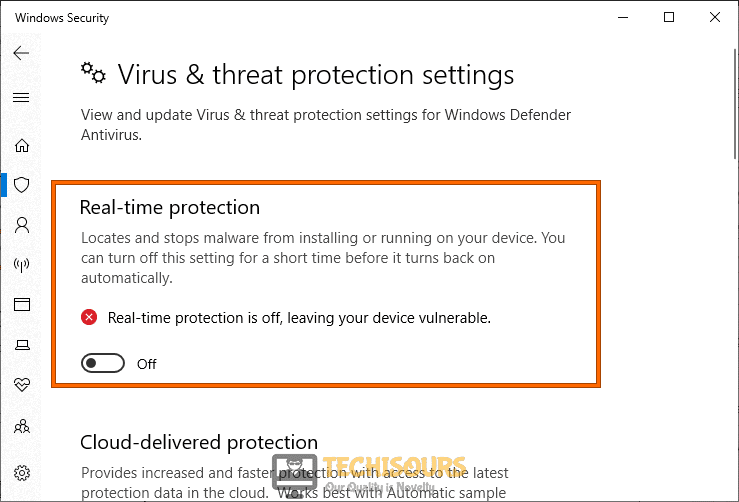
Choose Windows Security Option - Proceed to “Virus and Threat Protection” under the “Protection Areas” section. In the new pop-up window, navigate to “Virus and Threat Protection Settings” and click on “Manage Settings”.
- Now turn “OFF” the toggle button located under the “Realtime Protection”. Click to select “YES” when the “Permission” dialogue box pops up.

Disable Real-time protection - Finally, “Restart” your system, try getting back online and see if your problem got fixed.

Solution 3: Disable Third-Party Antivirus
- Open your desktop and right-click on the “Antivirus” software installed on your system.
- From the popup context menu, choose to select “Disable”.

Disable antivirus permanently - Now try to perform the same action again and see if the error persists or not.

Solution 4: Edit the ffxiv_boot.cfg File
- Press the “Window + E” keys together on your keyboard to open “File Explorer” and from here navigate to “This PC”.

Click on This PC - Then follow the path “C:/User/Documents/My Games/FINAL FANTASY XIV – A Realm Reborn/FFXIV_BOOT”.
- Right-click on the file “FFXIV_BOOT”, go over “Open With” and select “Notepad” from the drop-down menu.
- Then change the value of “BootVersionCheckMode” and “B4EulaAgreement” from “0” to “1”.
- Next, save all the changes made and launch the game again to check if the error got removed.

Solution 5: Checking the Servers
Check forums and the official Twitter account of Final Fantasy to get updates and to know if there are any server outages. You can also visit SQUARE-Enix Forum to check for any announcements.
Solution 6: Internet Troubleshooting
An unstable internet connection can also give rise to high ping. To get rid of low latency, bad connections, and potentially this error. Plug an ethernet cable into your system from your router or modem. You can also contact your ISP and confirm if the security services permit online gaming. Moreover, try disconnecting your router and plugging the internet cable into the main modem. This will form a direct connection between the modem and your PC.
Solution 7: Reinstall Final Fantasy
- Press the “Window + X” keys simultaneously on your keyboard and from the pop-up menu, click to select “Apps and Features/Programs and Features”.
- In the “Apps and Features/Programs and Features” window, locate “Final Fantasy”.
- Then right-click on it, select “Uninstall or Uninstall/Change” and click on “YES” on the “Permission Prompt” to uninstall.
- Now reinstall FFXIV again from here and check if everything works fine now.
Solution 8: Run An Adware Scan
- Download Adware and install it on your system by following the on-screen instructions.
- Open “Malwarebytes ADwCleaner” and press the “Scan Now” button to scan your system.

Download AdwCleaner - Lastly, observe if it helped you get over the ffxiv unable to complete version update 30605 error successfully.

Solution 9: Clean Boot Your System
Note: Proceed with these steps with caution. This is not recommended for a complete beginner as any mistake can harm your computer severely. To perform a clean boot on your system proceed with these steps:
- Press the “Window + S” keys together on your keyboard and search for “System Configuration” in the search bar.
- In the System Configuration window proceed to the “Services” tab.
- Here checkmark the box in front of “Hide all Microsoft Services” located on the bottom left side of the window. Then click the “Disable All” button located on the bottom right opposite.

Hide all Microsoft services - Now move to the “Startup” tab and click on “Open Task Manager”. Wait for the list to load entirely and then “Disable” each program one by one by proceeding as “Right-click > Disable”.
- Then close the “Task Manager” window and return to the “System Configuration” window. Click on “OK” to save these settings and “Restart” your PC afterward.
- Now check if you still face the ffxiv unable to complete version update 30605 error or not.

Solution 10: Update the Firmware Of Your Router
If your router is already running the latest firmware version, you can always rewrite by reinstalling the same firmware to erase any issues pertaining to the previous update. In order to update your router’s firmware proceed with these steps:
- On your PC open up your browser and here type in your router’s “IP Address” in the browser’s search bar.
- Then enter in your login credentials including the “Username” and “Password”.
- Next, locate the “Firmware” or “Update” option in the “Advanced”, “Administration” or “Management” section. The location may vary according to your router’s model.

Update Router Firmware - Next, go to your router’s manufacturer website, and here search for the firmware update files by entering the model number of your router.
- Now move on to “Download” the firmware update file which is usually contained in a “.Zip Folder”.
- Afterward, “Extract” the files from the zip folder and move them to the desktop.
- Then proceed to the “Update” section and click to select “Choose File” or “Browse”.
- Next, select the router update file on your desktop which is usually the largest file in the zip folder.
- Click on the “Update” button to start the update process and wait until the process gets finished.
- When the firmware gets updated manually “Reboot” the router if not done automatically.
- Finally, check to see if you have been able to get rid of the error now.

Solution 11: Use A Different Network
Another easy workaround is to set up a hotspot on your smartphone and then connecting your system to your mobile’s hotspot. Then you can launch the game and try updating it. If the update is successful, you can switch to your Wi-Fi network normally.
Solution 12: Update the Drivers
- Start by downloading and installing Driver Talent on your computer.
- Then open it up and click on “Scan” to detect all the drivers.

Click on Scan Button - Next click on “Repair” to fix faulty drivers or click on “Uninstall” any newly installed problematic drivers or you can also choose to click on “Update” to update the drivers.
- When the drivers get updated now see if the ffxiv unable to complete version update 2020 error persists or not.

Solution 13: Use A VPN
- Download a “VPN Service” to change your IP address. For this purpose, you can use Nord, Express, or any other VPN service.
- Then “Install” the setup on your system and connect the server to the nearest location available.
- Quit the game and relaunch it from the desktop to see if everything works fine now.
Solution 14: Whitelist Steam In Windows Firewall
- Press the “Window + R” keys together on your keyboard to open up the “Run” prompt.
- In here type in “control firewall.cpl” in the dialog box and press “Enter” to open the “Windows Defender Firewall” tab.

Typing Control firewall Command - Then click on “Allow An App Or Feature Through Windows Defender Firewall” in the menu pane on the left.

Allow an app through firewall - Now proceed to click on the “Change Settings” option in the “Allowed Apps To Communicate Through Windows Defender Firewall” dialogue box. Click to select “YES” if you come across any permission prompts.
- Then click on “Allow Another App” in the “Allowed Apps And Features” dialogue box and here browse for the “Steam.exe” file. Typically it is located in “C:\Program Files\Steam\bin.” Do the same with the .exe file of the game, causing the problem.
- Check the “Private and Public” boxes of both of the entries and click on “OK”.
- Now get back to the “Windows Defender Firewall” window and click on “Advanced Settings” in the menu pane on the left. Click on “YES” if you come across any permission prompts.
- Proceed to the “Inbound Rules,” located on the left side of the window, and click to select it. Then, under the “Inbound Rules” drop-down menu on the left proceed to the “Actions” tab on the window’s right-hand side, and click on “New Rule”.

Clicking on the “New Rule” option - The “New Inbound Rule Wizard” dialogue box will open up. Click on the “Port” option and then click on “Next”.
- At the “Protocols and Ports” step, choose the “TCP” option and then select the “Specific Local Ports” option.
- Now paste the following ports in the order as listed and select “Allow the Connection” each time you press “Next”. Do this for all the entries:
27015--27030

27036

27015
- Similarly, add another rule for UDP and select the “UDP” and “Specific Local Ports” option instead of “TCP,” this time following the same previous steps:
27015--27030

27000--27100

27031-2703

4380

27015

3478

4379

4380
- Once all the ports are added, click on “Next” and make sure that all three options, “Domain,” “Public,” and “Private,” are checked.
- Hit “Next” and name your rules. Proceed by clicking on “Finish” and restart your computer to let the changes have their effect.


Solution 15: Update and Reset Internet Explorer Settings
- Update Internet Explorer by proceeding with Internet Explorer Downloads, selecting your current OS, and downloading the update.
- If required, restart your browser and now click on the “Settings” option on the top left and navigate to “Internet Options” from the context menu.
- In the “Internet Options” dialogue box, move over to the “Advanced” tab and click on the “Reset” option. Check on the “Delete Personal Settings” option and afterward click on “Reset”.

Choose Internet Options - Then “Restart” your browser once again.
- Next, click on the “FFX14 Launcher” on your desktop and click on “Properties” from the context menu.
- Move over to the “Compatibility” tab and check on the “Run This Program In Compatibility Mode For” in the “Compatibility Mode Section” and select “Windows 7” from the drop-down menu.
- Click on “Apply” and “OK” and then restart your computer.
- Once the system restarts, right-click on the “FFXIV Launcher” and then select “Run As Administrator” from the context menu.
- When done with implementing all of the above steps now proceed to verify if the FFXIV Unable to Complete Version Update error got fixed.

Solution 16: Delete the FFXIV Folder in My Games
- Press the “Window + E” keys together on your keyboard to open up the “File Explorer” window and then navigate to “My Documents > My Games” respectively.
- Right-click on the “FFXIV” folder present here and hit the “Delete” button on your keyboard to delete it.
- Restart your system and check to see if the FFXIV Unable to Complete Version Update error is fixed.
Hopefully, the above-indexed solutions will be enough for you to overcome the error successfully but if the issue still persists then feel free to Contact Us here.