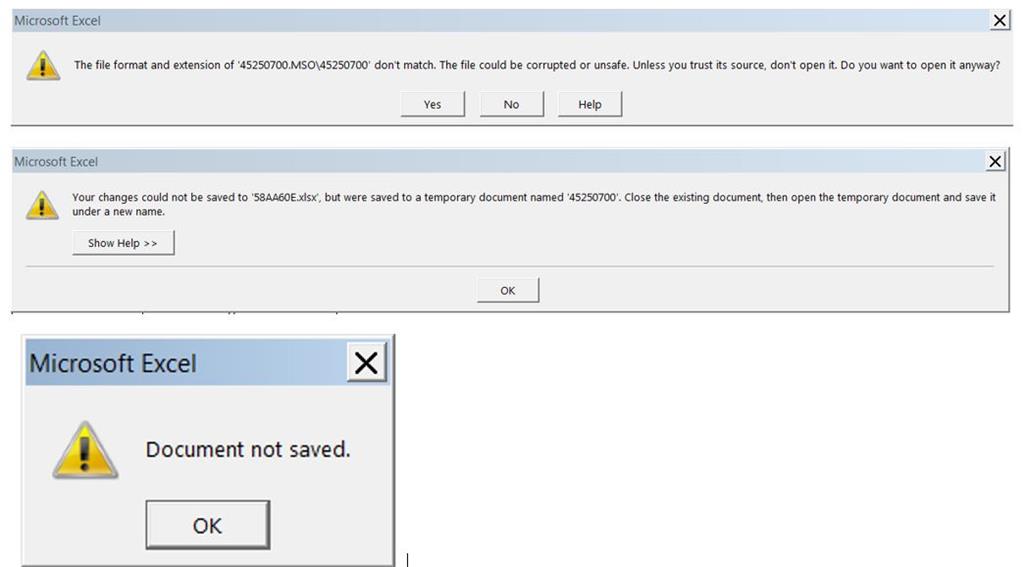
Easily Fix Excel document not saved Issue [Complete Guide]
If you have been getting the “Excel Document not Saved” error on your computer, it might be related to a network drive or some other issue that prevents the program from accessing a certain location or file. In this article, we have listed the solutions/fixes and workarounds that you can use to fix it completely.
Before You Start:
- If you are saving the excel file on an external hard drive or USB, then make sure that they are properly connected to your PC and are readable. No loose connection is present and the data cable is properly attached to your PC and external hard disk.
- If you are accessing the excel file from a network then there is a high probability that you can face this error due to disruption in your internet connection. It can arise due to a fault in your router or there is an issue with your internet service provider’s server. Restart your router and wait for it to stabilize and if the issue still persists then contact your internet service provider’s helpline.
- If you have a couple of Excel files with a similar name, then it can create a conflict and hence generate this error so try renaming your current excel file.
- If you are accessing the excel file from a network then check if you have the required permissions to modify/update the Excel file and if you do not have the permission then contact the original file’s creator/owner.
Fixing the Excel document not saved error:
Solution 1: Save File As A Different Excel File Type
- Firstly, open the excel file in which you are facing the error, navigate to the “File” tab located at the top left corner of your screen, click on the “Save As” option from the left pane, and afterward select the “Browse” option.

Accessing Excel Save As Option - A window will appear in front of you, choose a file location where do you want it to be saved, and then select a different file type from the save as type section’s drop-down menu, afterward click on the “Save” option.

Select Excel’s Different File Type - Now navigate to that folder where you saved your excel file with a different file type, open it, and check if the error is still occurring.


Solution 2: Move Your Workbook
- Open the excel file, right-click on the name of the worksheet located at the bottom of the screen and select the option “Move or Copy”.

Select Move or Copy Option - A window will appear in front of you, select the option “Move to End”, check the “Create a Copy” option and click “OK”.

Select Move To End Option - Delete your old worksheet and then check if your excel file is saving properly.


Solution 3: Save File In A Different Location
- Open the excel file, navigate to the “File” tab, click on the “Save As” option from the left pane, and afterward select the “Browse” option.
Accessing Excel Save As Option - A window will appear in front of you, choose a different file location instead of the current one, afterward click on the “Save” button.
Solution 4: Disable Excel Add-Ins
Sometimes the Excel Add-ins get corrupted due to some bug that creates these sorts of errors so disabling these add-ins might resolve your issue. Follow the below-mentioned procedure to disable excel add-ins:
- Open the excel file, navigate to the “File” tab, click on the “Options” from the left pane and afterward select the “Add-In” option.

Select Add-Ins Option - Locate the “Manage” section present at the bottom of the window, select “Excel add-ins” from the drop-down menu list and click the “Go” button.
Select Excel Add-Ins Option - Add-Ins window will appear in front of you, uncheck all the add-ins showing on the list and afterward click on the “OK” button.

Uncheck All Add-Ins


Solution 5: Create a Duplicate File
- Open the excel file in which you are facing the error, press the “Ctrl + A” keys simultaneously, and afterward press the “Ctrl + C” keys simultaneously too to copy the entire excel sheet.
- Now head to the “File” tab, open a new excel workbook, and press the “Ctrl + V” keys to paste the entire data of the previous excel sheet.
- Navigate to the “File” tab, click on the “Save As” option from the left pane and select the file location of your choice.
Accessing Excel Save As Option
Solution 6: Save File As Macro-Enabled Workbook (.xlsm)
Some users ended up just saving the file as a “Macro-Enabled Workbook (.xlsm)” instead of just the normal Excel Workbook file type (.xlsx) that they had previously saved it under. They tried initially saving it as the old Excel Workbook file type (.xls) but got some compatibility/fidelity errors with pivot table features that were new to the (xlsx) version so be careful about going that route.
Solution 7: Save File At The Original Location
- Create a new excel workbook, navigate to the “File” tab, click on the “Save As” option from the left pane, and afterward select the “Browse” option.
Accessing Excel Save As Option - A window will appear in front of you, choose the same file location where the original corrupt excel file is saved, click on the “Save” button and check if the new excel file is saving normally as it should at the original location.
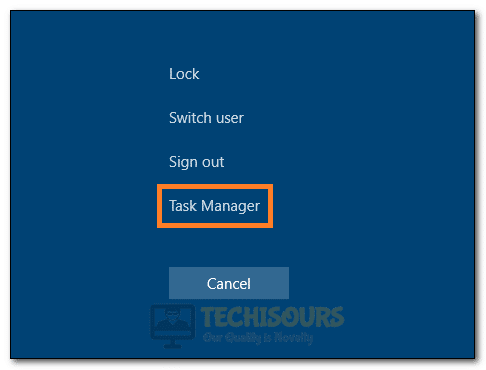
Solution 8: Disable Background Processes
Sometimes the tasks running in the background can interfere with the active current running tasks and causes them to behave strangely. Restricting the activity of background running tasks can also fix this issue. To disable the background running tasks, follow the below-mentioned steps:
- Press the “Alt + Ctrl + Del” keys simultaneously and click on the Task Manager.

Launching Task Manager - Navigate to the “Processes” tab and a list of tasks currently running in the background will appear in front of you.

Ending Additional Processes - Now, right-click on the potential task that you think is interrupting the excel file saving process, select the option “End Task” and afterward try saving the excel file again.

Solution 9: Launch Excel In Safe Mode
Launching excel in safe mode might resolve your issue, as in safe mode, all plug-ins are disabled. Follow the instructions given below to successfully launch excel in Safe Mode:
- Press the “Windows + R” keys simultaneously, a “Run” dialog box will appear, type the following command in the search box and then click “OK” button.
excel /safe

Typing in Excel / safe Command - Now excel will launch in Safe Mode afterward, try running the file and then saving it in safe mode.

Solution 10: Temporarily Disable Antivirus
Sometimes the antivirus software scans the newly created files on your computer, and this scan can disturb the excel file save process, resulting in this error. To temporary disable antivirus, follow the below-mentioned procedure:
- Navigate to the “Show Hidden Icons” option on the right side of the taskbar, locate your antivirus, and right-click on it.
- Select the option “Pause Protection” or “Disable Antivirus” (the option may vary depending upon your antivirus).

Disable antivirus - A warning prompt window will appear, click on the “OK” button.
- Now the antivirus has been disabled, launch the Excel file and check if the issue is resolved.

Solution 11: Check Hard Disk Status
Sometimes the data is not saved due to a malfunctioning hard disk drive and bad sectors within the hard disk. You can find out about the health status of your hard disk using the Windows built-in tool.
Method 1: Using Window Check Disk Utility
- Open the “This PC” folder on your computer, right-click on the system drive in which the file is being saved, and click on the “Properties” option.

Selecting Drive’s Properties Option - Navigate to the “Tools” tab and afterward click on the “Check” button. A popup message will appear in front of you, click on the “Scan Drive” option.

Clicking Scan Drive Option - Now windows scan disk utility will check for any bad sectors on your hard drive and it’ll let you know if found any.
- After running the scan, check to see if the Excel document not saved has been fixed.


Method 2: Using Command Prompt
- Click on the windows start button, type “cmd” in the search box, and hit “Enter” button.

Typing in cmd - In the command prompt window, type the following command and press “Enter” button:

wmic

- Now, type the following command and press “Enter”:
diskdrive get status

- Now, the Windows Scan Disk program will scan your hard drive for any faulty sectors and notify you if any are identified.
- Check to see if doing so fixes the Excel document not saved issue.
Solution 12: Edit Registry File
- Click on the Start icon, type “Registry Editor” in the search box, then press the “Enter” button and select the “Yes” button on the permission dialog box when prompted.

Typing Registry Editor - Type the following address in the search box and press the “Enter” button:

Computer\HKEY_LOCAL_MACHINE\SYSTEM\CurrentControlSet\Services\CSC

- Now, right-click in the registry editor window, select the option “Key” and type “Parameters” in the search box.

Creating parameters folder - Now, right-click on the newly created parameters folder, select the “New” option, and click on the option “DWORD (32-bit)Value”.

Selecting the DWORD (32-bit)Value option - Type “FormatDatabase” in the newly created file, press the “Enter” button, and afterward, right-click on this file and select the option “Modify”.

Creating FormatDatabase file - A new window will appear in front of you, type “1” in the Value data box and click “OK” button.

Typing in 1 in FormatDatabase - Close the registry editor window, restart your PC and check if the Excel document not saved issue is resolved.


Solution 13: Modify Disk Permissions
- Open the “This PC” folder on your computer, navigate to the folder where the excel file is being saved, right-click on the folder where the excel file is present and click on the “Properties” option.
- Navigate to the “Security” tab, click on the ”Advanced” option located at the bottom of the window.

Accessing Security Tab - A new window will open in front of you, click on the “Change” option to change the owner of the folder.

Clicking Change Option - Click on the “Advanced” option and afterward, select the option “Find Now”. Search results will appear at the bottom of the window, locate your account name, click the “OK” button and again click on “OK” in the next dialog box.

Selecting User - Now check both options i.e. “Replace owner on sub containers and objects” and “Replace all child object permission entries with inheritable permission entries from this object” and afterward click on “Apply” and then on the “Ok” button to close the window.
Select Options - Once again open the “Properties” option of that specific folder, navigate to the “Security” tab and then click on the “Advanced” option.
Accessing Security Tab - Click on the “Add” option located at the bottom of the window and afterward click on the option “Select a principal”.

Clicking Select a Principal Option - A window will appear in front of you, click on the option “Advanced” and in the next window, click on the option “Find Now”, select your user account and click the “OK” button on both dialog boxes.
Selecting User - Now you’ll be able to select all the basic permissions from the list. Select all of them and click the “OK” button.

Selecting Permissions - Finally, check the option “Replace all child object permission entries with inheritable permission entries from this object”, click on “Apply” and then on the “OK” button.
Select Child Object Option - Now you’ll have full control over that folder and all the permission issues should be resolved by now.
- Check to see if this fixes the Excel document not saved issue.


Workaround:
If you’re still unable to get around this issue then try modifying your file to be read-only, then whenever prompted to save you’ll have to save with a different file name and later overwrite the old file (and make the new one read-only once again). It’ll save you from having to export all of your modules.
If you still can’t figure out how to fix this issue, Contact Us for further troubleshooting.