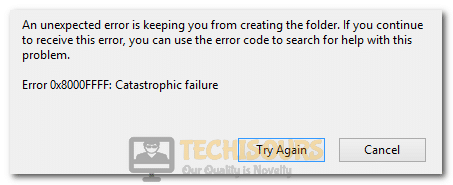
Easily Fix Error 0x8000ffff Catastrophic Failure on Windows
There can be numerous different reasons due to which the Error 0x8000ffff Catastrophic Failure might occur on your computer. In this article, we have focused on resolving the issue which is most usually seen while trying to restore from a previous backup. Not only have we compiled the reasons due to which the issue occurs, we have also listed the solutions that have been aimed at fixing this issue completely.

Why is the 0x8000ffff Catastrophic Failure Error Triggered on Windows?
Now that we have troubleshot this issue on most of our devices, we concluded that the following are the paramount reasons due to which they are triggered in the first place.
- Virus/Malware: In some cases, a Virus or Malware might be plaguing your system due to which it is unable to run properly. Therefore, we suggest that you try to check your computer for a Virus or Malware that is plaguing it and check to see if doing so fixes the Error 0x8000ffff Catastrophic Failure on it.
- Not Enough Permissions: Sometimes, the permissions that are required for the restoration process to proceed might not have been granted to the account that you are trying to run the restoration process from. Therefore, we suggest that you upgrade to an administrative account on the computer.
- Corrupted Registry Entries: In certain situations, the registry entries on your computer might be corrupted due to which the Error 0x8000ffff Catastrophic Failure might be triggered. Therefore, we suggest that you try to repair these corrupted entries or remove them entirely.
After having gone through most of the reasons behind their occurrence, we can finally start implementing the solutions.
Fixing the 0x8000ffff Catastrophic Failure Error:
Fix 1: Perform Complete Virus Scan
- Press “Windows + I” to launch into settings, click on the “Update & Security” option and select “Windows Security” from the left side.
Choose Windows Security Option - After that, select the “Virus & Threat Protection” button and click on the “Scan Options” button.
- From there, click on the “Full Scan” option and select the “Scan Now” button.
Perform a full scan - Wait for the scan to be finished and restart your computer.
- Check to see if the Error 0x8000ffff is now fixed on your computer.
Fix 2: Use Administrator Account
It is possible that you might be using a standard or a guest account on the computer which can sometimes trigger this issue. Therefore, we suggest that you switch to an administrator account that fixes this issue for most of the users that are facing it. This is because certain processes such as restoring from a backup require the administrative privileges on the account that only the admin users have.
Fix 3: Use Microsoft’s Workaround
If you are encountering the error while playing or connecting to a Multicast Station in Windows Media Player, then this fix is for you.
Microsoft has provided a fix specifically for this error. You can download the fix from here. Once downloaded, open the file, and follow the on-screen instructions. If you have done everything correctly, then your issue should be resolved. You can also use an older version of the Windows Media Player such as version 6.4, which will resolve your issue.
If you are facing the issue while using “Live Response (Sensor 3.3)” then you should switch/upgrade to “Carbon Black Cloud (Sensor 3.5)”
Fix 4: Make Sure Automatic Updates are Enabled
- Press “Windows + R” to launch Run, type in “services.msc” and press “Enter”.
Typing in “services.msc” - From here, make sure to right-click on the “Windows Update” button and select the “Properties” button.
- Now, make sure to click on the “Startup” dropdown and select the “Automatic” button.
- Select “Apply” after changing the startup to automatic.
- Check to see if doing so has fixed the Error 0x8000ffff Catastrophic Failure on your computer.
Fix 5: Disable Proxy
- Press “Windows + R” to launch into the Run prompt, type in “inetcpl.cpl” and press “Enter”.
Typing “inetcpl.cpl” - From there, click on the “Connections” tab and select the “LAN Settings” option.
- From there, uncheck the “Use a Proxy Server for your LAN” option and select the “OK” button.
Turn OFF Proxy Server - Select “Apply” and click on “OK” to exit out of the window.
- Check to see if doing so gets rid of the Error 0x8000ffff Catastrophic Failure issue on your computer.
Fix 6: Reinstalling Windows Store
- Right-click on the “Windows Icon” at the bottom left side of the taskbar and select the “Windows Powershell(Admin)” option.
Clicking on the “Windows Powershell Admin” option - From there, type in the following commands and press
- Type in the following command and press “Enter” afterward:
Get-AppxPackage -allusers Microsoft.WindowsStore | Foreach {Add-AppxPackage -DisableDevelopmentMode -Register "$($_.InstallLocation)\AppXManifest.xml"} - After executing this command, restart your computer and check to see if the Error 0x8000ffff Catastrophic Failure issue is fixed.
Fix 7: Fixing Driver Issues
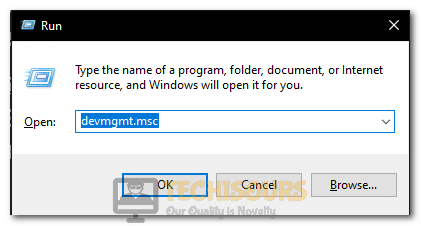
- Press “Windows + R” to launch the Run prompt, type in “Devmgmt.msc” and press “Enter” to launch the device manager.
Typing devmgmt.msc in the Run prompt - After that, click on the “Scan for Hardware Changes” button below the “Help” button and process the process to complete it.
Scan For Hardware Changes - From here, look for any devices that have the “Caution” sign in front of them.
- If they do, make sure to look for their related drivers and download them on your computer.
- Alternatively, you can download Driver Easy on the computer and perform a scan with it to check for any outdated or missing drivers and install them on the computer.
- After completing this process, check to see if the error message is fixed on the computer.
Fix 8: Using Clean Boot to Isolate Issue
- Press “Windows + R” to launch into the Run prompt, type in “msconfig” and press the “Enter” button to launch into the configuration panel.
Typing in “Msconfig” - From here, select the “General” tab and check the “Selective Startup” option.
- From under that option, make sure to uncheck the “Load Startup Items” box and then move on towards the “Services” tab from the top.
- In here, check the “Hide All Microsoft Services” box and select the “Disable All” button after that.
Hide All Microsoft Services - Now, click on the “Startup” tab and select the “Open Task Manager” button.
- Make sure to select the programs that have been enabled and select the “Disable” button to prevent them from launching at startup.
- Now, restart your computer and check to see if the Error 0x8000ffff Catastrophic Failure has been fixed on your computer.
- If it has, start by enabling the services back one by one and check which one makes the error come back. You can keep the faulty service “Disabled” or reinstall the application associated with it.
Fix 9: Performing Disk Scan
- Press “Windows + R” to launch into the Run prompt, type in “cmd” and press “Shift + CTRL + Enter” to launch with admin permissions.
Typing in cmd - From here, paste the following commands one by one and press “Enter” to execute them on the computer.
sfc /scannow

chkdsk /f /r

DISM /Online /Cleanup-Image /RestoreHealth/

vssadmin list writers

vssadmin list providers

vssadmin list shadows
- After having executed all of these commands, check to see if the issue has been fixed.
Fix 10: Removing Corrupted Registry Entries
- Press “Windows + R” to launch into Run, type in “regedit” and press “Enter” to launch into the registry editor.
Typing “regedit” - From here, navigate to the following locations one by one and right-click on the mentioned entries in the address and delete them. (Some Entires might not be found on the computer)
HKEY_LOCAL_MACHINE\COMPONENTS\AdvancedInstallersNeedResolving

HKEY_LOCAL_MACHINE\COMPONENTS\NextQueueEntryIndex

HKEY_LOCAL_MACHINE\COMPONENTS\PendingXmlIdentifier
- After removing the entries, check to see if the Catastrophic Failure issue has been resolved.
Fix 11: Creating New User Account
- Press “Window + R”, type in “cmd” and press “Ctrl + Shift + Enter” on your keyboard to run CMD as Administrator
Typing in cmd - Type in the following commands and press Enter after each:
net user /add (Desired Username) (Desired Password)

net localgroup administrators (Desired Username) /add
- Restart your PC and select the account that you just created, and log in to that
Fix 12: Remove Microsoft Store Cache
- Press “Window + R”, type in “wsreset.exe” and press Enter on your keyboard.
Typing in “wsreset.exe” - Wait for the Store to be reset and check to see if the issue persists.
Fix 13: Remove the SoftwareDistribution
- Press “Window + R”, type in “cmd” and press “Ctrl + Shift + Enter” to run it as Administrator.
Typing in cmd - After doing that, execute the following commands one by one by pressing “Enter” after typing them in.
net stop wuauserv

net stop bits
- After executing the commands, closeout of the command prompt and navigate to the “C:\Windows\SoftwareDistribution” location.
- In the location, press “Ctrl + A” and then press “Shift + Delete” from the keyboard.
- Confirm the UAC prompt to complete the deletion process and restart your computer.
- Check to see if doing so has fixed the Error 0x8000ffff Catastrophic Failure error while installing the update.
Fix 14: Run the Troubleshooter
- Press “Window + S”, type in “Troubleshoot settings” and press Enter on your keyboard.
- From there, select the “Additional troubleshooters” option and look for “Windows Store Apps”.
- Click on it and select the “Run the troubleshooter” option.
- The troubleshooter will now automatically start the troubleshooting process.
- Wait for the process to be completed and check to see if the issue still persists.
Fix 15: Checking Date/Time
- At the bottom-right of the screen, right-click the “Date and Time” displayed and select the “Adjust Date/Time” option from the menu.
- From there, turn the “Set Time Automatically” and the “Set Time Zone Automatically” option Off.
Set time zone automatically - Now, select the “Change” button under the “Set the Date and Time Manually” button.
- Adjust the current Date and Time according to your region and then set your Time Zone under the “Time Zone” heading.
- Click on the “Sync Now” button to complete the process and check to see if the issue has been resolved.
Fix 16: Enabling Volume Shadow Copy Service
- Press “Window + R”, type in “services.msc” and press Enter on your keyboard.
Typing in “services.msc” - Look for the service named “Volume Shadow Copy”, right-click it and select “Properties”.
- In the “General” tab, change the startup type to “Manual” and if the service status is “Stopped” then click on “Start” and click “OK”.
- Restart your PC and run the System Restore as Administrator and see if the issue is resolved now.
Fix 17: Using Safe Mode
- Press “Window + I”, select “Recovery” from the options on the left and click “Restart Now”.
- Once your PC is restarted, select “Troubleshoot” and click “Advanced Options”.
Advanced Options - Select “Startup Settings” and “Restart”.
- Now from the list of options, select “Safe mode with Networking” and you will now be booted into the safe mode.
- In the safe mode, press “Window + S”, type in “Check for updates” and press Enter.
- If any updates are available, they will automatically be downloaded and installed.
- Restart your PC and see if the issue is resolved now.
Fix 18: Perform Clean Install of Windows
If the issue still remains, the only thing left to do is to try installing Windows completely from scratch. This will get rid of all System files and replace them with new ones so we suggest that you backup all of your important data beforehand and then head on over to the Microsoft Website to download the Windows ISO.
If after all of these steps, the issue still remains, Contact Us for further troubleshooting.


