Easily Fix Amcrest Email Test Failed Issue [Complete Guide]
Some users that were encountering the “Amcrest Email Test Failed” Error came to us for guidance and after some intense brainstorming, we were able to decipher the reasons due to which the Amcrest Device fails to send the test email. We concluded that this occurs because the Amcrest device might not be able to send the email because it is generally considered less secure than some of the other devices that are conventionally used.
In addition to this, there might be several other reasons behind the failed email test as well which can range from security configurations to sending limits. We have discussed most of them below so that you can enlighten yourself with the precise reasons that might be triggering this issue before you move on towards implementing the solutions.
Why are you getting the Amcrest Email Test Failed Error?
After going through the details, we came to the conclusion that the following must be the leading reasons behind the occurrence of this issue.
- Email Address not Activated: In certain cases, it is possible that the Email Address that you are sending the test email to hasn’t been properly activated from your device. Therefore, following the solution below, make sure to activate the email address and check to see if doing so fixes the Amcrest Email Test Failed Error.
- DHCP Settings: Some DHCP Settings might not be enabled on your computer or they might have been improperly configured. Therefore, we suggest that you try and reconfigure them using some of the solutions below which will allow you to customize certain functionalities of your network.
- Storage Not Available: If the Email storage has already been filled up, the test email won’t arrive and you will get the “Amcrest Email Test Failed” message while trying to send it from your Amcrest device. Therefore, we suggest that you try to free up some storage by deleting emails or by increasing its capacity.
- Outdated Firmware: If the Amcrest firmware has been outdated, it is possible that the email provider might look at it as insecure due to which the issue might arise. Therefore, we suggest that you try to update the firmware and then check to see if doing so fixes the issue.
- Network and Security: If the Network and Security settings on your device or router haven’t been properly set, you will run into the error. In addition to that, if the connection is wireless, you could try to switch it to a wired connection and vice versa to check if the connection mode is causing the Amcrest Email Test Failed error.
Now that we have taken you through almost all of the reasons that might be behind this issue, you should start implementing the solutions that we have listed below in order to fix the Amcrest email test failed issue.
Fixing the Amcrest email test failed Gmail issue:
Method 1: Activate the Email Address
- Firstly, open the Amcrest Smart Home application on your mobile device, enter your credentials and “Log-in”.

Log-In Amcrest Application - Then, press the “Settings” logo on the top right corner of the screen and from the list of options, select “Email Alerts”.
- A dropdown menu of “Email Provider” will appear, from there select the type of email you are using e.g. Yahoo, Outlook etc.
- In the “Sender Email” section, type in your email address and password.
- Afterwards, provide the recipient’s email address in its appropriate section and press the “Save” button.
- Finally, press the “Email Test” option and see if the error is fixed.

Choose the Email Test Option

Method 2: Enable DHCP Settings of Your Router
- Press the “Windows + I” key combination to access Windows Settings.
- Click on “Network & Internet” on the main page menu.

Choose Network and Internet - From the list of options on the left side, select the source of the internet you’re connected to, either (Wi-Fi or Ethernet).
- Then, click on “Manage known networks” and afterwards, select the network in which you want to enable DHCP.

Manage known Networks - Next, click on “Properties” and then click on the “Edit” button appearing beneath “IP assignment”.
- From the dropdown menu, select either “Automatic (DHCP)” or “Manual”, they will both serve the purpose.
- Finally, click on “Save” and see if the Amcrest email test failed yahoo issue is resolved.


Method 3: Enable DHCP Settings of Your Device
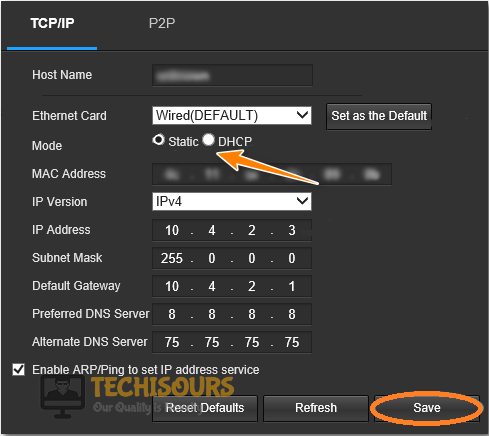
- First, access the “Web UI” of Amcrest Device and then, click on the “Setup” button appearing on the top right side of the screen.
- From the list of options appearing on the left side, select “Network” and select “TCP/IP”.
- DHCP option will be appearing in the “Mode” therefore, enable the DHCP radio button.

Choose the DHCP Option - Click on “Save” and finally, click on the “Email Test” to determine if the error is fixed.
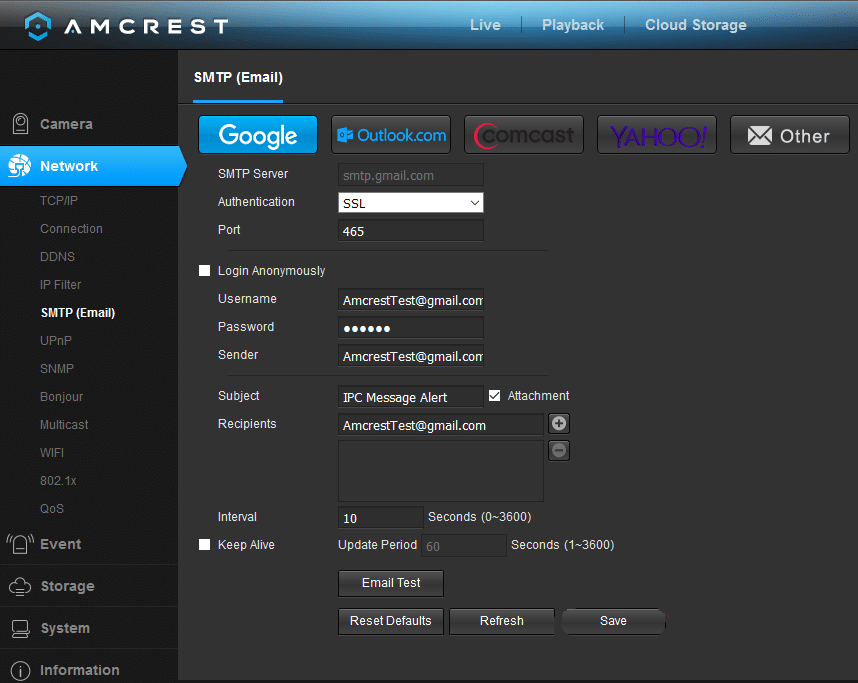
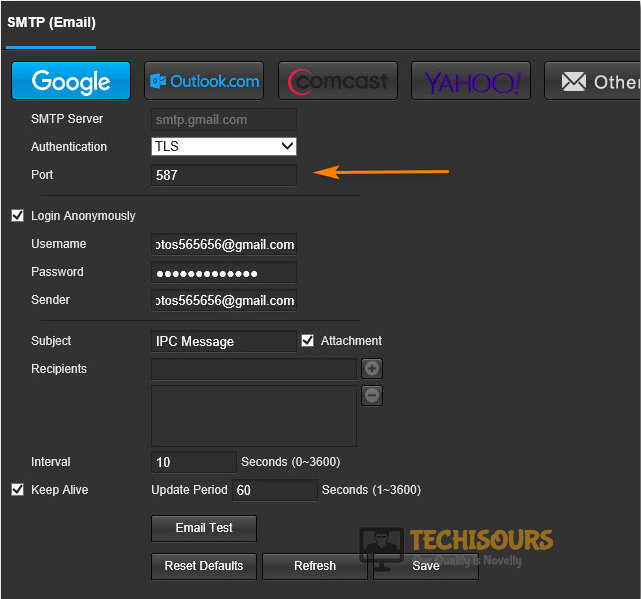
Method 4: Change Authentication to TLS
- First, access the “Web UI” of Amcrest Device and then, click on the “Setup” button appearing on the top right side of the screen.
- From the list of options appearing on the left side, select “Network”.
- Select the type of email you are using e.g. Yahoo, MSN, Gmail, outlook etc.
- In the “Authentication” dropdown menu, select “TLS” and set the “Port” to “587”.

Set the Port Number - Next, type in all your login credentials in their respected sections and click on “Save”.
- Finally, click on the “Email Test” to determine if the issue is resolved.
Method 5: Free Up Storage of Your Email
- First, access the browser you’re currently using and then, login to your email account.
- Now delete the unnecessary emails by simply opening the specific email and clicking the “Delete” icon.
- After removing the emails, see if the problem is fixed.
Method 6: Turn off Two Factor Authentication
- First, access the browser you are currently using and then, login to your Google account.
- From the list of options appearing on the left side of the screen, select “Security”.
- Afterwards, click on the “2 Step Verification” option appearing under the “Signing into Google” section.
- Provide your password at this stage to access further and click on “Turn Off” and see if the error is fixed.
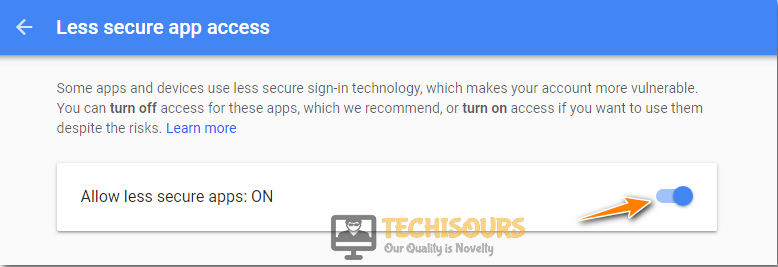
- If the error is still not fixed, click on “Less secure app access” from the “Security” section.
- Authorize the “Allow less secure apps” feature by simply turning on the toggle button.

Allow Less Secure Apps - A message saying “Updated” will be prompted on the screen.
- Finally, proceed to Amcrest settings and click on the Email Test to see if the Amcrest email test failed Gmail issue is resolved.
Method 7: Update Firmware of Your Amcrest Device
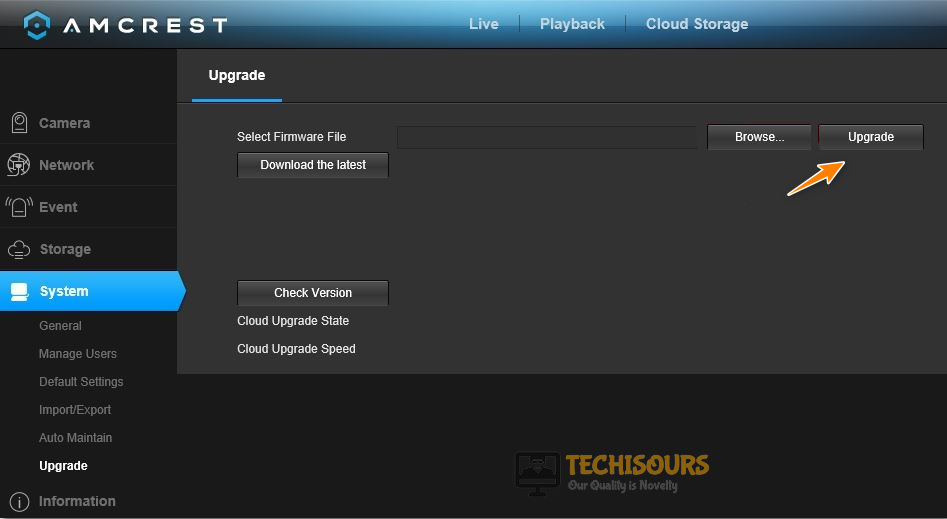
- First, access the browser you are currently using and click on the “System” button appearing on the left side of the screen.
- Select “Upgrade” from the list of options, click on “Browse” and afterwards, find and select the installed Firmware.
- When the Firmware file is loaded, click on the “Upgrade” and once the update is fully executed, the device will restart automatically.

Select the Upgrade Option - Access “Web UI” after restarting and click on the “Setup” button appearing on the top right side of the screen.
- Afterwards, click on the “System” button appearing on the left side of the screen and from there select “Default Settings” from the list of options.
- Finally, click on the “Restore to Default Settings” and wait as the system auto-reboots.
- After restart, click on the “Setup” button appearing on the top right side of the screen.
- Click on the “Network” button appearing on the left side of the screen.
- Go to SMTP (Email) section and click on the Email Test to determine if the problem is fixed.
Choose the Email Test Option - If you feel the need to bring back the original layouts, select the “Import/Export” option from the System’s list.
Method 8: Try Another Email Service
- First, access the “Web UI” of Amcrest Device and click on the “Setup” button appearing on the top right side of the screen.
- After that, from the list of options appearing on the left side, select “Network” and in the SMTP (Email) section, select “Outlook”.
- Now provide all the login information and then, click on the “Save” button.
- After that, click on “Email Test” to see if the issue is resolved.
- If the error is not fixed, then make the following changes to your Outlook email layout.
In “Authentication” dropdown menu, select “TLS”.

Afterward, Set the “Port” to “587”.
- For enabling camera notifications, you may have to authenticate the “Verification email”.
- In this scenario, “Zoho Email” or “BlueHost” can also be used.
Method 9: Use Your Manual SMTP Server
- Access your browser, type “hmailserver” in the search bar and hit the “Enter” key.
- Download and install the latest version and after the installation, type in a new password for the program.
- Confirm the password and then, click on “Next”, in the “Connect” dialogue box, choose “localhost” and click on “Connect”.
- Next, in the password section, provide the hmailserver password you previously entered and click on the “OK”
- In the very first window, click on “Add domain” and simply put a domain name of your choice e.g. machester.com and click on “Save”.

Add Domain - From the list on the left side of the screen, click on “Accounts” under “Domains”. Then, click on the “Add” button.
- In the address section, provide a name e.g. User1 and set a password for this account.
- Now, for setting up a new forwarding email, from the list on your screen’s left side, click on “Settings”.
- From the dropdown menu, click on “Protocols” and then select “SMTP”.
- Add your email address below Delivery of Email.
- Access the “Web UI” of Amcrest Device and then, click on the “Setup” button appearing on the top right side of the screen.
- From the list of options appearing on the left side, select “Network” and afterwards, select “Other”.
- Provide all the credentials in the SMTP section and in the “Authentication” dropdown menu, select “None”.
- Afterwards, set the “Port” to “25”.
- Finally, add the local IP address to hmailserver username and check if the Amcrest email test failed yahoo error is fixed.

Method 10: Switch Between Wired and Wireless Network
- First, disconnect your camera from Wi-Fi and afterwards, by attaching an Ethernet cable, form a connection of your camera with the wired network.
- Next, click on the “Email Test” and if it works, connect your camera to a wireless connection.
- Finally, click on Email Test to determine if the error is fixed.
METHOD 11: Create an App Password through Yahoo
- Access your browser, enter your credentials and login into your Yahoo account.
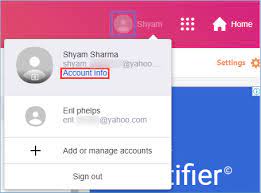
- Click on your profile on the top right side of the screen and click on “Account Info”.

Choose the Account Info Option - Afterwards, click on “Account Security” from the list of options appearing on the left side of the screen.
- From the menu, click on Generate app password” and in the window now appearing, enter your device name e.g. Amcrest.
- When the application’s password is successfully created, replace the Amcrest email settings password with the new app password.
Most probably after following the above-mentioned methods you would’ve been able to get rid of the problem but if you need further assistance in this matter please feel free to Contact Us.