Easily Fix Windows Command Processor on Startup issue with Windows
Several users have reported to seeing the Windows Command Processor on Startup of their computer and have been wondering as to why this occurs. In this article, we have written in detail, below, about what this is and what it means if the process is launching itself on the startup of your computer. Not only that, but we have also listed the detailed methods that you can adopt to fix this issue completely. Therefore, go through the step by step process that we have mentioned below to rid yourself of this issue.

What is Windows Command Processor?
The Windows Command Processor is supposed to be a legitimate program that runs on your computer in case you want to execute some commands or access the command line terminal. Not only that, this terminal is often used to run some scans and to access certain features that are not available in the Graphical User Interface of your operating system.
However, keep in mind that if you are getting the Windows Command Processor on Startup of your Windows, it probably means that a malware or virus has hijacked your computer and is now executing some commands or injecting itself on your computer at its startup. We have compiled and written a step by step process below that will help you in getting rid of the issue on your computer.
Fixing the Windows Command Processor on Startup:
Fix 1: Launching in Safe Mode
- Press “Window + R”, type in “msconfig” and press Enter on your keyboard to launch the configuration window.
Typing in “Msconfig” - After that, Go to the “Services” tab from the top and tick the “Hide all Microsoft services” option and then select the “Disable all” option.
- Select “Apply” and then move on to the “Startup” tab.
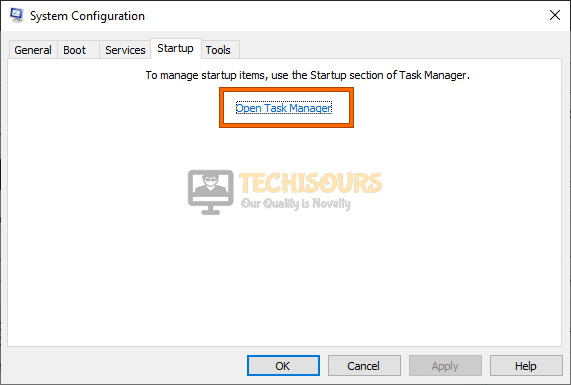
- From here, click on the “Open Task Manager” option.
Open Task Manager - Inside the Task Manager, right-click the enabled apps one by one and select the “Disable” button to prevent them from launching at startup.
- Restart your computer and check to see if doing so fixes the Windows Command Processor on Startup issue.
- If it is resolved then it probably means that one of your app/services is responsible for this issue and to identify the culprit, you can try to enable the applications one by one and check to see which one makes the issue come back on your computer.
Fix 2: Removing Malware from Windows
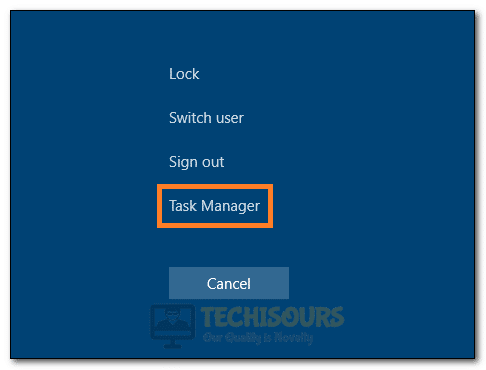
- Press “Ctrl + Shift + Esc” on your keyboard and select the “Task Manager” option from there.
Launching Task Manager - In the “Processes” tab, look for anything suspicious with a strange name or in a different language, right-click on it and select the “End Task” button to prevent the process from running on your computer.
- Now, press “Window + R”, type in “Regedit” and press Enter to launch into the registry editor.
Typing “regedit” - Inside here, make sure to navigate to the following path.
HKEY_CURRENT_USER\Software\Microsoft\Windows\CurrentVersion\Run
- In here, remove any entries that you don’t recognize and are suspicious.
- Now, click on the “Start” button, select the “Power” icon, hold down the “Shift” key and click on the “Restart” button to restart your computer.
- Now, after the computer starts, you should see different options, make sure to select the “Troubleshoot > Advanced Options > Startup Settings” options and then press the key for “Safe Mode with Networking” to restart your computer in the safe mode.
Selecting “Safe Mode with Networking” - After that, navigate down to the following path from your File Explorer.
C:\Users\’Your UserName’\AppData\Roaming
- In here, look for any files that seem suspicious to you or ones that you don’t recognize from your applications and remove them from the computer.
- After that, head to the following two paths and do the same as we did before.
C:\Users\’Your UserName’\AppData\Local

C:\Users\’Your UserName’\AppData\Local\Temp
- After removing such files, restart your computer and check to see if you have fixed the Windows Command Processor on Startup issue.
Fix 3: Performing SFC and DISM Scans
- Press “Window + R”, type in “cmd” and press “Ctrl + Shift + Enter” on your keyboard.
Typing in cmd - From there, type in the following commands one by one and press “Enter” to execute them on the computer.
sfc /scannow

DISM /Online /Cleanup-Image /CheckHealth

DISM /Online /Cleanup-Image /ScanHealth

DISM /Online /Cleanup-Image /RestoreHealth
- Restart your PC afterwards and see if the issue is resolved now
Fix 4. Performing a Scan Using third-party apps
Sometimes, the issue might be fixed simply by running a malware scan to remove any viruses and malware from your computer that might be causing this command processor to run at the Windows startup. For that, you can use any of the different software that we have used.
Scan with Combofix:
- Download the Combofix software on your computer from here and run the executable to install it on your computer.
- Make sure that the Antivirus and malware software other than Combofix on your computer has been disabled beforehand to ensure maximum compatibility.
- Run the software and it will prompt you to conduct a scan to check for any virus and malware.
- Approve this prompt and wait for the scan to be finished and the log file for the scan will be created in its installation folder. Make sure to take a look at this file to ensure that the scan ran smoothly.
- You can later remove this software from the computer if you don’t have any need for it.
- Check to see if the Windows Command Processor on Startup issue has been fixed.
- It will thoroughly scan your PC and output a log file afterwards
- The first run might not work out for you but have a look at the log file, it might help
- Now, to uninstall it you need to press “Window + R”, type in “ComboFix /uninstall” and press Enter
- This will remove Combofix from your PC
Scan with Junkware Removal Tool:
- Download the Junkware Removal Tool from here and install it.
- Disable all other antivirus and antimalware apps and run JRT.exe as administrator.
- The software will now automatically start scanning your computer for any junkware, wait for the scan to run and check to see if the issue is now fixed.
- Take the actions that have been recommended by the tool and check to see if the Windows Command Processor on Startup issue is now fixed.
Scan with Malwarebytes and AdwCleaner
- Download AdwCleaner from here and MalwareBytes from here.
- After downloading, make sure to run the executable to install this software on your computer and restart to complete the installation.
- Run both AdwCleaner and Malwarebytes one by one and make sure to perform a “Full Scan” to check for any viruses and malware.
- After removing the malware, restart your PC and check if the Command Processor still launches on startup.
Scan With Sophos Free Virus Removal Tool:
- Download it from here and install it.
- Launch the program and click “Start Scanning”.
- Wait for it to complete and take any necessary actions.
- Reboot your PC and see if the issue is resolved now.
Scan with Farbar Recovery Scan Tool:
- Download it from here and install it.
- Launch the program and click “Scan”.
- Wait for the scan to complete and take any necessary recommended actions.
- Restart your PC afterwards and see if the issue is resolved.
Fix 5: Perform a System Restore
- Press “Windows + R” to launch into the Run prompt, type in “rstrui.exe” and press “Enter” to launch into the restore management window.
Typing in “rstrui” - From here, click on the “Choose a Different Restore Point” and click on the “Next” option.
- From there, select a restore point that lies before the date on which this issue started occurring and click on the “Next” button to move ahead with the restore.
- Now, follow the on-screen instructions to complete the System Restore and check to see if the Windows Command Processor on Startup issue is resolved on your computer.
Fix 6: Updating Windows
- Press “Window + S”, type in “Check for updates” and press Enter on your keyboard.
Check for updates - Click “Check for updates” and windows will automatically download and install the latest available updates or click “Download and install” if the update does not start automatically.
- Restart your PC afterwards and see if the issue is resolved now.
Fix 7: Running Some Commands
- Press “Window + R”, type in “cmd” and press “Ctrl + Shift + Enter” on your keyboard.
Typing in cmd - Type in the following command and press Enter after each to execute them on the computer.
ipconfig /flushdns
nbstat -R
arp -d *
netsh branchcache reset
netsh advfirewall reset
netsh winsock
netsh int ipv4 reset
netsh int ipv6 reset
netsh int ip reset c:\resetlog.txt
- After running all the above commands, shut down your PC and router and turn them back on after a couple of minutes
- Run the following commands in cmd afterwards:
netsh interface tcp show global
IPCONFIG /ALL
- Additionally, type in the following command:
Powershell -ExecutionPolicy Unrestricted Add-AppxPackage -DisableDevelopmentMode – Register $Env:SystemRoot\camera\AppManifext.xml powershell -ExecutionPolicy Unrestricted Add-AppxPackage -DisableDeveopmentMode -Register $Env:SystemRoot\FileManager\AppxManifext.xml powershell -ExecutionPolicy Unrestricted Add-AppxPackage -DisableDevelopmentMode -Register $Env:SystemRoot\ImmersiveControlPanel\AppxManifext.xml
- Restart your PC afterwards and see if the issue is resolved now
Fix 8: Performing a Windows Defender Scan
- Press “Window + S”, type in “Windows Security” and press Enter on your keyboard.
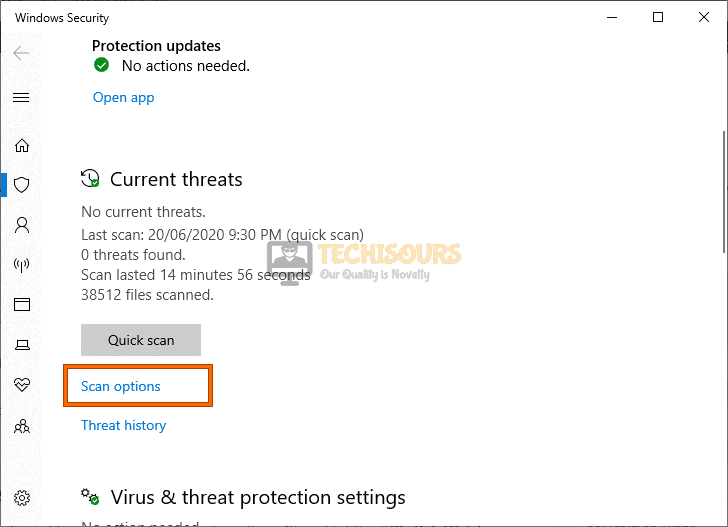
- Click “Virus & threat protection” and select “Scan options”.
Scan options - Make sure to check the “Full Scan” or “Microsoft Defender Offline Scan” option and click on the “Scan Now” option.
- Restart your computer and check to see if the issue is fixed.
Fix 9: Checking Hard Disk Integrity
- Press “Window + R”, type in “cmd” and press “Ctrl + Shift + Enter” on your keyboard to launch with admin permissions.
Typing in cmd - Type in the following in cmd and press Enter afterwards to execute it on your computer.
CHKDSK [volume[[path]filename]] [/F] [/V] [/R] [/X] [/I] [/C] [/L[:size]]
- Restart your PC afterwards and see if the issue is resolved
Fix 10:Resetting the PC
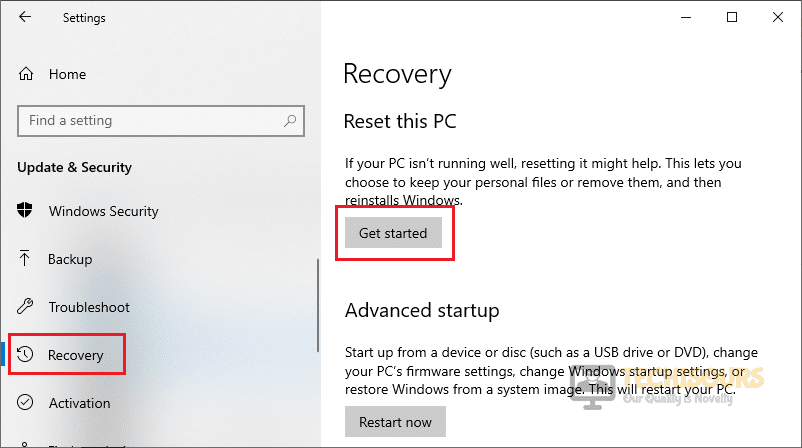
- Press “Window + S”, type in “Reset this PC” and press Enter on your keyboard.
Reset this PC - Select the “Get started” option and then click on the “Keep my files” option.
- Wait for it to complete and restart your PC.
- Check to see if the Windows Command Processor on Startup issue is now fixed.
Fix 11: Creating a New User Account
- Press “Window + R”, type in “cmd” and press “Ctrl + Shift + Enter” on your keyboard.
Typing in cmd - Type in the following command and press Enter.
-
net user USERNAME PASSWORD /add
- Make sure to enter in your Username and password that you want to configure for the new account instead of the actual words.
- Log out of your current account and log into the new one.
- Check to see if doing so fixes the Windows Command Processor on Startup issue.
If the issue still persists, contact us for further information.


