Easily Fix Steam Corrupt Content Files Error [Complete Guide]
Steam is one of the most popular Digital Gaming Platforms and Stores and it contains literally a plethora of different games from different Genres. However, recent feedback from users is suggesting that some people were getting the “Steam Corrupt Content Files” Error. The exact message states “An Error Occurred While Updating Corrupt Content Files” and sometimes prevents the user from installing or updating.

In this article, we have concluded some solutions that you can follow and certain instructions that will help you completely get rid of this error. Make sure to follow each step carefully and to ensure that you proceed in the same manner in which they have been presented.
What Causes the Steam Corrupt Content Files Error?
After going through some basic troubleshooting techniques, we concluded that the following are the most probable reasons due to which this error message occurs.
- Missing Game Files: Some game files might be missing or they might’ve been corrupted due to a storage failure due to which you are running into the Steam Corrupt Content Files error. Therefore, we recommend that you try and check for any missing files using the solution below.
- Corrupted Drives: Certain Drivers for hardware installed on your PC might have gone bad or they might be corrupted and that can have a serious toll on your PC’s hardware usage. This can also sometimes be responsible for the corrupted content files on Steam.
- Missing System Files: System files and drivers go hand in hand while running the operating system and using hardware installed on the computer. If some system files are corrupted, the operating system won’t be able to properly load the drivers and allocate the resources to different functions. This can cause the Steam Corrupt Content Files Error which can, in turn, prevent you from being able to update the game.
- Cached Data: All applications store some cached data on your device which is used to streamline the loading process and to ensure that the app doesn’t take too long to load. However, sometimes, this cache can be corrupted which can end up causing the Steam Corrupt Content Files issue.
- Windows Firewall: The Windows Firewall has been known to trigger some false positives in which it prevents certain programs from being run on the computer because it marks them as harmful or potential threats. Since you can vouch for the authenticity of the game and Steam, you can easily add them as an exception to the Firewall and then check to see if doing so fixes the issue.
- Antivirus: In addition to the Firewall, the Antivirus installed on your system can also sometimes prevent it from being able to run certain apps by imposing restrictions. Therefore, we recommend that you also temporarily disable the Antivirus or add the programs as an exception to ensure that it is able to run without any restriction.
- Steam Account: The Steam account that you are using to sign in might have been improperly logged in due to which you are getting the Steam Corrupt Content Files error on your screen. We recommend that you try and log in with another account and then log back in with yours to ensure that the login process is refreshed.
- Wireless Connection issue: Wired connections have an edge over wireless ones as they are less susceptible to interruptions and are generally more stable. Therefore, we recommend that you try out a Wired connection and check to see if that fixes the Steam Corrupt Content Files issue.
- RAM Hogging: Steam requires some RAM to be free on your computer in order to download and process updates. If there is little to no RAM available for it to use, you will see the Steam Corrupt Content Files error while trying to update a game. Therefore, we recommend that you try to free up some RAM by ending applications that are hogging too much of it.
- App Cache: Some Applications store their cache on the disk and load it up when needed. This process can sometimes exhaust system resources and refreshing the App Data cache by deleting it will help streamline certain processes. Therefore, we recommend that you do so by following the steps mentioned in the solution below.
- Disk Errors: The Storage device being used by your computer can acquire some bad sectors due to prolonged usage and end up causing the error while trying to install an update. Therefore, we recommend that you try to perform a disk check to ensure that all is up to mark with your storage device.
Now that you have gone through and understood the basic reasons behind this error, we can finally move on towards implementing the solutions.
Fixing the Steam Corrupt Content Files Error:
Solution 1: Verifying Game Files
- Right-click on Steam and select “Run as Administrator”.
- Navigate to the game that failed to update in the “Steam Library”.

Opening Steam Library - Right-click on the game, select “Properties”, and move to the “Local Files” tab. Click on the “Verify Integrity of Game Files”.

Verify integrity of game files - Launch and play the game like normal.


Solution 2: Scanning your drives
- Press “Windows + E” on your keyboard, and click on the “This PC” option from the left side.
- Right-click on the “Local Disk” in the list of storage drives on which Steam is installed and select “Properties” from the context menu.

Select Properties - Move over to the “Tools” tab and select the “Check” option under the “error checking” section.

Clicking on Check under the Error Checking Option - Check on the “Automatically Fix File System errors” option and proceed with the scan by clicking on “Start”. The scan would tell you the error code as well as fix the error.


Solution 3: Running an SFC (system file checker) Scan
- Press “Windows + R” on your keyboard, type in “Cmd” and press “Shift + Ctrl + Enter” to provide admin permissions.
- In the command prompt, type in the following command and press “Enter” to execute it.
sfc /scannow

sfc / scannow - Press “Enter” to run this command on your system.
- Let the scan run and check for any deformities on your system files and then check to see if the Steam Corrupt Content Files Error is fixed.

Solution 4: Clear Steam Download Cache
- First of all, launch the “Steam client” and click on the “Steam” option on the upper left side.

Steam Settings - Click on the “Settings” option and navigate to the “Downloads” in the left menu pane.
- Click on the “Clear download cache” button.

Clear download cache


Solution 5: Turning off Windows Defender Firewall
- Press “Windows‘ + “I” to launch into the Windows Settings.
- Once in “Settings“, locate the “Update and Security” option.

Clicking on “Update and Security” - In the “Update and Security” window, Locate and open “Windows Security“.
- Proceed to “Virus and Threat Protection” under the “Protection Areas” section. In the new dialogue box, navigate to “Virus and threat protection settings” and click on “Manage Settings“.

Manage Settings - Now turn off the button located under the “Realtime Protection” option, Click on “Yes” when the “Permission” dialogue box pops up, and you’re good to go.
- Check to see if disabling the Antivirus fixes the Steam Corrupt Content Files Error.


Solution 6: Temporarily uninstall your Antivirus
- Press “Windows + X” on your keyboard, In the pop-up menu, click on “Apps and Features/Programs and Features”.

Choose Apps and Features - In the “Apps and Features/Programs and Features” window, scroll down to locate your antivirus (McAfee, Avast, Sophos, etc.).
- Click on the name of the Antivirus application and select “Uninstall or Uninstall/Change”.

Clicking on the “Uninstall” button - Click on “Yes” to allow the permission prompt to uninstall the antivirus.
- Check to see if doing so fixes the Steam Corrupt Content Files Error on your computer.


Solution 7: Using a different Steam Account
Through the help of a friend or relative, ask them for their Steam Account for you to log in and update your game.
Solution 8: Reinstall the game
- Press “Windows” + “I” to open the settings, click on “Apps” and you will see the list of installed programs on the right side.
Note: Alternatively, you can also try and uninstall from a 3rd party software such as “Revo Uninstaller”.
Clicking on “Apps” in the Settings - In the “Apps and Features/Programs and Features” window, scroll down to navigate to the relevant game. Right-click on it and click on “Uninstall or Uninstall/Change.” Click on “Yes” on the “permission prompt” to “Uninstall the program.
- Make sure to backup all your saved game files before doing so.

Solution 9: Checking out a server problem
Often, an issue with Steam servers can cause such kinds of errors. To see if that’s really the case, you can use SteamStat.us and check if servers are down in your locality. Moreover, you can also check out Steam’s Twitter page to receive any kinds of updates.
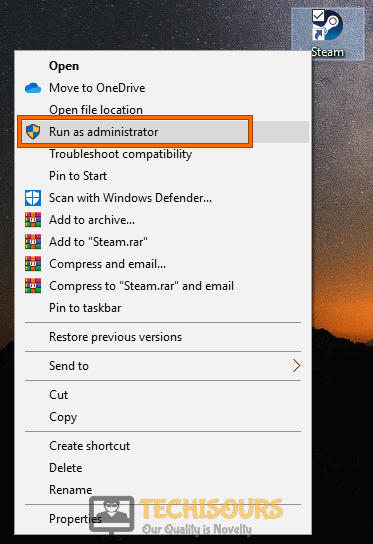
Solution 10: Running Steam as an Administrator
- Right-click on the “Steam Client” and select “Run as an Administrator”.

Run as administrator - Open the “Steam directory” where you have downloaded Steam, typically “C:\Program Files (x86)\Steam.”
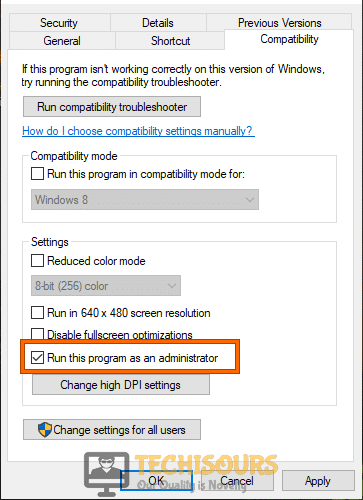
- Locate the executable file named “steam.exe.” Right-click on the file and click on “Properties” in the drop-down menu.
- Switch to the “Compatibility” tab and check the “Run this program as an administrator” option under the “Settings” tab.

Run this program as an administrator - Click on “Apply” for the changes to take effect. Now click on the same “steam.exe” file to see if the problem is resolved.
Solution 11: Setting up a wired connection
An unstable internet connection can also give rise to this error. To get rid of low latency, bad connections, and potentially this error. Plug an Ethernet cable into your system from your router or modem.
Solution 12: Whitelist Steam in Windows Firewall
- Press “Windows + R” on your keyboard to open the “Run” dialog box. Type “control firewall.cpl” in the address bar and press “Enter” to open “Windows Firewall.”
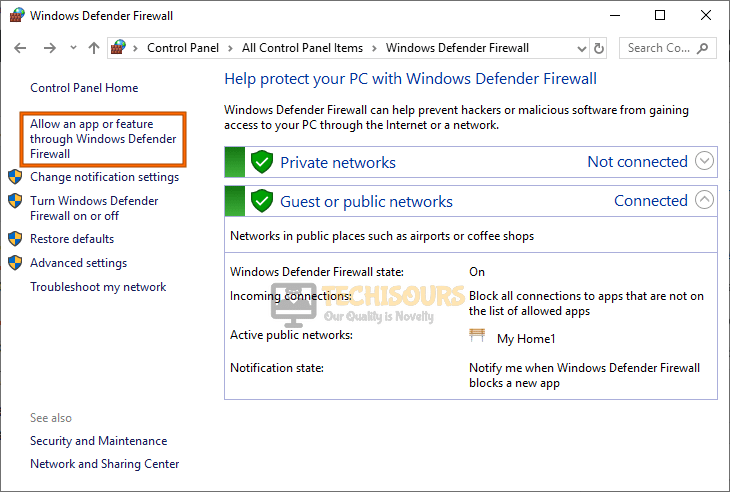
- Click on “Allow an app or feature through Windows Defender firewall” in the menu pane on the left.

Allow an app or feature - Click on the “Change Settings” option in the “Allowed Apps” dialogue box. Click on “Yes” if you come across any permission prompts.
- Now click on “Allow other apps” in the “Allowed apps” dialogue box and browse the “Steam.exe” file.

Allow another app Typically it is located in “C:\Program Files\Steam\bin.” Do the same with the .exe file of the game causing the problem.
- Check the “Private and Public” boxes of both of the entries and click on “OK.”
- Get back to the “Windows Defender Firewall” window and click on “Advanced Settings” in the menu pane on the left. Click on “Yes” if you come across any permission prompts.
- Navigate to “Inbound Rules,” located on the left side of the Window. Then, under the “Inbound Rules” drop-down menu under the “Actions” tab on the window’s right-hand side, click on “New Rule.”

Clicking on the “New Rule” option - The “New Inbound Rule Wizard” dialogue box will open up. Click on the “Port” option and click on “Next.”
- At the “Protocols and Ports” step, choose the “TCP” option and then select the “Specific Local Ports” option.
- Now paste the following ports in the order as listed and select “Allow the connection” each time you press “Next.” Do this for all the entries.
27015--27030
27036
27015
- Similarly, add another rule for UDP and select the “UDP” and “Specific Local Ports” option instead of “TCP,” this time following the same previous steps.
27015--27030
27000--27100
27031-2703
4380
27015
3478
4379
4380
- Once all the ports are added, click on “Next” and make sure that all three options, “Domain,” “Public,” and “Private,” are checked.
- Hit “Next” and name your rules. Proceed by clicking on “Finish” and restart your computer.


Solution 13: Doing a Winsock Reset
- Press “Windows + R” on your keyboard to open the “Run” dialogue box. Type “cmd” in the “address bar” and press “Ctrl + Shift + Enter” to open “Command Prompt Window.” Click on “YES” if you come across any permission prompts.
- In the “cmd prompt,” type or paste the commands below. Ensure that the commands are run separately, and you have pressed “Enter” after each command.
ipconfig /flushdns
nbtstat -R
nbtstat -RR
netsh int reset all
netsh int ip reset
netsh winsock reset
- Close the “CMD Prompt” and relaunch Steam.
Solution 14: Freeing up RAM Space
- Press “Ctrl +Shift + Enter” on your keyboard to open the “Task Manager.” Move to the “Processes” tab.

End discord processes - Right-click on each unnecessary tasking consuming RAM and click on “End Task” from the dropdown menu.

Solution 15: Deleting the app cache folder
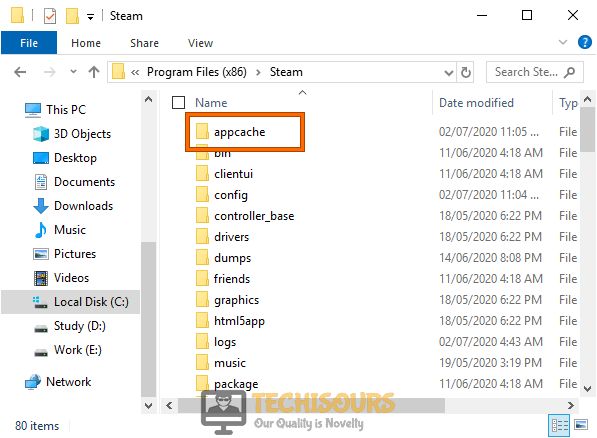
- Press “Windows + E” on your keyboard, and switch to “This PC.” Navigate to the folder where Steam is downloaded and locate the “app cache” folder. By default, you can find it at “C:\Program Files (x86)\Steam.”
- Once you have located the “app cache” directory, right-click on the file and select “Delete” from the drop-down menu.’

Delete the app cache folder - Restart your computer and see if you have solved the problem.
Solution 16: Updating and/or Uninstalling the Wireless network card driver
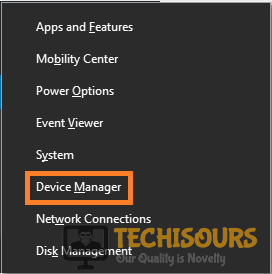
- Press “Windows + R” on your keyboard to open “Run.” In the “Run” dialogue box, type or paste “devmgmt.msc” to open the “Device Manager.”

Open Device Manager - Locate the “Network Adapters” option and double click on it to extend it further. Right Click on your “wireless network driver” and select “Update” from the context menu.
- In the “Update Drivers” dialogue box, select the “Search automatically for updated driver software” option and follow the onscreen prompts to successfully update your network driver. Alternatively, you can click on “Uninstall” from the drop-down menu if updating them doesn’t work and restart your system.
Solution 17: Run CHKDSK Command to Check Disk Error
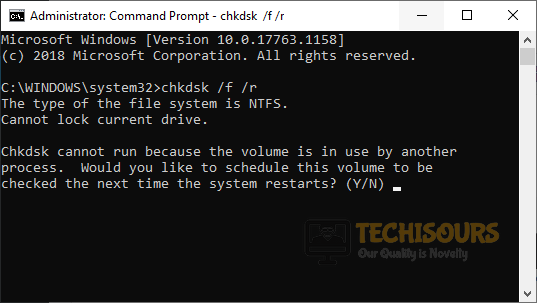
- Right-click on the “Windows icon” and select “PowerShell (Admin)” from the drop-down menu.
- Paste the command “chkdsk /f /r” ” in the Window and hit Enter.

Run CHKDSK Utility - Restart your computer.
Solution 18: Delete the downloading folder of steam
- Press “Windows + E” on your keyboard, and switch to “This PC.” locate the “downloading” folder inside the “steamapps” folder. By default, it is present in “C:\ program files (x86)\Steam\ steamapps.”
- Inside the “downloading” folder, delete all of its contents. Now return to Steam and try updating the game again.
Solution 19: Changing the server region
- First, launch the “Steam client” and click on the “Steam tab” at the upper left. Click on the “Settings” option and navigate to the “Downloads” in the left menu pane.
- In the “download region” option, select a “download server” and click on “OK.”
- Log out of your steam account and log back in, and try to update the game now.
Solution 20: Reinstalling Steam
- Press “Windows + X” on your keyboard. In the pop-up menu, click on “Apps and Features/Programs and Features.”

Choose Apps and features - In the “Apps and Features/Programs and Features” window, scroll down to locate “Steam.”
- Right-click on it and select “Uninstall or Uninstall/Change.” Click on “Yes” on the permission prompt to uninstall the antivirus.

Uninstall Steam


Solution 21: Restarting your PC
Sometimes, restarting your system is a cure to all problems. Similarly, just restart your system to see if the problem exists or not.
Solution 22: Relocate Steam Installation and Game Files
- First, launch the “Steam client” and click on the “Steam tab” at the upper left. Click on the “settings” option and navigate to the “Downloads” in the left menu pane.
- Click on the “Add Library Folder” option and select a new location for your Steam on your Hard drive. Once selected, click on “Move Folder” to move all your files.

Add library folder - Now press “Windows + E” on your keyboard, and switch to “This PC.” Navigate to the folder where Steam is downloaded. By default, you can find it at “C:\Program Files (x86)\Steam.”
- Now leaving the “SteamApps, UserData and .exe files and folders,” delete all the other content present in the directory.
- Press “Ctrl + X” on your keyboard to cut the files. Navigate to the new directory of Steam and press “Ctrl + V” to paste these files.
- Restart your computer and launch steam.

Solution 23: Repair Steam Library Folder
- First, launch the “Steam client” and click on the “Steam tab” at the upper left. Click on the “Settings” option and navigate to the “Downloads” in the left menu pane.
- Click on “Steam Library Folders” located under the “Content Libraries Option.”
- In the “Steam Library Folder” dialogue box, right-click on the default folder and click on “Repair Library Folder.”

Repair Library Folder - Once scanned, try downloading the games again.

Solution 24: Updating your Drivers
- Download and Install Driver Talent.
- Open “Driver Talent” and click on “Scan” to detect all the drivers.

Click on Scan Button - Click on “Repair” to fix faulty drivers or click on “Uninstall” any newly installed problematic drivers or click on “Update” to update drivers.

Solution 25: Update your Windows
- Go to the “Start Menu” located on the bottom left of the screen. Proceed to “Settings.”
- Navigate to “Updates and Security” and you would be directed to the “Windows Update” window.

Update and Security - Click on the “Check for Updates” option available at the top of the page. Install any updates if they are present and Restart your computer.

Check for updates


Solution 26: Uninstall problematic software
Any recently installed software might be interfering with Steam and causing it to crash. To avoid such instances, simply uninstall any program that has recently been installed on your computer.
Hopefully, the aforementioned fixes would be enough in getting you through the error successfully but if the issue still exists then you may Contact Us here.