How to Fix the Teredo Error on Xbox [Complete Guide]
Teredo is an adaptation technology that facilitates the transitioning of the internet by giving complete IPv6 connectivity for the hosts that are capable of IPv6 but are actually on the IPv4 internet without having a native connection to IPv6 network. Microsoft has embedded this technology in Xbox and Windows to use IPv6 for P2P connectivity which facilitates in multiplayer gaming purposes. Quiet recently, gamers have reported an error that states “Teredo is unable to qualify. This could Block you from playing Multiplayer Games” and prevents them from establishing a smooth P2P connection for multiplayer gaming. If you have just encountered this error message, worry not because we have compiled a guide for you to resolve this issue.

What causes the Xbox Teredo Error?
We have received several user complaints about this error and after deeply analyzing their reports, we have concluded that there are several reasons which can trigger the Xbox Teredo Error but some of the most common ones are listed below.
- Corrupt teredo adapter: The most common cause of this error is a corrupted teredo adapter. These adapters play an essential role by ensuring that everything runs smoothly when you are using Xbox services on your computer. If this adapter is somehow corrupted, then uninstall and reinstall it by following the steps explained in Solution 2.
- Disabled IP helper service: IP helper service is an essential Windows Service that assists the computer in retrieving and modifying information related to the network configurations. You might encounter a Teredo error on your computer if IP helper services are disabled. So, if this is the case, resolve this issue by following the steps indexed in Solution 3.
- Faulty Teredo server name: Your computer might encounter the Xbox Teredo error if you have set a wrong value as your Teredo server name. You can check the Teredo server name and correct it by setting to default. To carry this task out, follow the steps listed in Solution 4.
- Unwanted host files: In your computer system, Host files are plain text files that map the hostnames to IP addresses. If the host files contain some corrupted or useless data, then it might not be able to map a hostname to the IP address properly which can trigger a Teredo Error on Xbox. So, to resolve this issue, follow the steps compiled in Solution 5.
- VPN adapters: VPN is used by almost everybody to maintain their anonymity by establishing a secure connection over an insecure network. In some cases, these VPNs block some of the features of the Teredo adapter from functioning properly and trigger the Xbox Teredo Error. So, if there is a VPN adapter installed on your computer, uninstall it by following the steps indexed in Solution 7.
- Disabled Teredo tunneling and UPnP: Universal Plug and Play (UPnP) is a crucial feature integrated into the router that enables all the devices connected with the router to be able to discover and communicate with each other. Whereas Teredo tunneling is a technology that provides complete IPv6 connectivity to IPv6-capable hosts that are on the IPv4 configuration. If one of these features is disabled on your router then there is a higher chance for you to encounter the Teredo error message on your computer or console. So, to get around this problem, enable these features by following the steps listed in Solution 16.
- Outdated router’s firmware: Router’s firmware is responsible for providing network protocols, security, and administrative controls, etc to the administrator. If your router’s firmware is outdated, then you might encounter errors that will cause the Teredo Error. So, to resolve this issue, update your router’s firmware by following the steps explained in Solution 18.
Before we start:
The problem with finding and allocating the IP Address can be a temporary glitch that can be redressed simply by power cycling your router. So, before moving on to more complex solutions, it is always recommended to go through some basic troubleshooting steps that might resolve this issue.
- Take the power adapter of your router out of the socket and wait for it to completely shut down.
Removing the Plug from the socket - In the meanwhile change the place of the router where it can get a better signal strength. Also, move other electronic devices away from the router that interferes with the signals.
- Now detach the power cord of your console or computer and wait for it to completely shut down.
- After waiting for a couple of minutes, insert the power adapter of the router back into the socket and restart it and wait till it shows complete signals.
- Now power up your console and computer by inserting the power cables back into the socket.
- If your console or computer still experience poor signal strength of your local internet connection, then we always recommend you to attach your console or computer directly to the router with the help of an ethernet cable.
- Now open your favorite browser on your computer or smartphone and check the Xbox Live Service status at the Twitter support account or the Live Service Status website.
Fixing the Teredo Error on Xbox:
Solution 1: Examine Xbox Networking
- Hit “Win + I” keys on the keyboard to open “Settings”.
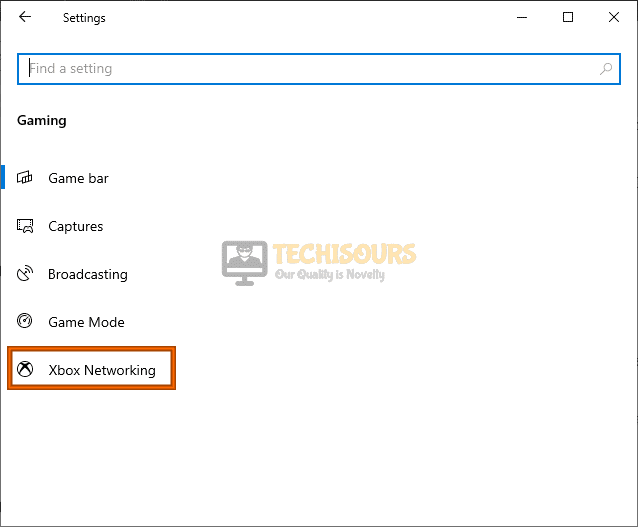
- Navigate to “Gaming” and select “Xbox Networking”.
Xbox Networking - In the right pane of the Settings window, make sure that the “Internet Connection” status is labeled as “Connected”.
- Now click on the “Fix it” button to fix the error associated with the Teredo IP address and then try to reconnect by clicking on the “Check again” button.
Examine Xbox Networking
Solution 2: Reinstall Teredo adapter
- Press the “Win + R” keys on the keyboard to open the Run box. Type “cmd” and hit the “Shift + Ctrl + enter” keys on the keyboard simultaneously to open it as administrator.
Open Command Prompt as administrator - Type the following command in the command prompt and hit enter to execute it.
netsh interface Teredo set state disable
- Now hit “Win + X key” on the keyboard and select the “Device Manager” option from the list.
Device Manager - Click on the “View” tab and select “Show hidden devices”.
Show hidden devices - Locate and click “Network Adapter” to expand its menu. Now locate and right-click on the “Teredo” option from the list and select “Uninstall device”.
Uninstall Teredo adapter - After the adapter is completely uninstalled, restart your PC to reinstall the adapter automatically.
- Now open the command prompt once again and enable the teredo service by executing the following command in it.
interface Teredo set state type=default
Set state type
Solution 3: Enable IP helper service
- Press the “Win + R” keys on the keyboard to open the Run box. Type “services.msc” and hit “enter” to open the services management window.
Services app - Scroll down the list and locate “IP helper”. Right-click on it and select “Properties”.
IP helper - Once you are in the properties window, navigate to the general tab, and locate the option associated with the “Startup type”. Make sure the startup type is set to “Automatic”.
Startup type - Apply the settings and click on “OK” and check to see if the issue persists.
- If the IP helper service is still not enabled, then open “IP helper” properties again and navigate to the “Dependencies” tab.
- Once you are in this tab, locate the “The service depends on the following system components” section and note down all the services on a paper.
Dependencies - Now go back to the Services window and enable all the services one by one that you have noted on the paper.
Solution 4: Reverting Teredo server name
- Press the “Win + R” keys on the keyboard to open the Run box. Type “cmd” and hit the “Shift + Ctrl + enter” keys on the keyboard simultaneously to open it as administrator.
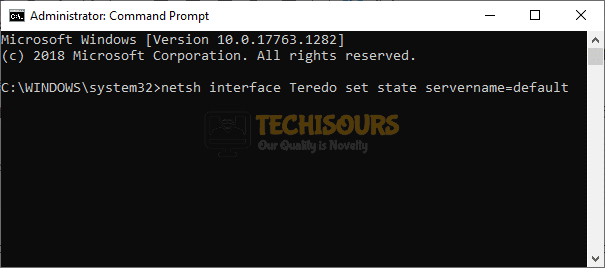
- Type the following command in the prompt and hit enter to change the Teredo server name to default.
netsh interface Teredo set state servername=default
Set state server name - After executing this command, check to see if the issue still persists. If you still encounter the error, execute the following commands in the prompt.
netsh interface teredo set state type=enterpriseclient
netsh interface teredo set state servername= teredo.remlab.net
Solution 5: Delete certain host files
- Press the “Win + R” keys on the keyboard to open the Run box. Type “cmd” and hit the “Shift + Ctrl + enter” keys simultaneously to open it as an administrator.
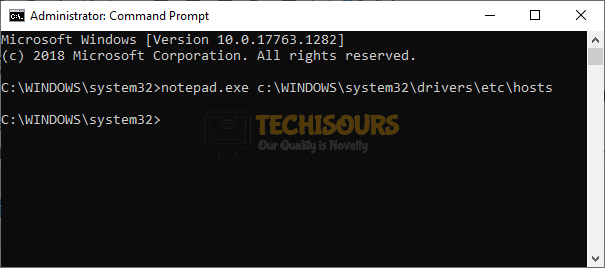
- Type the following command in the prompt and hit enter to open the host files and view them in notepad.
notepad.exe c:\WINDOWS\system32\drivers\etc\hosts
Open host files - Now hit “Ctrl + F” on the keyboard and search for “win10.ipv6.microsoft.com” entries.
- Once these entries are located, select them and hit the delete button from the keyboard to delete these entries.
Delete certain host files - Save the file and check if the error persists.
Solution 6: Enable Teredo in the registry
- Press the “Win + R” keys on the keyboard to open the Run box. Type “cmd” and hit the “Shift + Ctrl + enter” keys on the keyboard simultaneously to open it as an administrator.
- Execute the following command to check if Teredo is enabled or disabled in your registry.
reg query HKLMSystemCurrentControlSetServicesiphlpsvcTeredo
- If the Teredo is disabled in the registry, the command prompt will display a message on the screen that states “DisabledComponents REG_DWORD 0x8e”.
- So, to enable Teredo again, execute the following command in the prompt and check if the error is terminated.
reg add HKLMSystemCurrentControlSetServicesTcpip6Parameters /v DisabledComponents /t REG_DWORD /d 0x0
- If your computer has “Asus Game First Service” enabled, then try to disable it before enabling the Teredo service. Execute the following commands in the command prompt and see if the error persists.
sc config AsusGameFirstService start= disabled
sc stop AsusGameFirstService
reg add HKLM\System\CurrentControlSet\Services\Tcpip6\Parameters /v DisabledComponents /t REG_DWORD /d 0x0
Solution 7: Uninstall VPN adapters
- Hit “Win + X key” on the keyboard and select the “Device Manager” option from the list.
Device Manager - Click on the “View” tab and select “Show hidden devices”.
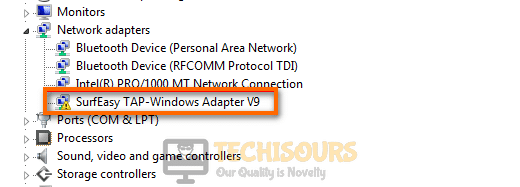
Show hidden devices - Locate and click “Network Adapter” to expand its menu. Now locate and right-click on the adapter similar to “TAP-Windows Adapter V9” from the list and select “Uninstall device”.
TAP-Windows Adapter V9 - If this solution eliminates the error from your computer then the best approach to permanently terminate this issue is to switch to another VPN.
Solution 8: Configure IPv6 on all tunnel interfaces
- Launch your favorite browser and open the Microsoft support page.
- Locate “Re-enable IPv6 on all tunnel interfaces” and click on the “Download” button to download the file.
Re-enable IPv6 on all tunnel interfaces - Once the file is downloaded, double-click on it to run the executable and check if the error persists.
Solution 9: Disable IPv6 in your computer
- Press the “Win + R” keys on the keyboard to open the Run box. Type “Control panel” and hit enter to open it.
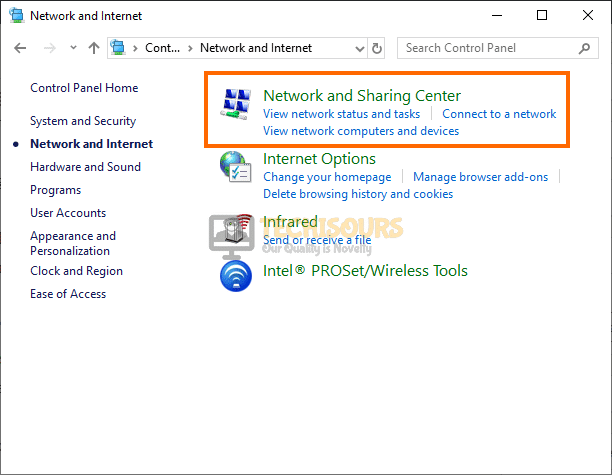
Control panel - Click on “Network and Internet” and select “Network sharing center”.
Network sharing center - From the left pane, select “Change adapter settings”.
Change adapter settings - Right-click on your local internet connection and select “Properties”.
Properties - Once you are in the properties windows, locate the checkbox associated with “Internet Protocol Version 6 (TCP/IPv6)” and uncheck it to disable IPv6 on your computer.
Disable IPv6 - Restart your computer to check if the error persists.
Solution 10: Create a new user account on your PC
- Hit “Win + I” keys on the keyboard to open “Settings” and navigate to “Accounts”.
Accounts - From the left pane, select “Family and other users” and click on “Add someone else on this PC” from the right side of the window.
Add someone else on this PC - Click on “I don’t have this person’s sign-in information” and then select “Add a user without a Microsoft account”.
Add a user without a Microsoft account - Now fill the user credentials to immediately create a new user account.
- Once the account is created, switch to the new account and check if you encounter the error message again.
Solution 11: Set Time zone to Automatic and enable Firewall
- Hit “Win + I” keys on the keyboard to open “Settings” and navigate to “Time and Language”.
Time and Language - Enable the toggle button associated with both “Set time automatically” and “Set time zone automatically”.
Set time zone automatically - Press the “Win + R” keys on the keyboard to open the Run box. Type “control panel” and hit enter to open it.
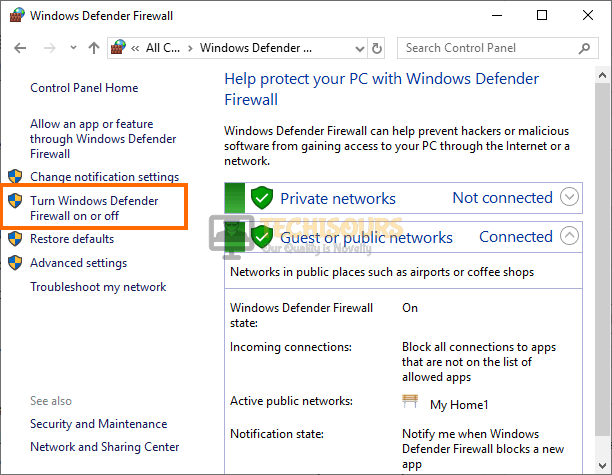
Control panel - In the “View by” dropdown menu, choose “Large icons” and select “Windows Defender Firewall”.
Windows Defender Firewall - From the left pane, click on “Turn Windows Firewall on or off”.
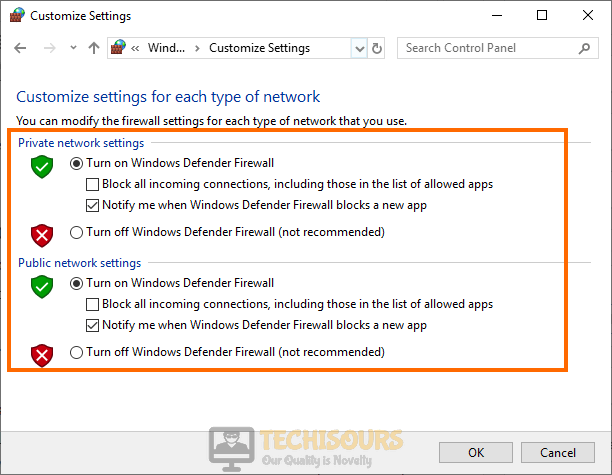
Turn Windows Firewall on or off - Now enable the radio buttons parallel to “Turn on Windows Firewall” under both private and public network sections.
Turn on Windows Firewall
Solution 12: Hard reset your console
- Press and hold the power button on your console for 20 seconds and wait for it to completely shut down.
- After waiting for at least 2 minutes, press the power button to restart your console and wait for it to start.
- When the console starts, log in to your Xbox account and check if the error persists.
Solution 13: Set Open NAT type in your console and renew UPnP
- Press the “Xbox” button on the controller to open the menu.
- Select “Profile and System” and go to “Settings“.
- Navigate to “General” and select “Network Settings”.
- Check the “NAT type” under the “Current Network Status” and set it to “Open”.
Set Open NAT type in your console - Now go to the “Settings” and run the “Test multiplayer connection”. As soon as the test finishes press and hold the “LT + RT + LB + RB” buttons on the controller to renew its UPnP.
Solution 14: Clear console’s alternate MAC address and set port manually
- Navigate to the console’s home screen. Select “Settings” and choose “Networks”.
- Go to “Advanced settings” and select the “Alternate MAC Address” option. Now select the “Clear” option.
Alternate MAC Address - Now click on “Alternate port selection” and set it to “51098”.
- Restart your console and check if the error persists.
Solution 15: Hard reset your router
- Power OFF your router and locate the Reset button at the back of your router.
- Push the Reset button with the help of a paper clip and hold it for at least 30 seconds.
- When all the router’s LEDs go dim, release the button and wait for the device to boot up after the reset.
Solution 16: Tweak your router’s settings
- Press the “Win + R” keys on the keyboard to open the Run box. Type “cmd” and hit the “Shift + Ctrl + enter” keys on the keyboard simultaneously to open it as administrator.
- Type the following command in the prompt and hit enter to execute it:
ipconfig
- Scroll down until you see a setting for “Default Gateway” under Ethernet or Wi-Fi.
Choose default gateway - Copy the router’s Default Gateway IP Address and paste it in your browser’s search bar to open your “Internet Settings”.
- Navigate to the “IPv6 settings” page and locate the settings associated with “Teredo tunneling” or “IPv6 tunneling”.
- If you see either of the above options, enable them and save the settings.
- Now navigate to the “Forwarding” tab and select “UPnP”.
- Click on the “Enable” button parallel to “UPnP” to enable it.
Enable UPnP - Apply the changes and restart your router to see if the error still persists.
- If the error persists, go back to your router’s settings interface and look for “Enable IPv6” settings. If it is enabled, disable it and save the settings.
Solution 17: Enable bandwidth limit in your router
- Press the “Win + R” keys on the keyboard to open the Run box. Type “cmd” and hit the “Shift + Ctrl + enter” keys on the keyboard simultaneously to open it as administrator.
- Type the following command in the prompt and hit enter to execute it:
ipconfig
- Scroll down until you see a setting for “Default Gateway” under Ethernet or Wi-Fi.
Choose default gateway - Copy the router’s Default Gateway IP Address and paste it in your browser’s search bar to open your “Internet Settings”.
- Navigate to “WPS wizard” and select “QoS settings” from the left pane.
- Check the box parallel to “Turn Bandwidth Control On” and enable the button parallel to the “Automatically check internet uplink bandwidth” option.
Turn on bandwidth control - Restart your router and check if the error is eliminated.
Solution 18: Update your Router’s Firmware
- Press the “Win + R” keys on the keyboard to open the Run box. Type “cmd” and hit the “Shift + Ctrl + enter” keys on the keyboard simultaneously to open it as administrator.
- Type the following command in the prompt and hit enter to execute it:
ipconfig
- Scroll down until you see a setting for “Default Gateway” under Ethernet or Wi-Fi.
Choose default gateway - Copy the router’s Default Gateway IP Address and paste it in your browser’s search bar to open your “Internet Settings”.
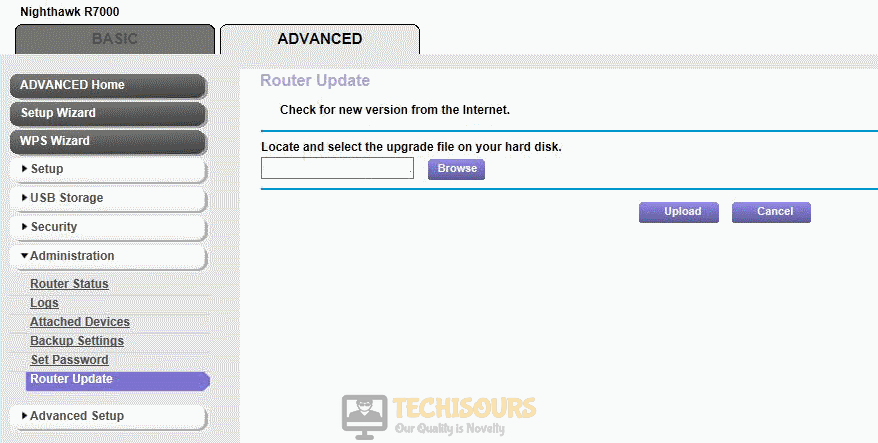
- Navigate to the “Advanced” section and select “Administration”.
- Now locate and click on the “Router Update” or “Firmware Update” option.
Choose router update - Now click on “Check for a new update on the Internet”. It will look for any updates available and if there are any updates available, click on the “Install Update” button to update your firmware.
If this solves the Xbox Teredo error for you, then all you can do is to contact your ISP and explain your issue to your ISP’s representative. They will most probably replace your device with a new one if the issue with your router is permanent.
Solution 19: Forward Ports
- Press the “Win + R” keys on the keyboard to open the Run box. Type “cmd” and hit the “Shift + Ctrl + enter” keys on the keyboard simultaneously to open it as administrator.
- Type the following command in the prompt and hit enter to execute it:
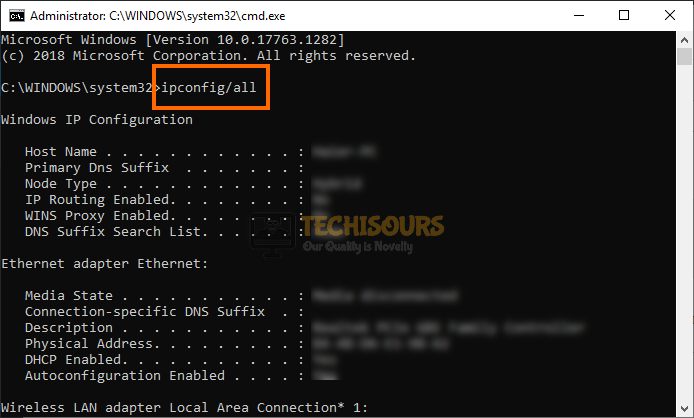
ipconfig/all
ipconfig/all - Note down the IP address of your computer and increase its last number by 10. For example, if the computer’s IP address is “192.168.10.6”, note down the IP address as “192.168.10.16”.
- Now go to your console and open its “Settings”.
- Navigate to “General” and select “Network Settings”.
- Click on “Advanced Settings” and select “IP Settings”.
IP Settings - Now select “Manual” and enter the unique IP address that you just created in step 3.
- Also, enter your computer’s “Subnet mask” and the “Gateway”.
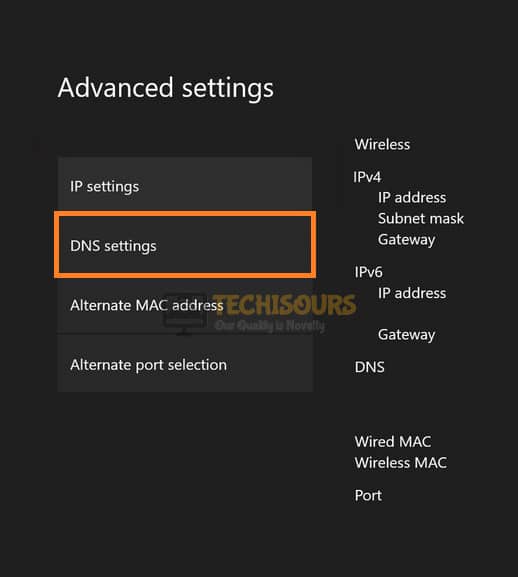
- Now go back and select “DNS settings”.
DNS settings - Click on “Manual” and enter the primary DNS settings that you observed in your computer. Enter the secondary DNS settings also if you found them on your computer.
- Now press the “Win + R” keys on the keyboard to open the Run box. Type “cmd” and hit the “Shift + Ctrl + enter” keys on the keyboard simultaneously to open it as administrator.
Open Command Prompt as admin - Type the following command in the prompt and hit enter to execute it:
ipconfig
- Scroll down until you see a setting for “Default Gateway” under Ethernet or Wi-Fi.
Choose default gateway - Copy the router’s Default Gateway IP Address and paste it in your browser’s search bar to open your “Internet Settings”.
- In the internet settings, click on the “Manual Assignment” option and add the IP address and Mac address that you noted before from the console, and after typing in the addresses, click Add” button.
- Now navigate to the “Port Forwarding” section and open the following ports.
TCP: 53, 80
UDP: 53, 500, 3544, 4500 - Check to see if the Xbox Teredo Error still persists.
Solution 20: Enable DMZ or Perimeter network in your router
- Press the “Win + R” keys on the keyboard to open the Run box. Type “cmd” and hit the “Shift + Ctrl + enter” keys on the keyboard simultaneously to open it as administrator.
- Type the following command in the prompt and hit enter to execute it:
ipconfig
- Scroll down until you see a setting for “Default Gateway” under Ethernet or Wi-Fi.
Choose default gateway - Copy the router’s Default Gateway IP Address and paste it in your browser’s search bar to open your “Internet Settings”.
- From the left pane, click on “Forwarding” to expand its list and select “DMZ”.
Enable DMZ - Click on the Radio button parallel to “Enable” to enable the DMZ in your router.
- Save the settings and restart your router to check if the Xbox Teredo error is terminated.
Hopefully, the Xbox Teredo error might have gone by now but if you need further assistance, contact here.

