Fix: Discord Screen Share not Working [Complete Guide]
Discord is definitely in the most commonly used VoIP applications that are used by numerous gamers for communicating with their teammates and it is used for socializing by some people as well. However, we have recently come across some user complaints that have faced the Discord screen share not working issue. In this guide, we have compiled some of the most common reasons behind this issue and have also provided fixes to implement on your computer.
What Prevents Discord Screen Share from Working?
After going through some basic troubleshooting instructions, we came to the conclusion that the following were some of the most basic triggers behind this error.
- Discord App: Sometimes when you launch the Discord application, some of its features might not be properly loaded from the storage device due to which you are running into the Discord Screen share not Working error. It is best to just give your application a clean restart and check if this issue goes away on its own.
- Discord Settings: If you have manually reconfigured your application settings or if they have been set to the default ones that come preloaded on your application, you might run into this issue because a couple of features need to be enabled in order to properly run the Discord screen sharing service.
- Cache: As all applications, Discord also builds up a cache on your storage device and this cache is used by the computer to speed up the loading process of the app. If the cache has been corrupted, however, you will not be able to properly use all of Discord’s features.
- Audio Driver: In some cases, the Audio Driver installed on the system might have been corrupted or it might be outdated due to which users are running into the Discord Screen share not working issue while trying to use it. A simple update to the audio driver or reinstallation should be able to fix this error completely.
- Shadow Play: Shadow Play is another feature provided by the Nvidia driver software and it can sometimes prevent certain applications from running on the computer properly. Therefore, you can try to disable Shadow play as shown in the guide below and check if doing so fixes the error.
Now that you have been made aware of many of the potential reasons behind this issue, we can move on towards implementing solutions to completely get rid of the Discord screen share not working issue.
Before we start:
- Detach the power cable of your computer from the power socket and wait for at least 5 minutes.
- When the waiting period is over, insert the power adapter back into the socket and reboot your PC.
Power cycle computer - It is always recommended to check whether your microphone is working properly or not.
- We also recommend you to check whether the Discord servers are working properly and also that the Discord app is compatible with your device software or the browser.
Fixing the Discord Screen Share not Working Issue:
Solution 1: Restart the Discord application
On the desktop client:
- Right-click on the “Windows” icon located on the taskbar and choose “Task Manager” from the pop-up menu.
- Under the “Details” tab, select all the processes related to “Discord”, one by one, and click on the “End Task” button.
End discord processes - Now right-click on the Discord’s shortcut, present on the desktop, and select “Properties” from the pop-up menu.
- Under the “Compatibility” tab, check the box parallel to “Run this program as an administrator”.
Run this program as an administrator - Apply the changes and launch Discord again to see whether the discord screen share not working issue persists.
On web client:
- Terminate your screen share session and hit “Ctrl + R” keys simultaneously on the keyboard to refresh the page.
- Now click on the “X” button located on the top-right corner of the browser to close it and then reopen it after waiting for a couple of minutes.
- Now open your Discord’s account and try to play some sound first.
- If the sound is playing normally, start your screen share session.
Solution 2: Add the game through Game Activity
- Click on the “Setting cog” icon located a the bottom of the left pane of the Discord home screen to open “Settings”.
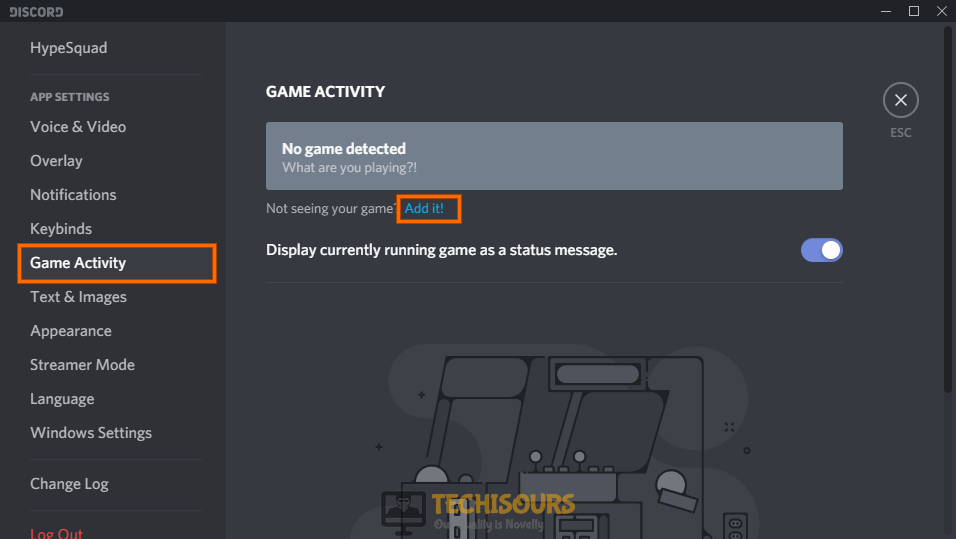
Open Discord setting - From the left pane, navigate to “Game Activity” and click on the “Add it” button located on the right side of the Window.
Game Activity - Now click on the box that just appeared on the screen and select a program from the drop-down list, that you want to add in discord.
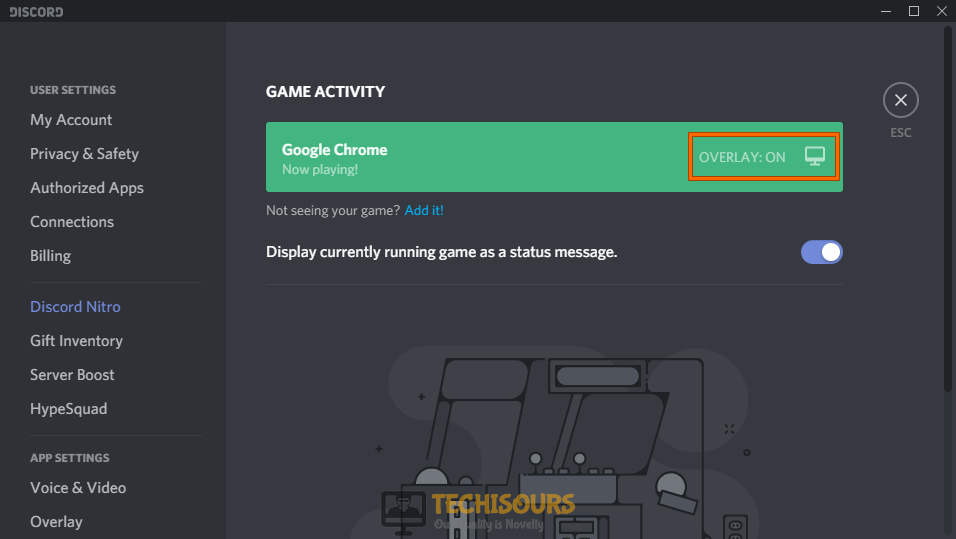
Selecting Application - Now click on the “Add Game” button and toggle the “Screen” icon to enable the in-game overlay of the application and hopefully, you will now be able to share your screen.
Enable Overlay
Solution 3: Tweak Discord settings
- Click on the “Setting cog” icon located a the bottom of the left pane of the Discord home screen to open “Settings”.
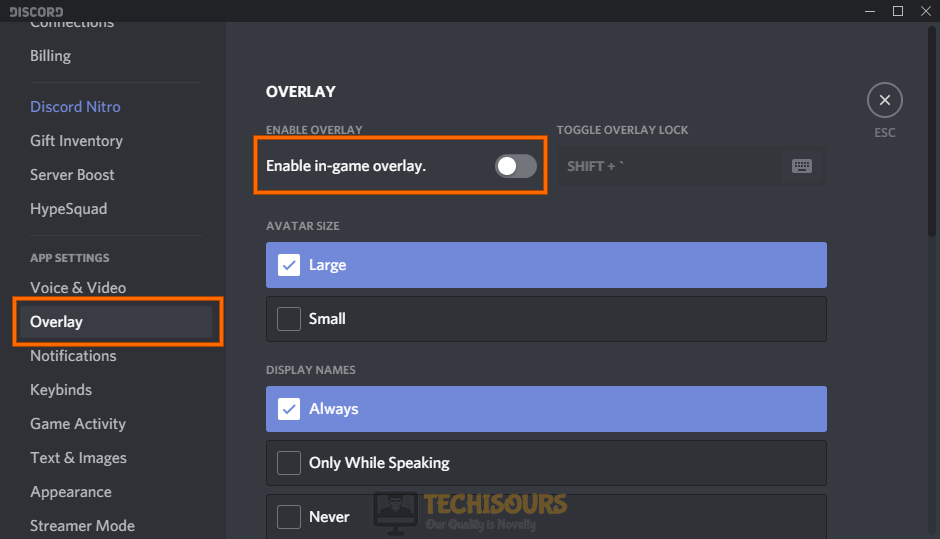
Open Discord Settings - From the left pane, navigate to “Overlay” and enable the toggle button, parallel to “Enable in-game overlay”.
Enable Discord overlay - Now proceed to the “Voice and Video” tab from the left pane of the window and disable the toggle buttons, parallel to both “Use our latest technology to capture your screen” and “Use an Experimental method to capture audio from applications”.
Enable Multiple Options
- In the same tab, we also recommend you to check the box parallel to “Push to Talk” to enable this feature and increase the volume by dragging the sliders of “Input volume” and “Output Volume” to the extreme right.
Tweak settings - Now scroll down and select “Legacy” from the drop-down menu associated with the “Audio Subsystem”.
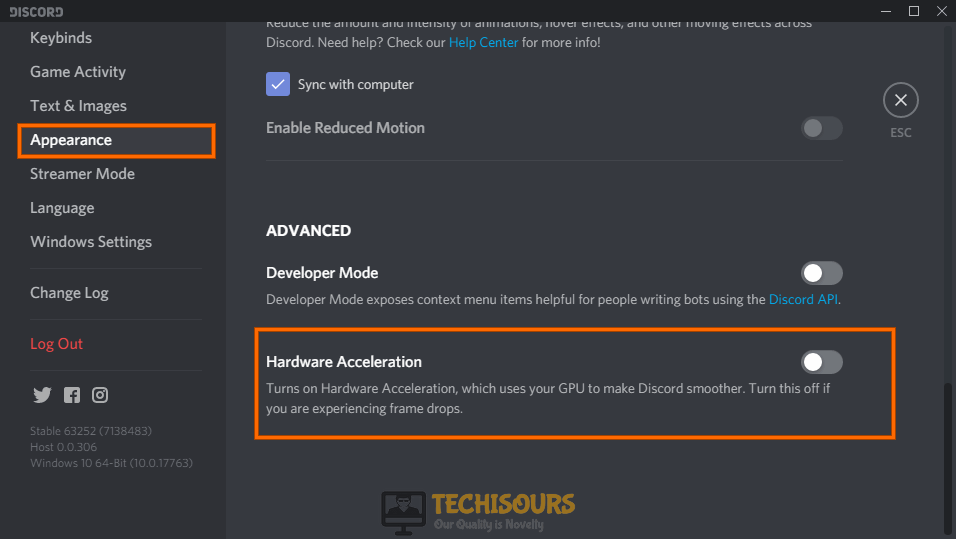
Modify Audio Subsystem - After propagating the above changes, navigate to the “Appearance” tab and disable the toggle button, parallel to “Hardware Acceleration”.
Disable Hardware Acceleration
Solution 4: Reset Voice settings on Discord
- Click on the “Setting cog” icon located a the bottom of the left pane of the Discord home screen to open “Settings”.
Open Discord settings - From the left pane, navigate to “Voice and Video” and click on the “Reset voice settings” button.
Reset Voice settings - Now click on “Okay” to confirm the reset process and relaunch the app to check whether the discord screen share not working issue is rectified.
Solution 5: Clear Discord’s cache
- Press “Win + I” keys simultaneously on the keyboard to open the Run box and search for “%appdata%”.
Typing in %appdata% - Locate the “Roaming” folder, select the “Discord” folder, and press the “Delete” key on the keyboard to clear the Discord cache from our PC.
Clearing Discord’s Cache
Solution 6: Update or Reinstall the audio driver
- Right-click on the “Windows” icon located on the taskbar and choose “Device Manager” from the pop-up menu.
Open Device Manager - Now click on the “Sound, Video and Game controller” option to expand the list of audio drivers installed on your computer.
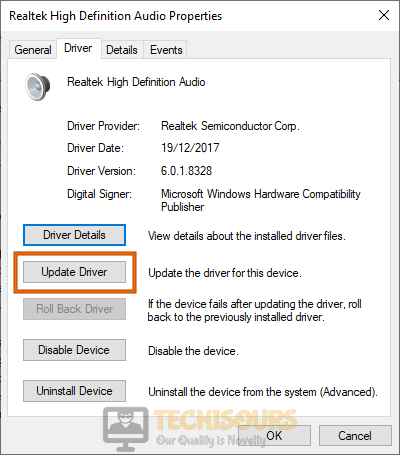
Sound, video, and game controllers - Now locate and double-click on your audio driver to open its “Properties” and navigate to the “Driver” tab.
- Click on the “Update driver” button to update the driver to its latest version.
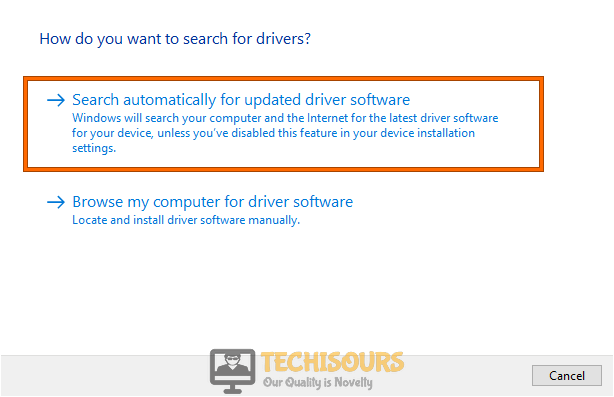
Update driver - Now select the “Search Automatically for updated driver software” option and wait while the latest version of the driver is installed on your PC.
Search automatically for updated driver
If updating the driver does not resolve this issue, we recommend you to uninstall and re-install the audio driver by following the steps indexed below.
- Follow steps 1-3, listed above, to open the driver’s properties window.
- Now click on the “Uninstall device” to uninstall the driver from your computer.
Uninstall driver - Now reboot your computer to automatically detect and install the latest version of the driver.
- When the driver is re-installed, launch Discord again and see if you can now hear proper sound while screen sharing.
Solution 7: Disable third-party antivirus software
- Click on the “^” icon located on the taskbar and then right-click on the Avast icon.
- Hover over the “Avast Shield Control” and choose the “Disable Permanently” option to disable your antivirus software completely.
Disable antivirus permanently - After disabling the antivirus, relaunch the Discord app and see whether the discord screen share not working issue arises again.
Solution 8: Disable ShadowPlay in the Background
- Launch “GeForce Experience” on your computer and navigate to its “Settings”.
- From the left pane, go to the “General” tab and disable the toggle button parallel to “Share” to disable the ShadowPlay in the background.
- Now relaunch the Discord application and see if you encounter the same issue again.
Solution 9: Tweak Settings in the Browser (Opera browser)
- Click on the “Opera” icon located at the top-left of the screen and select “Settings” from the list.
Open Settings - In the search bar, type “Hardware acceleration” and disable the toggle button parallel to “Use hardware acceleration when available”.
Disable hardware acceleration - If you are using the Opera browser, type “opera://flags/” in the address bar of your browser and hit “Enter” on the keyboard.
- Now type “#use-angle” in the search bar and select “D3D9” or “OpenGL” from the drop-down list parallel to the “#use-angle” option.
Select “D3D9” or “OpenGL”
Note: If you are using a different browser, follow a similar procedure to disable hardware acceleration in that particular browser.
Solution 10: Check Audio settings of your PC
- Press “Win + I” keys simultaneously on the keyboard to open the System Settings and then click on the “Privacy” option.
Select “Privacy” - From the left pane, navigate to “Microphone” and enable the toggle button, parallel to “Allow apps to access your microphone“, located on the right side of the Window. Also, make sure that the application you are having trouble with is listed below in the list of applications and its toggle button is enabled.
Allow apps to access the microphone - Now right-click on the “Sound” icon located on the right side of the taskbar and select “Sounds”.
Select “Sound” Option - Under the “Recording” tab, right-click on the device you use for recording purposes and select “Enable” from the pop-up menu.
- Now right-click on the same device again and select “Set as the default device”.
Set as the default device - Save the changes and reboot your computer to check if you can now listen to sound properly while screen sharing through Discord.
Solution 11: Update Discord
- Right-click on the “Windows” icon located on the taskbar and choose “Run” from the pop-up menu.
Click on Run Option - In the Run box, type “%appdata%” and hit the Enter key to open it in the file explorer.
Typing in %appdata% - Now open the “Discord” folder and double-click on the “Update” file to updated the Discord app to its latest version. Note: Make sure you have a strong internet connection.
Update Discord
Solution 12: Reinstall Discord
Windows Users:
- Right-click on the “Windows” icon located on the taskbar and choose “Run” from the pop-up menu.
Click on Run - In the run box, type “appwiz.cpl” and hit the Enter key on the keyboard.
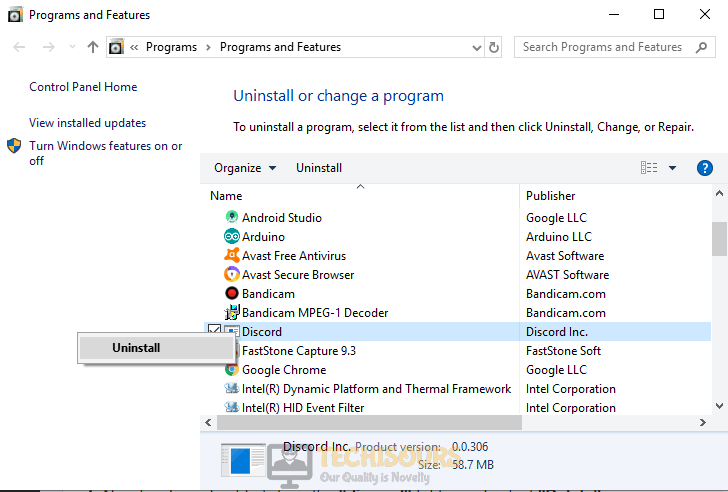
Typing “appwiz.cpl” Command - Now right-click on the “Discord” application and select “Uninstall” from the pop-up menu.
Uninstall Discord - When the Discord application is uninstalled, open the Run box again and search for “%appdata%”.
Typing in %appdata% - Right-click on the “Discord” folder and select “Delete” from the pop-up menu to delete the folder permanently from your PC.
Deleting Discord folder - Now launch your favorite browser and download Discord again.
- Double-click on the downloaded, setup file to open its installation wizard and follow the on-screen instructions to install it.
- When the application is installed successfully, launch it and proceed to start a screen share session to check if you encounter the same issue again.
Mac Users:
- From the menu bar located at the top of the screen, hover over the “Go” option and select “Go to Folder” to open the “Finder” wizard.
- In the finder wizard, type in the following address and click on the “Go” button.
~/Library/Application Support
- Here, locate the “Discord” folder and move it to “Trash”.
- Now type in the following location in the Finder wizard and click on the “Go” button.
/Library/Application Support
- Here, locate the “Discord” folder and move it to “Trash”.
- Now open the “Applications” folder and move the Discord app to Trash.
- Now empty your Trash and Reboot your machine.
- When the computer restarts, download and install the Discord app again on your Mac, and most probably the discord screen share not working issue would’ve been resolved.
Workaround:
While running a screen share session for a game, we recommend you to launch the game in Windowed mode because Discord doesn’t support full-screen sharing for programs.
Apart from that, we also recommend you to terminate third-party background processes in the Task Manager. You can carry this task out by following the steps indexed in Solution 1. Sometimes the affected application is not compatible with Discord. If this is the case, we recommend you to wait until the Discord’s team suggests a fix.



 Enable Multiple Options

