What is Adobe Acrotray.exe and Prevent it from Running at Startup
AcroTray is an Adobe tool that helps you to view, create, edit and manage PDF files. AcroTray is loaded on your computer when you install Adobe Acrobat, AcroTray is also added to the list of startup programs, meaning it will launch automatically on Windows startup.
A lot of users might want to get rid of AcroTray or think that AcroTray is a virus because of its usage or its suspicious appearance inside the Task Manager. However, in this article, we will completely let you know all the things that you want to know about it.
Ending the AcroTray Process:
Method 1: Disable AcroTray From Task Manager
Try disabling the AcroTray process temporarily using the task manager window by following this method:
- Right-click on any empty space on your “Taskbar” and from the drop-down menu click to select the “Task Manager” option.
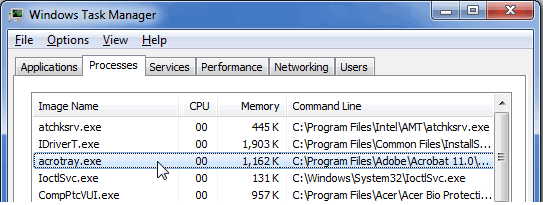
- In the “Processes” tab scroll down to find “AcroTray.exe” and once located right-click on it to select it.
- Lastly, choose “End Task” from the drop-down menu.

Ending Acrotray Process

Method 2: Disable AcroTray From Startup Programs
You can disable AcroTray from Startup programs so it doesn’t launch on Windows Startup. Follow the steps below in this regard:
- Open up the “Task Manager” window by pressing the “Ctrl + Alt + Del” keys together on your keyboard.
- Next click on the “Startup” tab at the top and from the list of programs locate and click on “AcroTray.exe”.
- Once selected click on the “Disable” option at the bottom.

Disable Acrotray from Startup

Method 3: Disable AcroTray Using Autoruns Software
Autoruns is a tool that helps control all Startup programs on Windows. If “Solution 2” does not work for you, you can try Autoruns by following this method:
- Download the latest version of “Autoruns” from their official website and extract the downloaded file using “WinRAR”.
- Once extracted open the file and run the “Autoruns64.exe File” inside.
- Make sure you run the file as an “Administrator” by right-clicking on it.
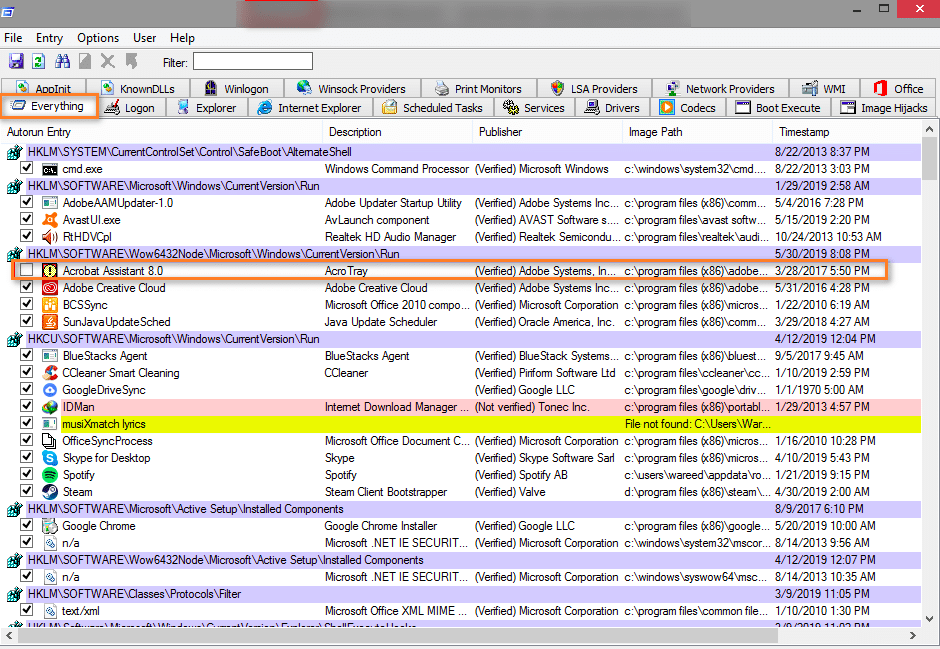
- Once Autoruns opens up locate “AcroTray” and then untick the box in front of it.

Disable Acrotray Using Autoruns Software
Method 4: Disable AcroTray From Services
- In the search bar near the Start menu type in “Services.msc” and press “Enter”.

Typing in “services.msc” - When the Services windows opens up locate “Adobe Acrobat Update” and “Adobe Genuine Software Integrity” from the list.
- Then right-click on them one by one and select “Properties”.

Choose Adobe Acrobat Update Properties - In the “General” tab change the “Startup” type to “Manual”.
- Apply all the changes made, hit the “OK” button, and also, make sure you make these changes to both of them.


Method 5: Run An SFC Scan
Running a system file checker of SFC scan helps find and fix corrupt Windows files. To run an SFC scan on your system proceed with these steps:
- In the search bar near the Start menu type in “Command Prompt” and from the search results right-click on it to select “Run As Administrator”.
- In the pop-up command prompt window type in the following command and press “Enter”:
sfc /scannow
- The scan may take a while to get completed and once done check to see if the acrotray startup error stays or not.
Method 6: Run An Anti-Virus Scan
You can try running an anti-virus scan on your computer to rule out any Malware suspicions by following this procedure:
- In the search bar near the Start menu type in “Virus & Threat Protection” and from the search results click to select it.

Virus and Threat protection - In the pop-up window click to select “Scan Options” and then select “Full Scan” from the available options.
- Then click on the “Scan Now” button and wait for the scan to get completed.
- Afterward, check to see if got over the issue successfully.

Method 7: Uninstall Acrotray Manually
You can uninstall Acrotray manually by using the following method:
- Open up the “Run” dialog box using the “Window + R” keys together on your keyboard.
- In the Run prompt type in “appwiz.cpl” and press “Enter”.

Typing “appwiz.cpl” - In the “Programs and Features” window locate “Adobe Acrobat Reader” from the list of installed programs and afterward select it and click on the “Uninstall” button.

Uninstall Adobe Acrobat Reader - Then follow the on-screen instructions to complete the uninstallation process.


Method 8: Download ShellExView
- Download the latest version of “ShellExView” from the official website.
- Once “Downloaded” and “Installed” by following the on-screen instructions, click to open the application.
- Then click on the “Options” tab at the top and select “Show 32-bit Shell Ex Extensions”.
- Now proceed to disable the following:
Adobe Acrobat Create PDF from selection

Adobe Acrobat Create PDF Helper

Acrobat Create PDF Toolbar
- Once done now click on the “Options” tab again.
- Select the “Deselect 32-bit Shell Extensions” option and disable the above items plus “Acrobat Elements Context Menu”.
Method 9: Edit Registry Value
The following method has also been suggested by some users to help resolve this issue:
- In the search bar near the Windows Start menu type in “Regedit” and from the list of search results click on “Registry Editor”.
Typing “Regedit” - In the left pane of the Registry Editor window navigate to the following address:
HKEY_CLASSES_ROOT*\*\shellex\ContextMenuHandlres
- And here proceed to this address:
HKEY_CLASSES_ROOT\Folder\shellex\ContextMenuHandlers
- Now go to the “Adobe Folder”, right-click on the entry file, and from the drop-down menu choose to select “Modify”.
- Next change the value data by putting in a “–” before the value, just like below:
If the value is something like {A659CD1-BF77-…..} change it to -{A659CD1-BF77-…..} - Once done “Save” your changes made and then close the window.

Method 10: Edit Registry Value (Alternate Option)
You can also opt to change the value in “HKEY_LOCAL_MACHINE\Software\Classes” or “HKEY_CURRENT_USER\Software\Classes” instead of “HKEY_CLASSES_ROOT”. To do so follow these steps:
- Open up the “Registry Editor” window from the windows search bar near the Start menu.
- Now instead of navigating to “HKEY_CLASSES_ROOT”, proceed to the following addresses:
HKEY_LOCAL_MACHINE\Software\Classes

HKEY_CURRENT_USER\Software\Classes
- Now follow the exact “Solution 9” from steps “4-6” and afterward check to see whether the issue got settled.
Method 11: Boot Your Computer Into Safe Mode
If for any reason you aren’t able to perform any of the above solutions you can try booting your computer into Safe Mode. For this you need to follow this procedure:
- Click on the “Windows” logo icon also known as the Start menu at the bottom left of the screen.
- From the Power OFF options click to select “Restart”.
- Now start spamming the “F8 Key” on your keyboard unless you see the “Advanced Boot Menu”.
- From here select “Safe Mode”, you can choose safe mode with networking if you want.
- Once booted into the safe mode try implementing any of the solutions indexed above you think is going to work best for you.
Hopefully, the above-mentioned methods will help you to overcome this problem easily but if you still have any questions or queries don’t hesitate to Contact Us here.