How to Fix Gateway Authentication Failure on AT&T and Other ISPS
AT&T U-Verse provides Internet Protocol TV (IPTV) service to the 48 states of America. Although it is very popular for its robust and efficient performance, quiet recently, many of its consumers have encountered an error while trying to connect to the internet through a U-Verse router that states: “gateway authentication failure. Please Contact your Service Provider”. If you have unexpectedly encountered this error message, don’t panic and follow this guide throughout to eliminate att gateway error as we have illustrated some efficient solutions that will help you to terminate this glitch.

What causes gateway authentication failure on AT&T?
After going through user’s complaints we came to know that there are numerous reasons that are responsible for triggering the att uverse gateway authentication failure.
- If your router’s configurations get corrupted unexpectedly then you might encounter this issue.
- If your network equipment is faulty then gateway authentication failure issues may arise.
Pre-Tips:
Whenever you encounter an error that is interlinked with your network, then the most basic troubleshooting step you can perform to eliminate it is to power cycle the router. It is more than a regular device restart since it ends up draining most of the power capacitors and fix most of the firmware issues that are related to corrupted temp files. To power cycle, your router, follow the steps indexed below:
- Take the power adapter of your modem out from the power socket and wait for it to shut down.
- Change the location of your modem or try to move other electronic devices away from it so that they don’t interrupt with the Wifi signals of your modem.
- After waiting for a couple of minutes, insert the power adapter back into the socket, turn it ON and wait till it displays full signals.
- Now launch your browser and check whether the error is terminated.
How to fix Gateway Authentication Failure Error ATT?
Solution 1: Perform a hard reset of your modem
People have reported that a hard reset of the modem has been proven the most efficient solution to eliminate att gateway authentication failure error. Hard reset helps you to revert the settings of the router to its default factory settings. If the remedy indexed in the pre-tips section didn’t prove efficient for you then, follow the steps illustrated below to perform a hard reset your modem and see whether the issue is resolved.
Reset Through Browser:
- Click the search button in the taskbar and type Command Prompt.
Open command prompt - Type the following command in the window and hit enter to execute it.
ipconfig
- Scroll down until you see a setting for Default Gateway under Ethernet or Wi-Fi.
Note down default gateway - Copy the router’s Default Gateway IP Address and paste it in your browser’s search bar to open your Internet Settings.
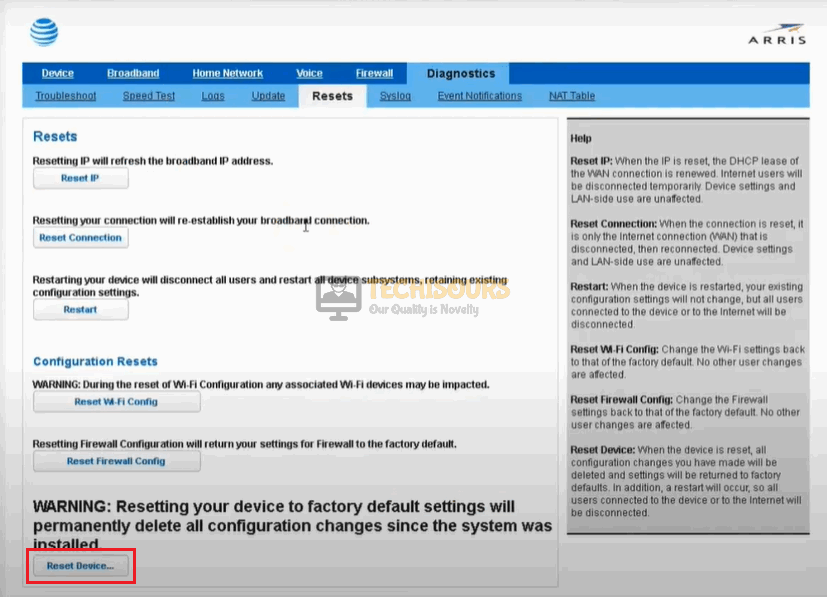
- Navigate to the Diagnostics tab and click on Reset.
Choose Reset option - Enter the Device Access Code and click Continue.
Device Access Code - Now choose the Reset Device option.
Reset Device
Reset through Router:
- Power OFF your router and locate the Reset button at the back of your router.
- Push the Reset button with the help of a paper clip and hold it for at least 30 seconds.
- When all the router’s LEDs go dim, release the button and wait for the device to boot up after the reset.
Solution 2: Use myAT&T app for troubleshooting
If you still can’t get rid of at&t gateway authentication failure error after a hard reset of your modem, there is an alternate method to troubleshoot the problem. AT&T has launched the myAT&T mobile application that helps its customers to locate the trouble and fix it easily without seeking help from customer support. This application tests your service and displays some on-screen instructions that you can follow to rectify most of the glitches.
Solution 3: Enable Dual-band on your router
Dual-band routers are those which can provide better performance than a single-band, by transmitting two simultaneous wireless signals at 2.4GHz and 5GHz. If you encounter gateway authentication failure issue then there might be a chance that Dual-band mode is disabled on your router hence, enable it by following the steps indexed below:
- Click the search button in the taskbar and type Command Prompt.
Type Command Prompt - Type the following command in the window and hit enter to execute it.
ipconfig
- Scroll down until you see a setting for Default Gateway under Ethernet or Wi-Fi.
Choose Default Gateway - Copy the router’s Default Gateway IP Address and paste it in your browser’s search bar to open your Internet Settings.
- From the menu on the left pane, click on Wireless and then select Advanced option.
- Now locate Band on the right side of the window and set it to 5 GHz.
Enable dual-band on your router - Apply the changes and wait for a couple of minutes.
- Restart your router to make sure that it operates with the new settings.
Solution 4: Switch to Google’s DNS
Google offers a Domain Name server to internet users that is known as Google DNS. If you still can’t get rid of this issue, proceed below to modify your DNS to Google’s DNS by following the steps illustrated below and check if the error is rectified.
- Click on the search button in the taskbar and open Control Panel.
Open Control Panel - Now proceed to the Network and Internet option.
Choose Network and Internet option - Now locate and select the Network and Sharing Center.
Choose the Network and Sharing Center option - From the left pane, select Change Adapter Settings.
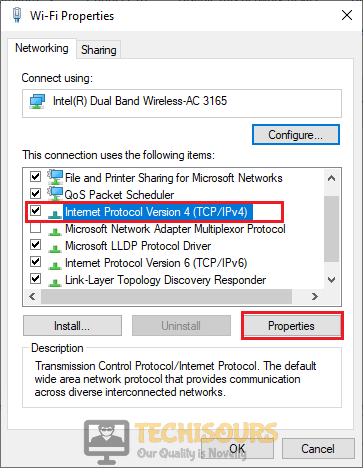
Change Adapter Settings - Right-click on the Internet you are currently connected to and select Properties.
- Select Internet Protocol Version 4 (TCP/IPv4) and click on Properties.
Choose Internet Protocol version 4 - Check the button parallel to Use the following DNS server addresses.
- Now set the Preferred DNS and Alternate DNS as 8.8.8.8 and 8.8.4.4 respectively.
Enter DNS server addresses - Apply the settings and see if the issue is resolved.
Solution 5: Run system set-up wizard on AT&T
Router’s system setup wizard is a GUI that helps the user to go through a set by step procedure to carry out complex tasks related to the router. If you still can’t get rid of this error message, proceed to your system setup wizard and follow the on-screen instructions to identify the type of error. Follow the steps illustrated below:
- Click the search button in the taskbar and type Command Prompt.
Type Command Prompt - Type the following command in the prompt and hit enter to execute it.
ipconfig
- Scroll down until you see a setting for Default Gateway under Ethernet or Wi-Fi.
Choose Default Gateway - Copy the router’s Default Gateway IP Address and paste it in your browser’s search bar to open your Internet Settings.
- On the bottom-right side of the window, locate and click on the Run system set-up wizard option.
- Now enter your password and click on Submit.
- Follow the on-screen instructions until you see PPP Authentication. Enter your credentials here and click Next.
PPP Authentication and Settings - After entering your credentials if still, you encounter this error message or no PPP log-in service found, then contact AT&T support and explain to them the problem you are facing.
Solution 6: Manually register your device with the network
There might be a chance that your router is unable to register the device on the network automatically. If this is the case, then proceed to the internet settings and add the device to the network manually by following the steps indexed below and see if the gateway authentication error is rectified.
- Click the search button in the taskbar and type Command Prompt.
Type Command Prompt - Type the following command in the prompt and hit enter to execute it.
ipconfig
- Scroll down until you see a setting for Default Gateway under Ethernet or Wi-Fi.
Note down Default Gateway - Copy the router’s Default Gateway IP Address and paste it in your browser’s search bar to open your Internet Settings.
- Locate and click on the WPS button and select Add Device.
- Here you will be asked to enter a PIN code of the device you want to manually connect with your network.
(To get this pin, navigate to the device’s Intenet settings and locate a WPS PIN in manual registration section) - Enter the PIN here and apply the settings.
Solution 7: Contact customer support
If none of the solutions explained above, helped you to rectify this glitch, then the only option you are left with is to contact your ISP and enquire about the workaround to get rid of this error. There might be a chance that the MAC address on your new network equipment is not authorized. All you have to do is to call the ISP and explain your problem to their representative. They will most probably send an engineer at your place who will figure out the problem and rectify it so that you don’t come across this error again in the future.
Hopefully, the error might have gone by now but if you need further assistance, contact here.


