How To the Fix Error 14098: The Component Store Has Been Corrupted?
The component store has been corrupted error is also known as DISM error 14098. DISM allows users to update and alter different features and drivers of Windows and it can occur while servicing Windows’ images due to which the image can become corrupted. Several features of Windows can stop working due to this error. The occurrence of this error displays the following message:
Error: 14098, The component store has been corrupted

What Causes “Component Store Has Been Corrupted” Error?
The main reasons for the component store has been corrupted error can be one of the following listed below.
- Corruption of Windows Update Components.
- Presence of confliction between files.
Pre Tips:
If you are a victim of this error before doing anything else. Follow the steps mentioned below.
- Go to the taskbar and in search bar type command prompt.
- Right-click on command prompt and select run as administrator.
Command Prompt (admin) - Type the following command in cmd and press enter
Dism.exe /online /Cleanup-Image /StartComponentCleanup

What to do if you get the Component Store Has Been Corrupted Error on Windows?
Solution 1: Reboot Your Windows Update Components.
Resetting your windows update components can be beneficial in eliminating the error. Follow the given steps to do that.
- Go to the taskbar and in search bar type command prompt.
- Right-click on command prompt and select run as administrator.
Clicking on “Run as Administrator” - Type the following commands in cmd one by one and press enter after every command.
net stop bits
net stop wuauserv
net stop appidsvc
net stop cryptsvc
Running Commands - Now delete the qmgr*.dat files .Type the following command to do so
Del “%ALLUSERSPROFILE%\Application Data\Microsoft\Network\Downloader\qmgr*.dat”
- After the above steps type the following command
cd /d %windir%\system32
Running Command - In order to reregister the BITS files and the Windows Update files you need to type following commands and press enter after each command
regsvr32.exe atl.dll
regsvr32.exe urlmon.dll
regsvr32.exe mshtml.dll
regsvr32.exe shdocvw.dll
regsvr32.exe browseui.dll
regsvr32.exe jscript.dll
regsvr32.exe vbscript.dll
regsvr32.exe scrrun.dll
regsvr32.exe msxml.dll
regsvr32.exe msxml3.dll
regsvr32.exe msxml6.dll
regsvr32.exe actxprxy.dll
regsvr32.exe softpub.dll
regsvr32.exe wintrust.dll
regsvr32.exe dssenh.dll
regsvr32.exe rsaenh.dll
regsvr32.exe gpkcsp.dll
regsvr32.exe sccbase.dll
regsvr32.exe slbcsp.dll
regsvr32.exe cryptdlg.dll
regsvr32.exe oleaut32.dll
regsvr32.exe ole32.dll
regsvr32.exe shell32.dll
regsvr32.exe initpki.dll
regsvr32.exe wuapi.dll
regsvr32.exe wuaueng.dll
regsvr32.exe wuaueng1.dll
regsvr32.exe wucltui.dll
regsvr32.exe wups.dll
regsvr32.exe wups2.dll
regsvr32.exe wuweb.dll
regsvr32.exe qmgr.dll
regsvr32.exe qmgrprxy.dll
regsvr32.exe wucltux.dll
regscr32.exe muweb.dll
regsvr32.exe wuwebv.dll
- To reset Winsock.Type following command
netsh winsock reset
Winsock reset - Now it is time to reset BITS service and the Windows Update service to the default. To do so type the following code.
sc.exe sdset bits D:(A;;CCLCSWRPWPDTLOCRRC;;;SY)(A;;CCDCLCSWRPWPDTLOCRSDRCWDWO;;;BA)(A;;CCLCSWLOCRRC;;;AU)(A;;CCLCSWRPWPDTLOCRRC;;;PU)
sc.exe sdset wuauserv D:(A;;CCLCSWRPWPDTLOCRRC;;;SY)(A;;CCDCLCSWRPWPDTLOCRSDRCWDWO;;;BA)(A;;CCLCSWLOCRRC;;;AU)(A;;CCLCSWRPWPDTLOCRRC;;;PU)
- Now type the following code to start window update service.
net start bits
net start wuauserv
net start appidsvc
net start cryptsvc
Winding-up - Restart your system.
Solution 2:Delete The Recent Updates.
Recent updates can be the reason for error 14098 on your computer. So you can eradicate the component store corruption by deleting them. This can be done by following these steps.
- Go to the taskbar and type settings in the search bar.
- Select updates and security.
Clicking on “Update and Security” - Select windows update.
- Select View update history and then click on the Uninstall Updates option.
Uninstalling updates - Select the recently installed updates.
- Right-click on it and select uninstall.
Uninstall update
Solution 3: Permit “dism.exe” in your system’s antivirus
Sometimes your antivirus program can cause the Error: 14098 due to the blockage of dism.exe. In order to allow dism.exe through the antivirus:
- Go to the taskbar and type virus and threat protection in the search bar.
Virus and threat Protection - Select Virus and threat protection settings.
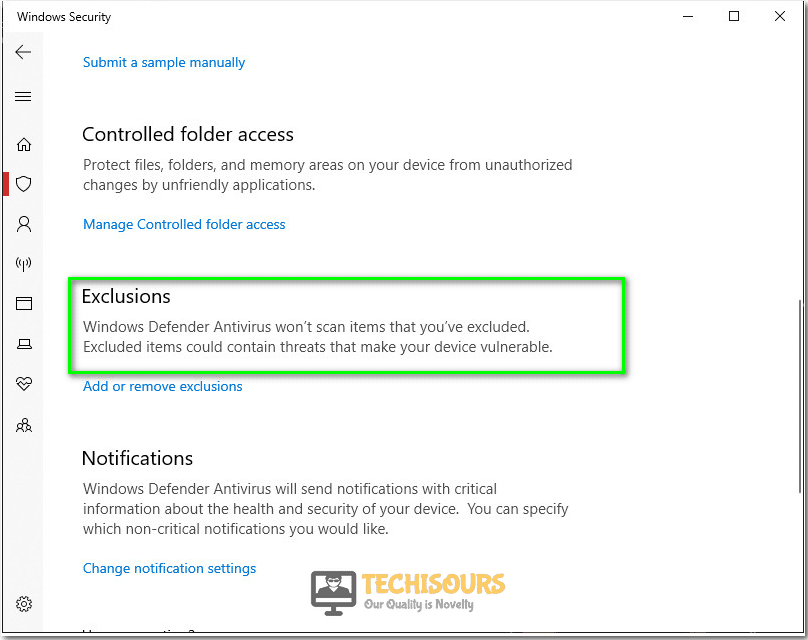
Virus and Threat Protection Settings - Find the Exclusions in the current window and click on the Add or remove exclusions option.
Exclusions - Left-click on the + button and add the desired exclusion and then select the item from the menu.
Selecting item - Select the WinSxS folder: C:\Windows\WinSxS by navigating the path.
- Select yes to proceed.
Solution 4: Scan Your System by using ASR.
If you have already performed all the above solutions and the component store corruption still exists try doing a full system scan using ASR.
- Reboot your system
- BIOS screen will appear. Continue pressing f8 until advance options show up.
- Select Safe Mode with Networking.
Selecting “Safe Mode with Networking” - When Safe Mode with Networking is loaded. Press Windows key +R to open the Run prompt.
- After following all the steps Windows Run Box will appear.
- Type the URL address and click ok.
- It will start downloading the program When it is done open launcher to install the program.
- Run ASR to perform a full system scan.
- Click the Fix, Clean & Optimize Now option.
Advanced System Repair
Solution 5: Repair using Microsoft System Readiness Tool
If you still can’t get rid of store corruption, try to use a repairing tool to resolve this issue. Follow the steps to carry his task out:
- Download the Microsoft System Readiness Tool from your favorite browser.
- Click the downloaded executable file and follow the onscreen instructions to install the tool on your PC.
Installing update - After the installation is done, click close.
- This tool will help you to repair the broken parts of the registry. Now reinstall the update you were trying to install previously and see if the issue is resolved.
If you need further assistance. Contact here


